- About this guide
- This guide describes the procedures associated with the Plastic SCM plugin for Office.
- Audience
- This guide is targeted to Plastic SCM users that work every day with documents and text processors, as well as developers and people who write documentation, memorandums etc., assuming familiarity with Plastic SCM, office suites and operating system concepts.
- Online documentation
-
Besides this document and the rest of the guides, Plastic SCM provides online reference throughout its different client frontends.
On the command line interface, both Windows and Linux, this reference can be obtained with the command:
cm helpFor extended information on a specific command, type:
cm help {command} - Documentation errors
- If you find any problem in this guide or any other part of the online reference, please report it using the following email address: devops-vcs-support@unity3d.com
Office guide
Chapter 1: Introduction
The Plastic SCM plugin for Office
The Plastic SCM plugin for Office is compatible with Microsoft Office 2003, 2007, 2010, and 2013 for Word and Excel, and is also compatible with PowerPoint in Microsoft Office 2007.
This guide will help you to work with the plugin for Office in case you are using Office 2010. The differences between the plugin for this version and the plugin for previous versions are minimal; basically these differences consist of aesthetic issues.
The Plastic SCM integration with Microsoft Office lets you to easily manage revisions of Word, Excel, and PowerPoint documents. As your work in the documents progresses, you store new versions of them in the Plastic SCM server by checking in. The versions created in this way can be easily reviewed and compared, eliminating the need to enable "track changes" inside the documents.
Chapter 2: Office Plugin Installation
Installation
The Plastic SCM plugin for Office is part of the Plastic SCM Full and Client Components installers. Start the installer and continue to the Select Components screen. In the components list, make sure the Office 2003, Office 2007, or Office 2010 option is checked, corresponding to the version of Office that you have installed. The Plastic SCM client is required as well and will be selected automatically.

Once the client has been installed, the plugin is registered automatically the first time Word, Excel or PowerPoint is launched.
If this dialog is not displayed at startup and the Plastic SCM plugin does not show up in Office, open the COM Add-Ins window in Office and ensure that Plastic SCM for Office is checked as shown below:

To get further information about how to install Plastic SCM, see the ADMINISTRATOR'S and INTRODUCTION TO PLASTIC SCM guides.
Chapter 3: How To Use The Plugin
Before using the Plastic SCM plugin inside Office applications, you need to ensure that:
- Plastic SCM client and Office integration have been installed in the computer.
- The Plastic SCM client is configured to connect to a Plastic SCM server and there is a workspace created that contains the folder where documents to version are located.
For more details about how to install and setup a workspace, please refer to the INTRODUCTION TO PLASTIC SCM guide.
Once the client is installed and a workspace is set up, you can use the Plastic SCM plugin for Office to add documents to Plastic SCM and create versions.
Basic Plastic SCM concepts
Before using the plugin, let's review some basic Plastic SCM concepts needed to properly operate it.
- Repository - This is the container where all of your folders and documents (and prior versions) are stored. All of this data is located on the Plastic SCM server.
- Plastic SCM server - Manages any number of repositories, each of which stores the entire history of a particular directory tree.
- Workspace - This is the directory in your computer that holds your documents and folders. It contains one specific version at a time of each document that has been added to the repository. For instance, you can create a workspace in the folder "My documents" using the Plastic SCM GUI client. You can have as many workspaces as you need.
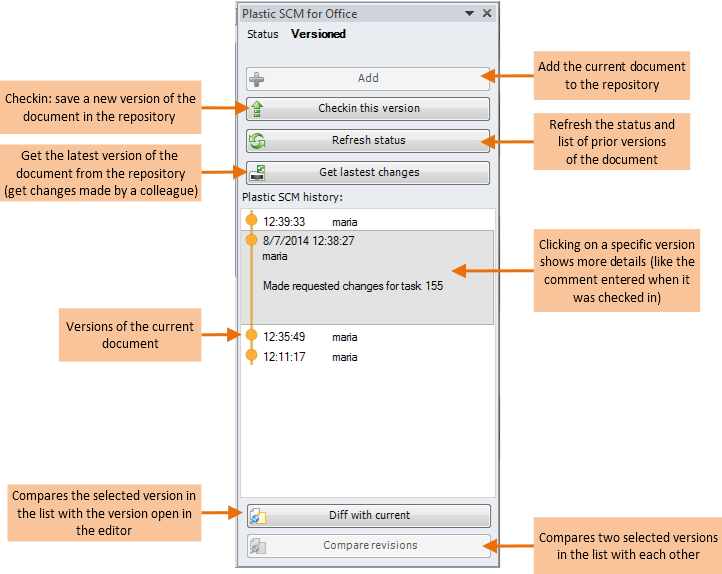
- Check-in - This is the operation to save a new version of a document in the repository.
Workflow
Your normal workflow to version documents in the repository will be something like this:
- You create a document in Word, Excel, or Powerpoint.
- Save it in a folder that is inside a Plastic SCM workspace.
- You Add the document to the repository (using the Add button in the plugin panel). When you add it, you are actually saving the first version of the document in the Plastic SCM repository (i.e. in the server).
- You make changes on the document. When you are happy with your changes, you check in (using the Checkin this version button in the plugin panel) to save a new version in the repository. Creating versions of the document help you track the changes you have made over time.
- When desired, you can compare the past versions to see what has changed between them.

Operations summary
The Plastic SCM plugin for Office appears as a panel in the right side of Word, Excel and PowerPoint by clicking in the Plastic SCM toolbar in the Show/Hide controls . Figure shows this panel in action:

Plastic SCM controls versions of documents once they are added to the repository. This is achieved with the Add button and needs to be done only once per document. Be aware that in order to add a document to the repository it must already be saved inside a workspace. If you need to create a workspace, it must be done inside the Plastic SCM GUI client (this operation is normally performed only once and is not available inside the Office plugin). For more details, please refer to the INTRODUCTION TO PLASTIC SCM guide.
Once a document has been added, the panel enables some other options and displays a list of versions (only one, since it has been just added). Figure summarizes the contents of the panel and the available actions:

Comparing revisions
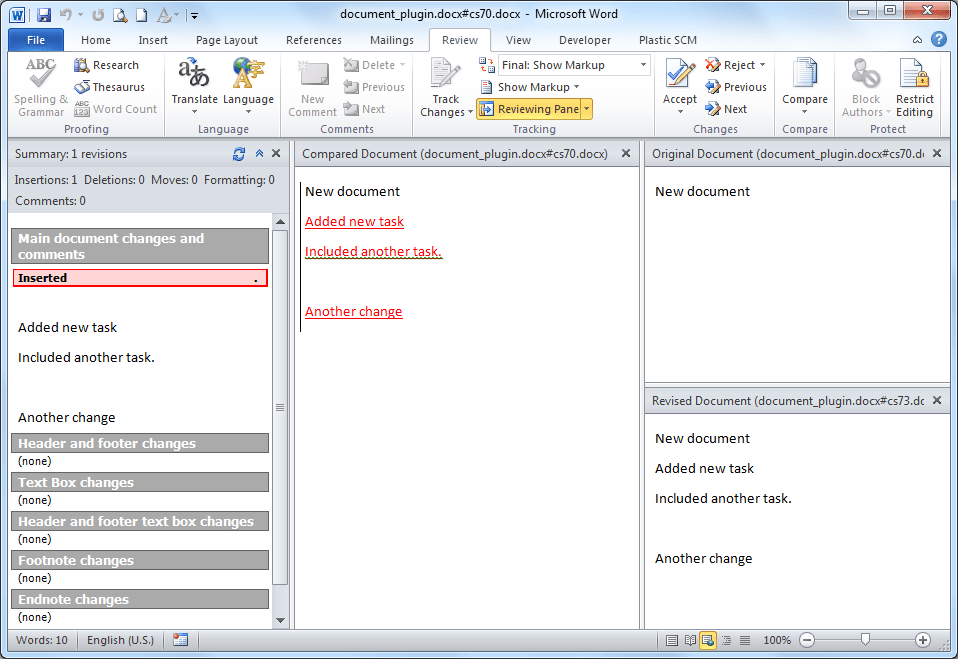
It is possible to compare any two versions of the current document using the buttons at the bottom of the plugin panel.
- To compare the current document with a previous version in the repository, select another version in the list and click Diff with current.
- To compare any two versions select the desired versions (using the Ctrl key) in the list and click Compare revisions.
These commands will open a new Office window showing the differences between the versions selected:
