IDE integrations
Chapter 1: MS Visual Studio integration
Plastic SCM provides a comprehensive integration with Visual Studio 2005 and newer versions. In the form of a Visual Studio Extensibility Package, this integration offers the user most of the functionality found in the Plastic SCM GUI right inside Visual Studio.
This section will describe the functionality and commands of the Plastic SCM Source Control Package for Visual Studio. Basic knowledge of Plastic SCM concepts and terminology is needed. Things like a workspace, checkout / checkin, branch or merge should be familiar to the reader. For more details, please refer to INTRODUCTION TO PLASTIC SCM and the PLASTIC SCM GUI GUIDE.
Installing the Visual Studio Source Control Package
The Plastic SCM Source Control plug-in is installed as part of the full Plastic SCM installer or the "Client + Plugins Plastic SCM installer".
The component "Visual Studio Integration Package" has to be selected in the component selection screen of the installer. Note that Visual Studio needs to be installed for this component to be enabled.

Selecting Plastic SCM as the source control provider
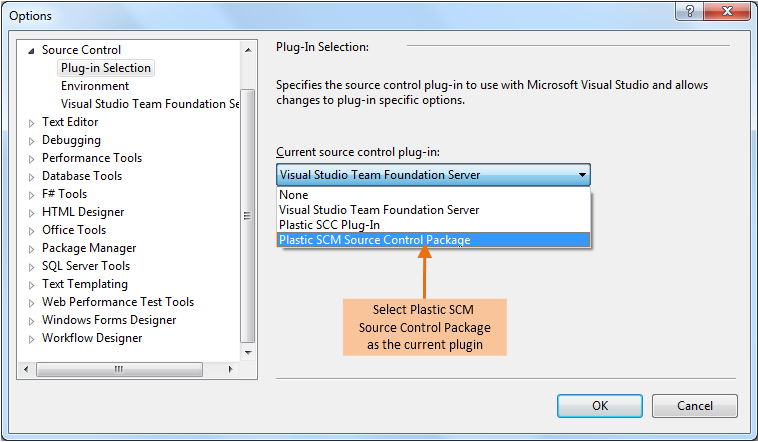
Once Plastic SCM has been installed and configured, the next step is to configure Visual Studio to use Plastic SCM as the source control provider. To do this, you need to go to:
Tools > Options > Source Control
There, select "Plastic SCM Source Control Package" as shown in the next figure, and click OK. The plug-in is ready to be used.
Note: If you selected "Plastic SCM SCC plug-in" during the installation, you will see this plug-in as well in the dropdown list. The SCC plug-in was designed for the old SCC version control interface that was standard in versions of Visual Studio prior to 2005. The "Plastic SCM Source Control Package" is a far more complete solution and is the recommended integration for Visual Studio 2005 and newer versions.
Adding the solution to Plastic SCM
Before using Plastic SCM inside Visual Studio, the solution has to be added to Plastic SCM. Adding the solution to Plastic SCM binds them together and this binding is stored inside the solution and project files.
Note: the solution should be contained in a single Plastic SCM workspace. If the projects inside the solution are located in more than one Plastic SCM workspace, many operations of the plug-in will choose to act only on the workspace of the first project (for instance, displaying any view from the Plastic SCM menu, or checking in pending changes right clicking on the solution will be applied only to the workspace of the first project).
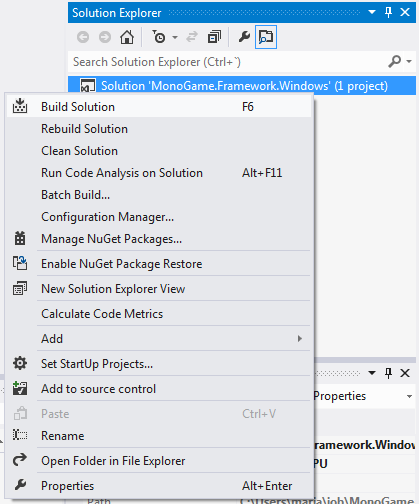
If no other developer has added the solution to Plastic SCM already, it has to be added for the first time. This is done by right clicking on the solution in the Visual Studio's Solution Explorer and selecting Add to source control.
If the solution directory tree is not contained inside a workspace, the Plastic SCM plug-in will show a dialog to create a new workspace. This dialog is the same used to create a new workspace in the Plastic SCM GUI client. For more details, refer to the PLASTIC SCM GUI guide.
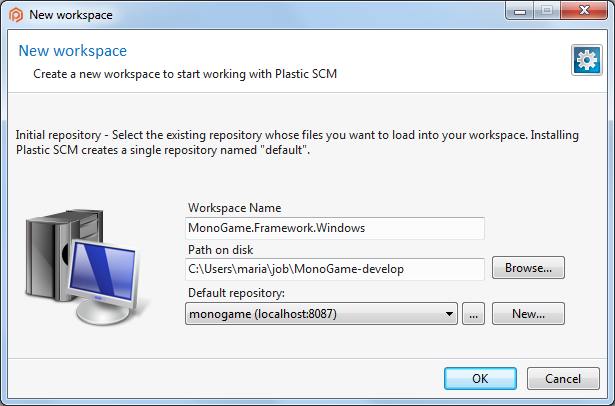
The new workspace configuration can be customized using the following commands:
- Workspace name
- This is a name chosen by the user to identify the workspace. This name will appear in the Plastic SCM GUI workspaces tab.
- Path on disk
- This is the directory where the workspace will be created. By default, the plug-in will fill in this field with the top directory of the solution.
- Default repository
-
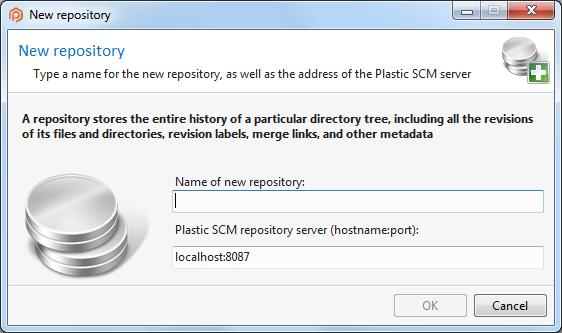
This is the repository where the solution will be added. The dropdown list contains all the repositories in the Plastic SCM server. When adding a new solution to Plastic SCM, you will normally want to create a new repository for it. This is done using the New button.
The New button will open a new dialog that lets you create a new repository to contain all the data of the solution you are adding to Plastic SCM. This dialog is the same used to create a new repository in the Plastic SCM GUI. Refer to the PLASTIC SCM GUI guide for more details.
If the solution was already contained in a workspace, although it had not been added to Plastic SCM yet, the new workspace dialog will not appear and the solution will be added automatically.
Once the workspace and optionally the repository have been created, the solution is added to the source control. All the items inside it are added to the repository and checked in. Being controlled items (as Plastic SCM defines it) they are decorated with a lock icon.
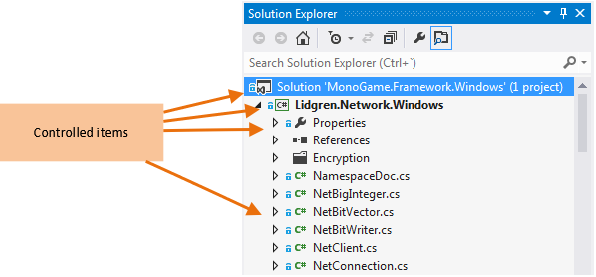
When the solution has already been added to Plastic SCM by another user, you can directly open it from within Visual Studio. To do so, go to:
File > Open > Open from Plastic SCM...

This command lets you open a solution from one of the Plastic SCM repositories. The sequence is this:
- Choose a workspace or create a new one. The source code will downloaded to this workspace from the repository.
- If a new workspace is created, choose the repository it will be pointing to. Keep in mind that, by default, the workspace points to the latest changeset in the /main branch.
- Browse the repository directory structure and select a solution file.
- The repository browser will use the same branch that the workspace is pointing to.
- Once a solution file is chosen, the workspace is updated to download the selected versions (if it was created in the first step).
If the files that make the solution are already in a Plastic SCM, but the solution and projects are not bound to Plastic SCM, binding them is just a matter of adding the solution to source control. The solution and project files will be modified to include the binding information, so they are automatically checked out.
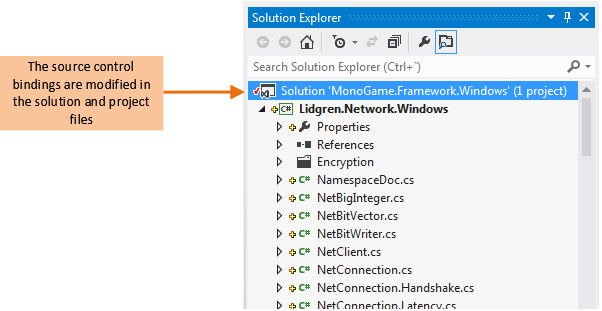
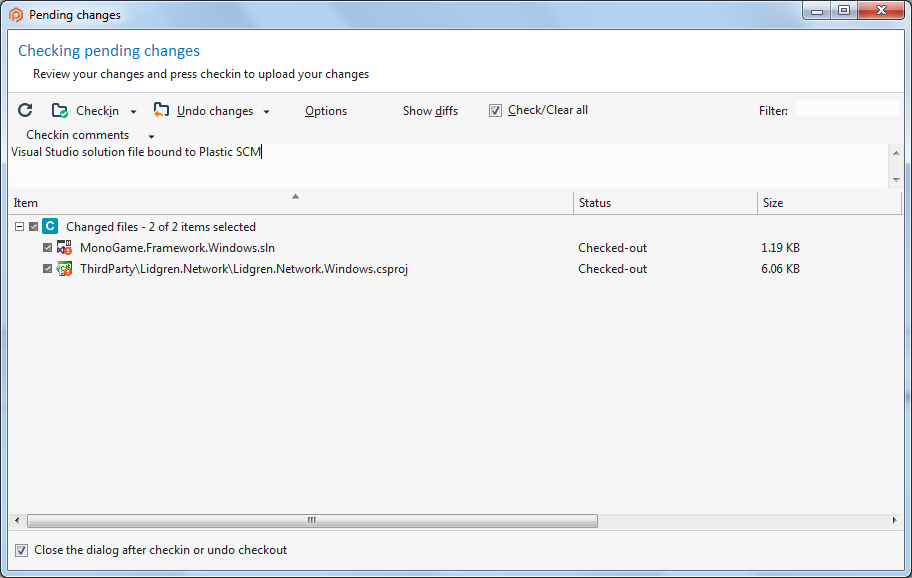
To complete the binding, you will need to checkin the changes. To do so, right click on the solution and select Checkin. The Pending changes view will appear, letting you enter a comment to checkin. This is the same Checkin dialog that appears when you select the Checkin command in the items in the Plastic SCM GUI.
Basic operations
Once the solution is bound to Plastic SCM, most of the changes in the solution are handled transparently by the Plastic SCM integration. When a file is modified, it is automatically checked out. When a file is moved (even between projects), the change is detected as a moved item.
You can review all the pending changes by right clicking in the solution in the Solution Explorer and selecting Checkin. This will open the Pending changes window and let you check in the changes or undo some of them. The Pending changes view details the items whose content has changed as well as moved, added and deleted items. For more details on the Pending changes view, refer to the PLASTIC SCM GUI guide.
Plastic SCM provides several commands when right clicking a file or folder in the Visual Studio Solution Explorer.
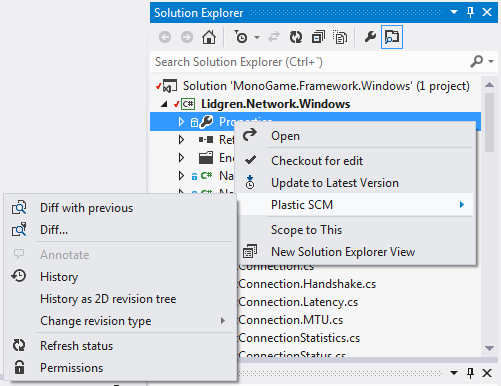
The following commands are added to the context menu by the Plastic SCM Source Control Package.
- Checkout for edit
- Explicitly checkout the item so that Plastic SCM knows that it is going to be edited. By default, the plug-in will automatically checkout the files that are modified inside Visual Studio. If an item is modified outside the IDE, however, you may want to check it out explicitly.
- Update to Latest Version
- Update the selected item to the latest changes in the repository.
- Diff with previous
- Open a Side-by-side Diff tool that compares the selected file with its previous version. If the item is checked out, the diff view shows the changes made.
- Diff...
- Display a dialog in which you choose two revisions of the selected item and then open a Side-by-side Diff tool to compare those revisions. By default, one of the revisions is the item as it exists in your workspace.
- Annotate
- Open an Annotate view for the selected item. The annotate view displays the contents of the file with annotations for each line detailing its author as well as the branch and changeset where the change was made.
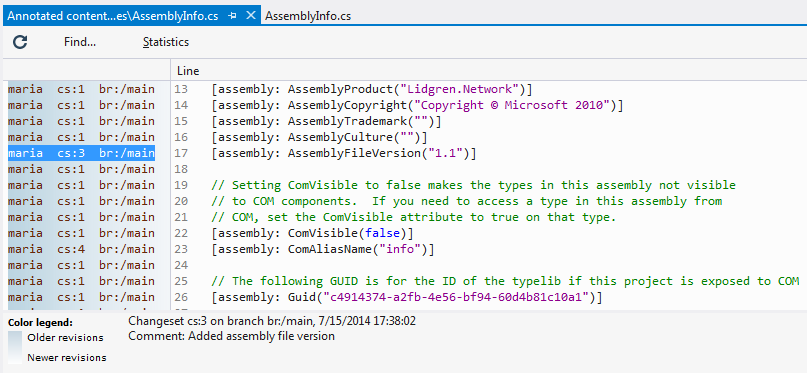
- History
-
Open a History view of the selected item. This view details all the revisions created for the item, as well as any namespace change (i.e. if the file has been moved, renamed or deleted).
- History as 2D revision tree
-
Open a Branch Explorer for the selected item showing the revisions and their types as described in the 2D revision tree.
- Change revision type
- Change the revision type of each selected item, to binary or text. The type of an item controls how it is handled by the Diff and Merge tools.
- Refresh status
-
Reload the status (checked out / checked in / controlled / added) of the selected item and its children, updating the decorators.
This command is useful when some items have been modified outside Visual Studio, to set the status up to date again in the IDE.
- Permissions
-
Open a new window to view or edit the permissions of the selected item.
Any open document in the code editor has an associated context menu. The Plastic SCM plug-in adds some options to that menu, detailed below.
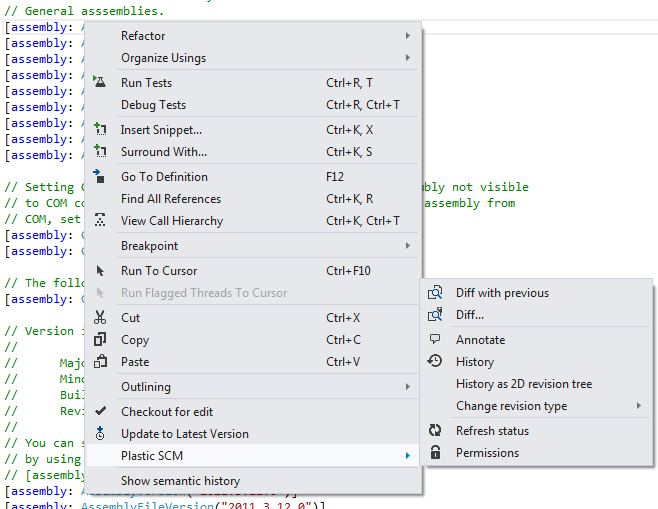
- Show semantic history
-
Open a new window with a browser for the history of the specific method where the right click was made. This option works on C#, Java and Vb.net projects.
Many times a developer looks at a piece of code and wonders how it ended up written like it is. In such cases, she can use the history and annotate view to find out how the method evolved. But in this process, she has to go find the method inside the file each time a new revision is compared.
With method history, the developer can focus on a specific method and browse the changes specific to it. The method history view can filter the revisions in which the analyzed method had changes, so the answer to the question "What happened to this method?" is quickly answered.
The method history view will download the different revisions of the item from the repository, and parse the code to find the requested method, so it is found even if it has been moved.
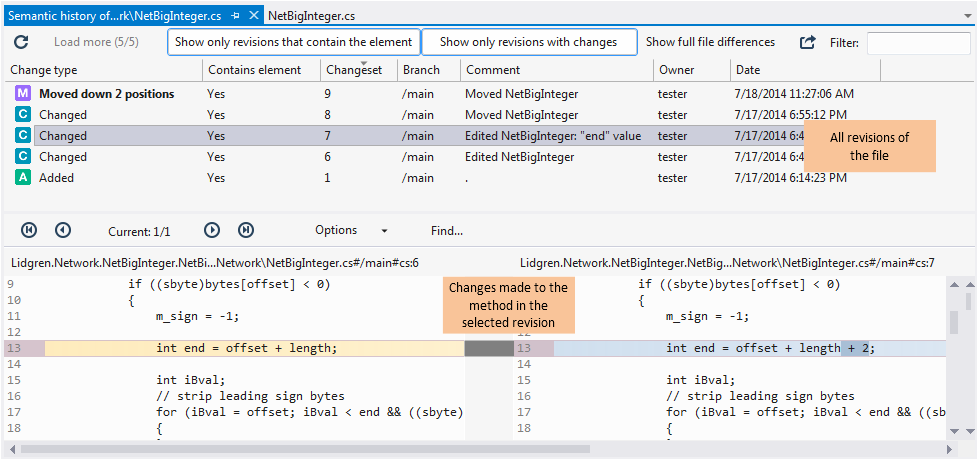
The view contains a top panel with a table displaying all the revisions of the file that contains the selected method. When a revision is selected in the top panel, the changes made to the method in that revision are shown in the bottom panel. This panel contains a Side-by-side diff tool as described in the PLASTIC SCM GUI guide.
The revisions table on the top panel has one row for each revision of the file. It has the following columns:
- Change type
- Show the change type of the revision. These can be some of the possible values: Unchanged, Added, Deleted, Changed, Moved from...to..., Moved down..., Moved up..., Renamed from...to...
- Contains element
- Indicate whether or not the selected element is in the revisions showed.
- Changeset
- The number of the changeset that contains the revision.
- Branch
- The name of the branch that contains the revision.
- Comment
- The comment of the revision.
- Owner
- This is the author of the revision.
- Date
- The timestamp when the revision was created
The top panel has several controls to filter the list of revisions upon the following criteria:
- Show only revisions that contain the element
- Filter out those revisions where the element is not present.
- Show only revisions with changes
- Filter out those revisions that don't have changes in the revision. Only revisions with "Change type" column different from "Unchanged" will be showed.
- Show full file differences / Show only element differences
- Show in the bottom pane all the differences in the file. Or show only the differences involved in the selected method.
The Plastic SCM menu
The Plastic SCM Toolbar shows the most common views available.
To enable this toolbar click on
View > Toolbars or Tools > Customize
and select "Plastic SCM".

By clicking on these buttons the corresponding view will appear the same way as clicking on the View > Plastic SCM menu (see picture below).
Most of the work in Plastic SCM happens inside a "view". The most relevant views can be open right inside Visual Studio, through the View > Plastic SCM menu.
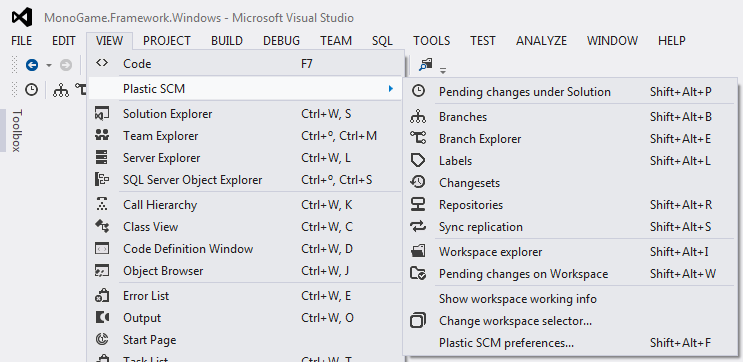
The views available under that menu behave in the same way as their counterparts in the Plastic SCM GUI. Since they are fully described in the Plastic SCM GUI guide, that information will not be duplicated here. Please refer to the pointers given below for more details on each specific section.
- Pending changes under Solution
-
Open a Pending changes view with all the changes of the solution. This is mostly as the Checkin command available on the solution explorer. Both commands differ only in their extent: while this includes changes for the whole solution, the one in the solution explorer only affects the selected item and its children.
If you want to see all the pending changes in the workspace instead of only those of items in the Visual Studio solution, check the Pending changes on workspace command described below.
- Branches
-
Open a Branches view with the branches of the repository loaded in the workspace. The view is fully functional and lets the user perform all the operations available to branches such as creating new child branches or switching the workspace to a specific branch.
- Branch Explorer
-
Open a Branch Explorer view for the repository loaded in the workspace. The view is fully functional letting the user perform all the operations available to branches, changesets and labels, like comparing changes or opening new filtered Branch Explorer views.
- Labels
-
Open a Labels view for the repository loaded in the workspace. Again, all the operations normally available for labels on the Plastic SCM GUI are available here as well.
- Changesets
-
Open a Changesets view for the repository loaded in the workspace. This lists all the changeset of the last month by default. It operates as the same view in the Plastic SCM GUI.
- Repositories
-
Open a Repositories view that contains the list of repositories in the default Plastic SCM server and possibly repositories in other servers as defined by the server connection profiles (in Preferences, see below). This view behaves as the Repositories view in the Plastic SCM GUI client.
- Sync replication
-
Open a Sync replication view.
- Workspace explorer
-
The Workspace explorer view is the same as the Workspace Explorer in the Plastic SCM GUI. Normally items are handled in Visual Studio through the Solution Explorer, but this view can be better suited for files in the workspace that are not contained in the Visual Studio solution.
- Pending changes on workspace
-
Open a Pending changes view displaying with the changes of the whole workspace. Like the Workspace explorer view, this one makes more sense when the user needs to look at changes on items not contained in the Visual Studio solution.
To open a view that only contains the changes in the solution, see the Pending changes under solution view above.
- Show workspace working info
-
Open a workspace status view. It contains details about the workspace, such as the location on disk of the workspace as well as the repository and branch loaded in the workspace.
This view is slightly different to the Plastic SCM GUI counterpart (the workspace status bar) and is meant to be docked in a visible place inside Visual Studio. But the information shown is essentially the same.

For more details, refer to chapter Introduction to the Graphical User Interface in the PLASTIC SCM GUI guide.
- Plastic SCM preferences
-
Open a Preferences dialog to change Plastic SCM settings. This window is the same as the Preferences window available in the Plastic SCM GUI.
All the views opened from the View > Plastic SCM menu can be arranged with the usual docking controls found in Visual Studio.

To dock any Plastic SCM view, drag the window or tab title and drag it. Visual Studio will display the docking guides that let you dock the window in the desired location.
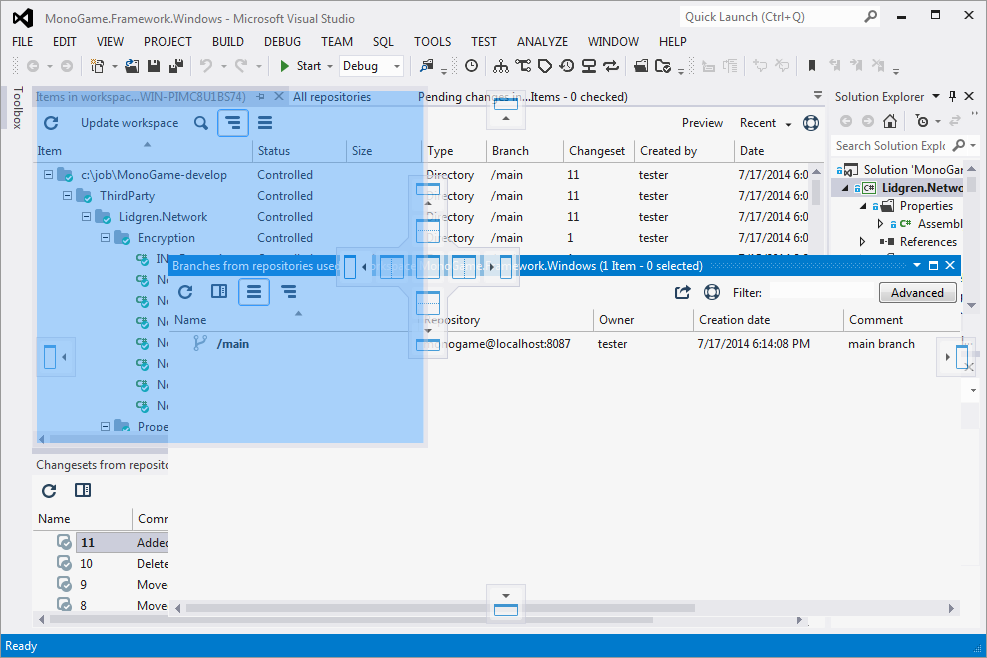
Working offline and unbinding the solution from Plastic SCM
When a solution has been bound to Plastic SCM, the plug-in will try to connect to the Plastic SCM server to perform each operation (checkout, checkin, diff, annotate, etc). If the server is not available for some reason, most of the operations will fail, after some time spent waiting for the network timeout.
It is possible to set the Plastic SCM plug-in into "offline mode", so that the operations that require the server are not available (like annotate or diff), but still it is possible to make changes in the code. Later, when the connection with the server is back, those changes can be sent to it by setting the plug-in online again.
To set the solution offline, go to:
File > Plastic SCM Source Control > Change Source Control
The bindings dialog appears and displays the status of the solution and the different projects inside it.
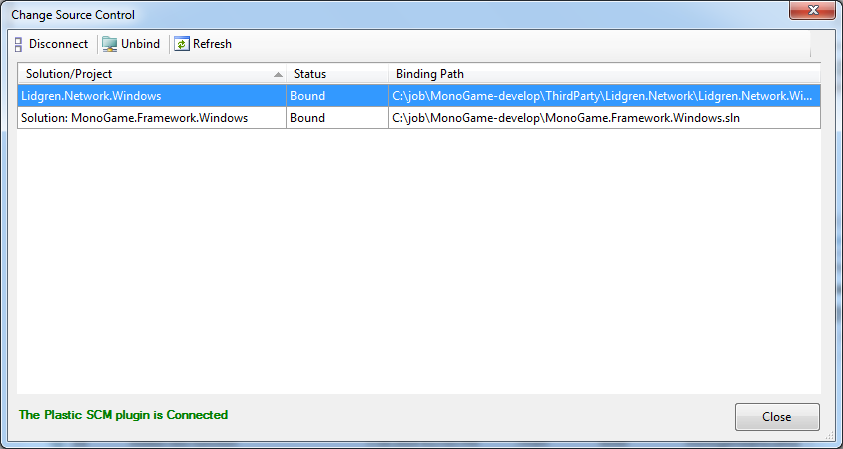
To work offline, select all the items in the table and click the Disconnect button. The green status line "The Plastic SCM plug-in is Connected" changes to a red "The Plastic SCM plug-in is disconnected (Working offline)".
If you right click on an item in the Solution Explorer, the only Plastic SCM command available is Checkout for edit. When an item is modified, it is indeed checked out in the workspace.
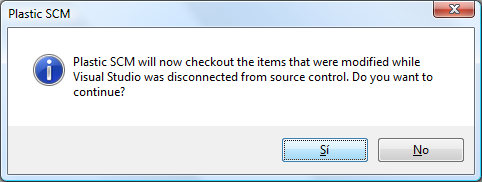
To go online again, open the bindings dialog and select all the items in the table and click the Connect button. The red status line changes back to green and the items that were checked out locally while offline are now checked out in the source control.
This same dialog also lets you remove the bindings from the solution so it is no longer connected to Plastic SCM, as well as bind it back if needed.
To unbind the solution, select all the items in the table and click the Unbind button. The status column for all the selected items should change from "Bound" to "Not bound".
To bind the solution with the Plastic SCM plug-in, select all the items in the list and click the Bind button. The status column changes from "Not bound" to "Bound".
Configuring Plastic SCM options
Additional options can be configured inside Visual Studio once the "Plastic SCM Source Control Package" has been selected as the source control plug-in. Go to:
Tools > Options > Source Control > Plastic SCM settings

- Preferences
-
This button opens the Preferences dialog from the Plastic SCM GUI. It is the same as the menu command View > Plastic SCM > Plastic SCM Preferences.
- Delete files in Plastic SCM when they are deleted in Visual Studio
-
Visual Studio provides hooks to notify the Plastic SCM plug-in when certain operations happen. For instance, when a file is moved, Visual Studio notifies the Plastic SCM plug-in of this fact.
However if you move a file between different projects inside the solution, Visual Studio notifies this as a deleted item in the source project and a new added file in the destination project. This is normally not desirable from the source control perspective because the history if that item is "lost" (it is there, but you will have two items, the old and the new, instead of the one single item that has been moved).
Plastic SCM is capable of detecting when a file has been moved on its own, so when this option is not set (the default), the moved items detection is handled by Plastic SCM. The only thing to consider is that, in the pending changes view, the option to "Show deleted items" has to be checked and everything will work smoothly.
If Delete files in Plastic SCM when they are delete in Visual Studio is set, then moving a file between projects will appear in Plastic SCM as if the file has been deleted from the source and added new in the destination.
Chapter 2: Eclipse integration
Plastic SCM provides a complete integration plug-in for the Eclipse IDE covering the most common operations needed by developers. Eclipse version 3.1 and higher are supported.

This section will describe the functionality and commands of the Plastic SCM Eclipse integration plug-in. Basic knowledge of Plastic SCM concepts and terminology is needed. Things like a workspace, checkout / checkin, branch or merge should be familiar to the reader. For more details, please refer to INTRODUCTION TO PLASTIC SCM guide and the PLASTIC SCM GUI guide.
Adding projects to the source control system
Most likely the first operation a developer can do is putting some existing code project in the source control system. In Plastic SCM, this means adding the code to the repository (the repository is the database on the Plastic SCM server that holds all the data about files, directories, versions and branches).
Adding a project to Plastic SCM is a two step process. First create the workspace and bind the project to Plastic SCM, then add the files to the repository.
To add an existing Eclipse project to the repository, a Plastic SCM workspace a needed. Normally the workspace will be created in the same directory where your code already sits.
In the following example, the workspace is located in 'c:\wks', and the project structure will be the following:
C:\wksC:\wks\projectC:\wks\project\src\
Open the project in Eclipse as usual. To add the project to Plastic SCM, right click on the top directory (that of the project itself) in the Package Explorer and select:
Team > Share project
Eclipse will ask about the repository type. Depending on the plug-ins available to your Eclipse installation, different options may appear. Choose "Plastic SCM" to continue.
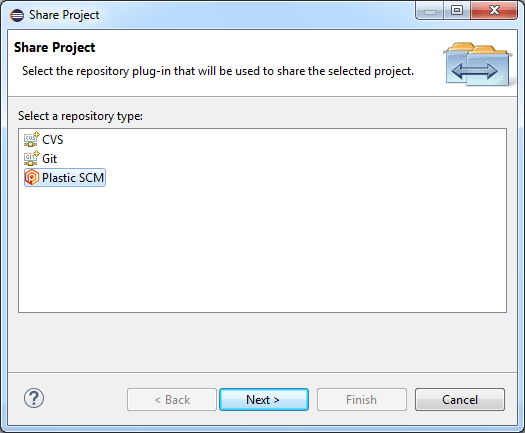
The plug-in needs to find the Plastic SCM binaries directory. It will try to locate the Plastic SCM command line interface executable "cm" in the PATH environment variable automatically, but if it is not found, a dialog will be displayed so the user can enter the location of such file. This file is located under "client" in the Plastic SCM installation directory.
Then the plug-in will ask to create a workspace. The next figure shows the fields needed for this.
- Workspace name - The name assigned to the workspace. This name is used to refer to the workspace in the Plastic SCM GUI and some other administrative commands.
- Workspace path - By default this is the directory where the project is located. You can adjust it to a different directory, but keep in mind that it should contain your project code.
- Repository - This is the Plastic SCM repository where the code will be stored. Select an existing repository from the dropdown list or create a new one using the button on the right.
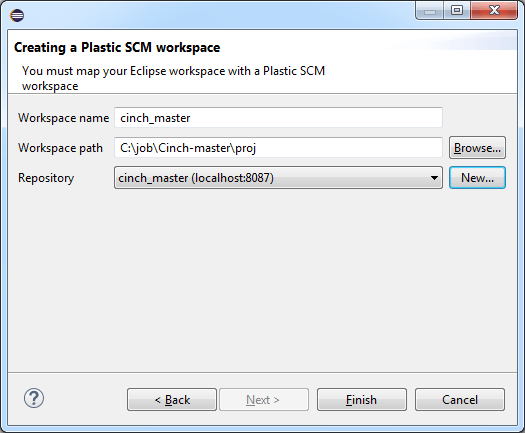
Once this is done, the project is bound to Plastic SCM. The next step is to add the files to the repository. You can add the whole project or just a part of it. To add the whole project, right click on the project in the Package Explorer and select:
Team > Checkin pending changes...
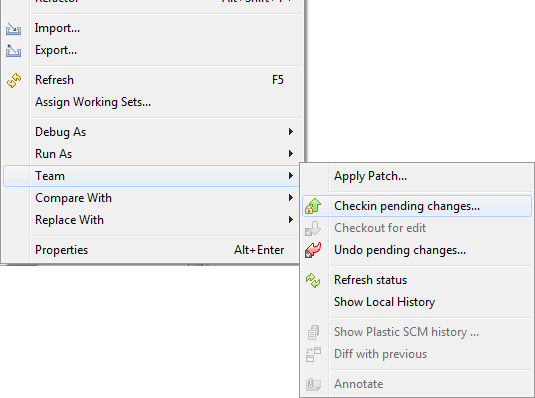
Once added, the items in the Package Explorer display the status as "Controlled" through a decorator.

Checkout from Version Control
Once the project is in the repository, other developers don't need to add it again; they will simply download it from the repository. To do this, go to:
File > Import...
The import dialog opens up. Select "Plastic SCM" and "Projects from Plastic SCM" inside it:

The step in the wizard lets you select the data source. In Plastic SCM, this means the repository where the project is contained in the Plastic SCM server, as well as the specific branch whose content will be downloaded to the workspace.
First select the repository:
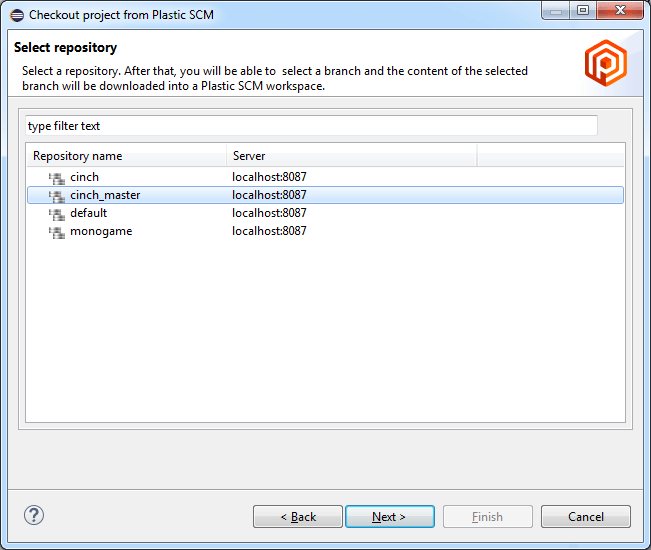
Then click Next and, in the new dialog, select the branch to proceed to the next step.
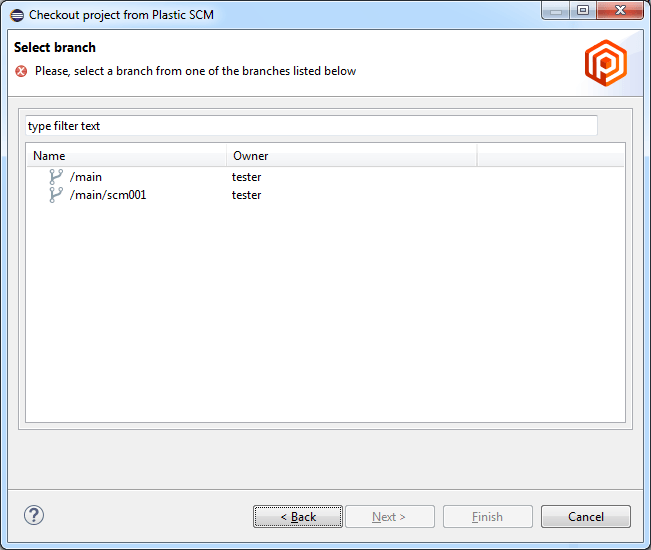
In the next step of the wizard, you can select an existing workspace or create a new one. The workspace is the directory in the local disk where the code will be downloaded from the repository.
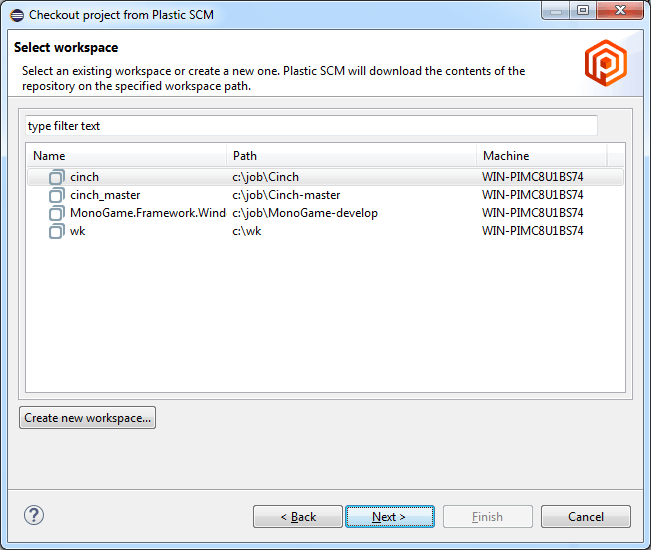
Normally you will create a new workspace to work on the new project you are connecting to. To do so, click the Create new workspace button. The new workspace dialog appears, with the same fields described in the Adding projects to the source control system section.
The next page summarizes the details of the workspace that will be created. It contains the directory where the code will be downloaded and the repository and branch (or label) from which the code will be downloaded.

Clicking Next, the workspace will be updated and the code downloaded from the repository. Once this is done, the next page of the wizard lets you import the code from the Plastic SCM workspace into Eclipse, as shown in the figure below:
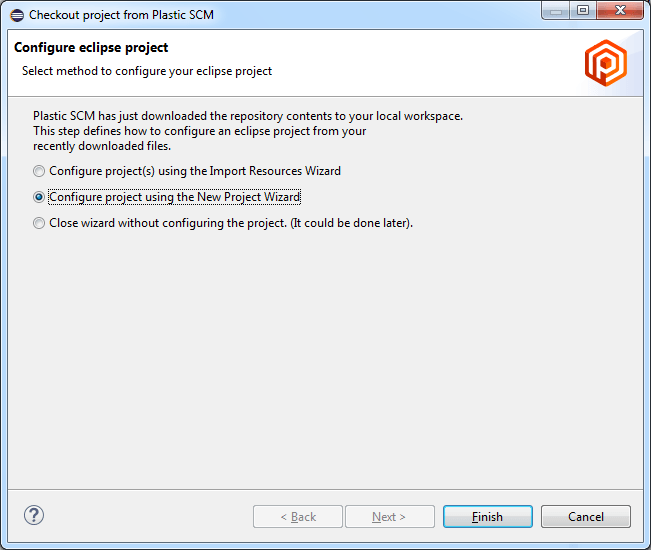
Now you can choose whether to import using the familiar Eclipse wizards: "Import resources wizard" or "New project wizard". Three options are available once all the data is downloaded into the workspace.
- First, you can configure an Eclipse project importing resources from the workspace content; this process uses the Eclipse Import Resources Wizard and at the end of the wizard all the resources imported will be bound to Plastic SCM automatically.
- The second option is to create a new project in the new Plastic SCM workspace; this new project will be bound to Plastic SCM.
- Finally, you can exit directly without configuring any Eclipse project. It can be later done using the File > Import dialog.
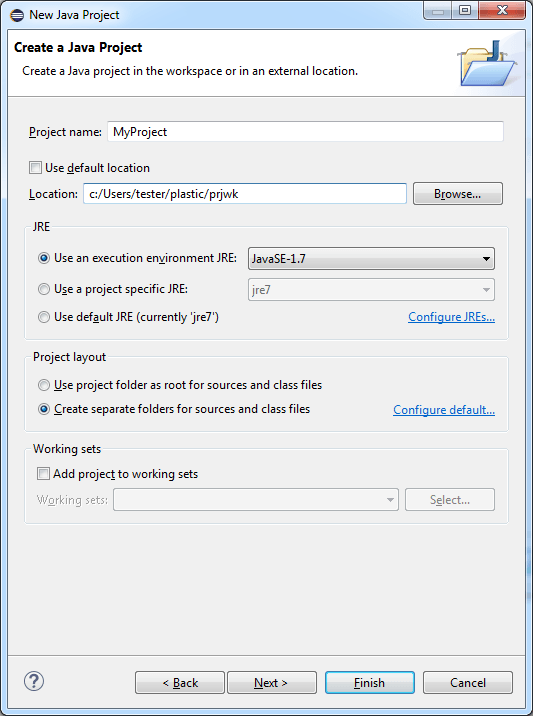
If using the "New project wizard", make sure to select the location of the workspace you have just created, overriding the default. For instance, if your Eclipse workspace is located in:
c:/Users/tester/EclipseWk
and the Plastic SCM workspace you just created is located in:
c:/Users/tester/plastic/prjwk
you want to specify this directory as location, opposed to the default location c:/Users/tester/EclipseWk.
Bind a project in an existing workspace
Another possible way to work in a project is to create the Plastic SCM workspace and downloading the contents from the repository outside Eclipse, and then bind the project. Creating the workspace and updating it can be done using the Plastic SCM GUI or the command line interface (the cm command).
Once the workspace is populated with the code from the repository, it only needs to be bound to Plastic SCM inside Eclipse. To do so, right click on the project in the Package Explorer, and select
Team > Share project...
Then proceed as described in the Adding projects to the source control system section, but this time the source code files are already added and that part can be skipped.
Item Operations
The Eclipse plug-in lets you perform the most common operations on files. These operations can be found under the Team submenu right clicking on a file in the Package Explorer.
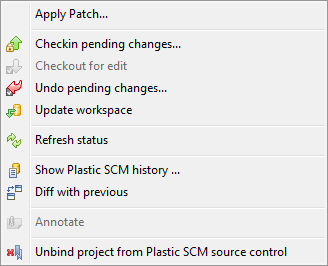
Here is a description of the Plastic SCM specific operations in the Team menu:
- Checkin pending changes
-
Check in the selected items. A Pending changes window appears (see the next figure) listing the items grouped in categories according to the type of change: changed, added, moved or deleted.
You can select what items will be checked in using the checkboxes in each row of the table. Enter the comment associated to the changes in the textbox at the top and press the Ok button to check in the changes.
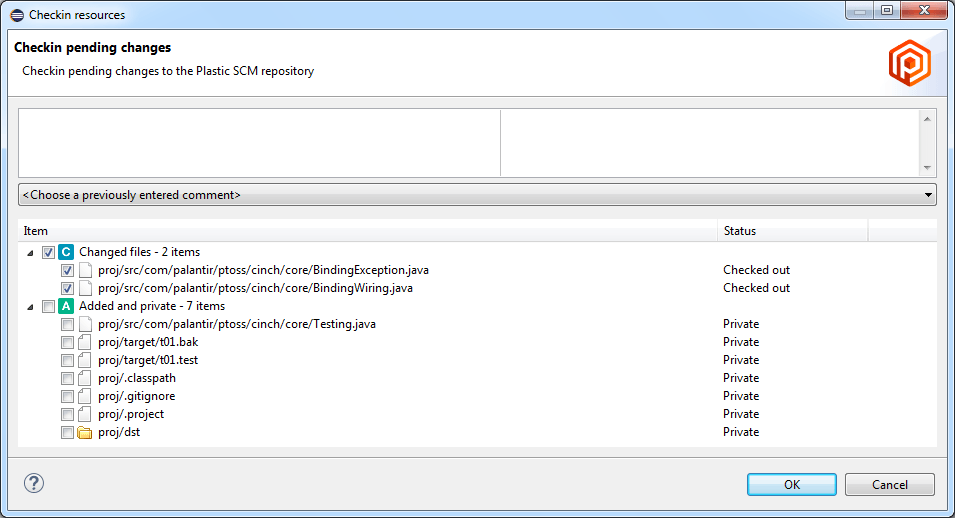
Note that if the selected items are directories, this operation will also list the pending changes inside those directories. If this operation is performed on the project itself, then all the pending changes are listed. This is, indeed, the most common use of the check in operation.
- Checkout for edit
- When an item is to be edited, it is checked out so that Plastic SCM tracks the changes. This operation is rarely used, since files are checked out automatically when they have been changed and are saved.
- Undo pending changes
-
Open a new window listing the pending changes of the selected items to confirm that they are being undone. The list of items is grouped in categories for changed, added, moved and deleted, similar to the pending changes window described above in the Checkin operation.
Again, if the selected items are directories, this operation will also list the pending changes inside those directories. If the operation is performed on the project itself, then all the pending changes are listed and can be undone.
- Update workspace
- Download the latest changes from the repository.
- Refresh Status
- Refresh the state (checked in or checked out) of the selected items. If any project file has been modified and checked out or checked in outside Eclipse, the state can be refreshed with this operation.
- Show Plastic SCM history
-
Open a new tabbed table with the history of the selected item.

The history view lets you open any given revision in the editor, as well as compare the selected revision with the current one in the workspace, or compare any two revisions.
When two revisions are compared, a differences tab is open inside Eclipse. The figure below shows this.
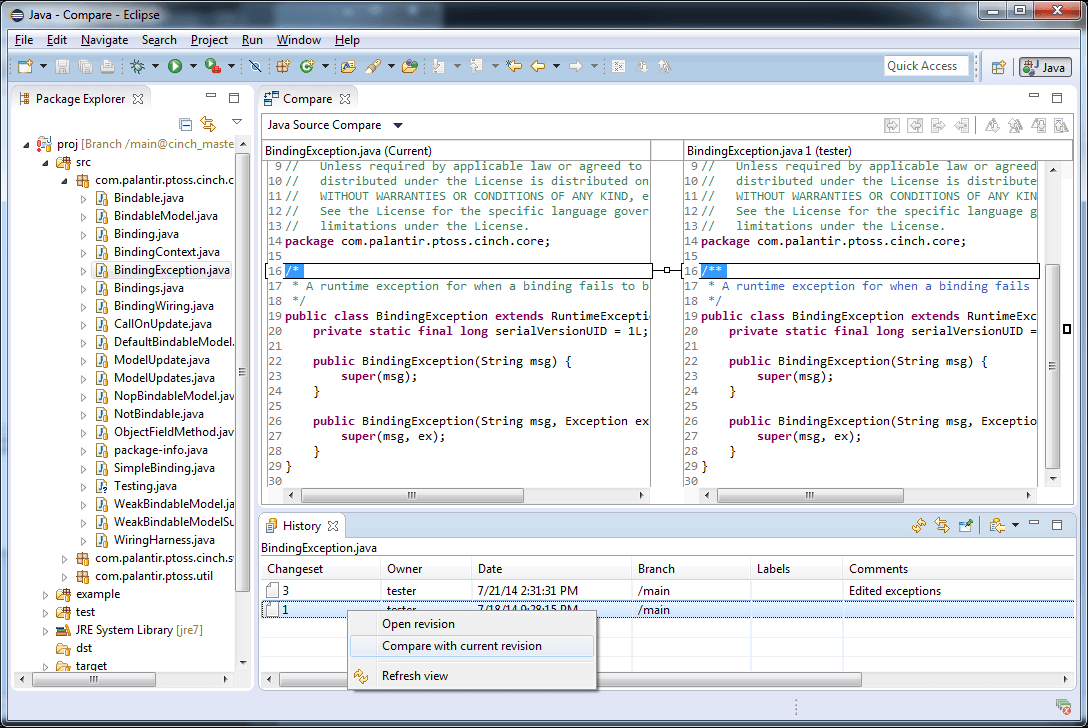
To compare any two revisions, select both by holding down the Control key (or Command in a Mac computer) and clicking on the desired revisions. Right click and select Compare revisions.
- Diff with previous
-
Open a differences view (as described above) comparing the contents of the latest revision of the selected item with its previous revision in the workspace.
If the selected file is checked out, the content of the file in the workspace is compared to the latest revision of the item in the repository.
- Annotate
-
Display an annotated view of the selected item. This is a normal editor window with an annotations column on the left. The different colors in this column represent the different changesets that each line belongs to. Hovering the mouse over this column displays a tooltip with extended information about the specific change for the line on the right.
The tooltip displays the author that created the change, the changeset number, the date it was created and the comment associated to the changeset.

- Unbind project from Plastic SCM source control
- Unbind the project from the version control. This effectively disables the Plastic SCM plug-in for the current project.
Decorators
Decorators are small overlay icons drawn on top of items in the Package Explorer that tell you the status of the item. This is a summary of the possible status:

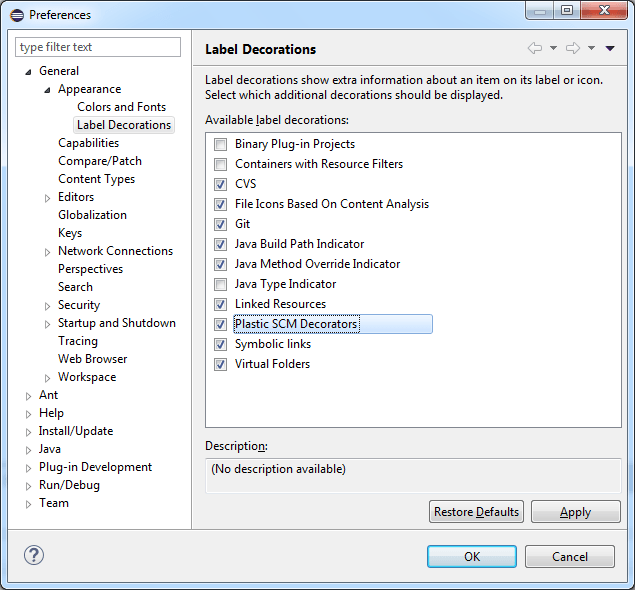
Decorators are activated by default when the Plastic SCM Eclipse plug-in is installed. It is possible to enable or disable them by going to
Window > Preferences > General > Appearance
Check or uncheck the Plastic SCM Decorators option to enable or disable the decorators, respectively.
Plastic SCM views inside Eclipse
Plastic SCM provides several views to access repository objects and their operations right inside the Eclipse IDE. Although the functionality in these views is not as complete as the Plastic SCM GUI, they provide enough functionality to a developer to work comfortably without leaving the IDE.
The next figure displays the available Plastic SCM views. To show any of these views, go to:
Window > Show View > Other...
In the dialog that appears, open the Plastic SCM category, select the views you want to show in the IDE and click the Ok button.

Open a Branch Explorer view similar to the one in the PLASTIC SCM GUI guide.
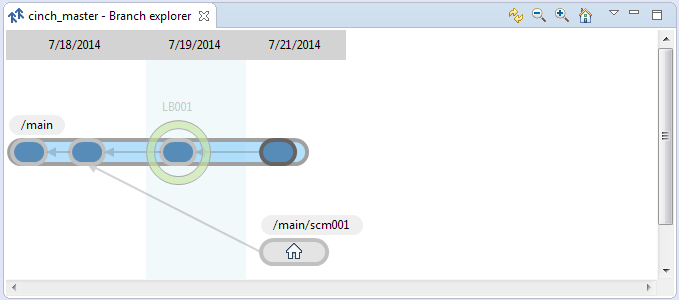
Inside the Branch Explorer view you can run the following operations right clicking in a branch:
- Create child branch
-
Create a child branch of the selected branch. A window is open to enter the details of the new branch to be created.
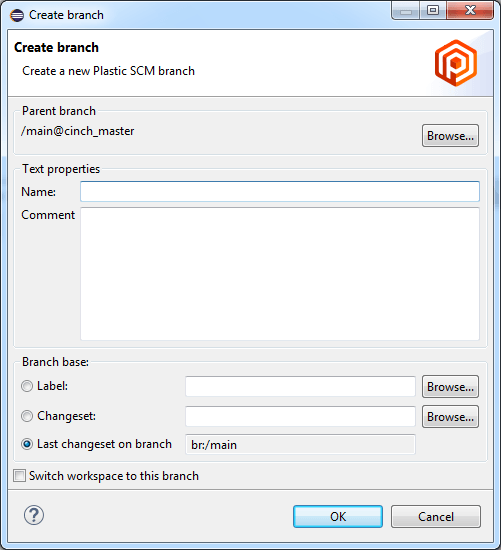
This dialog lets you set the name of the new branch, as well as the comment and the branch base. The branch base indicates the point where the branch starts and lets you select a label, or a specific changeset in the parent branch (the last one being a special case and having its own option).
Refer to the PLASTIC SCM GUI guide for more details about the Create child branch command.
- Switch to this branch
-
Change the workspace configuration so that it downloads the contents of the selected branch to the workspace. Refer to the PLASTIC SCM GUI guide for more details about workspaces and the Switch workspace to this branch command.

- Merge from this branch
-
Open a merge branch window. This window lists the items that need to be merged from the selected branch to the current configuration of the workspace. For more details about the functionality of this window and the merge operation in general, refer to The Merge Organizer Window chapter in the PLASTIC SCM GUI guide.
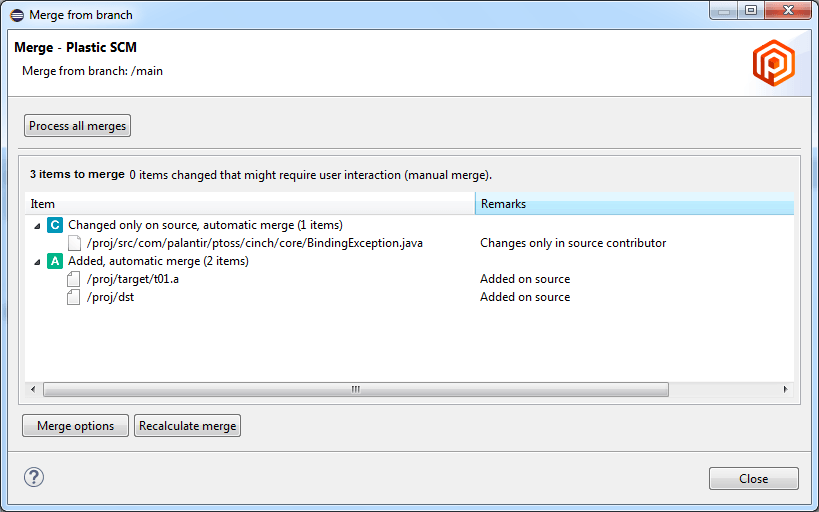
- Diff branch
- Open a Diff window and shows you the differences existing in the selected branch.
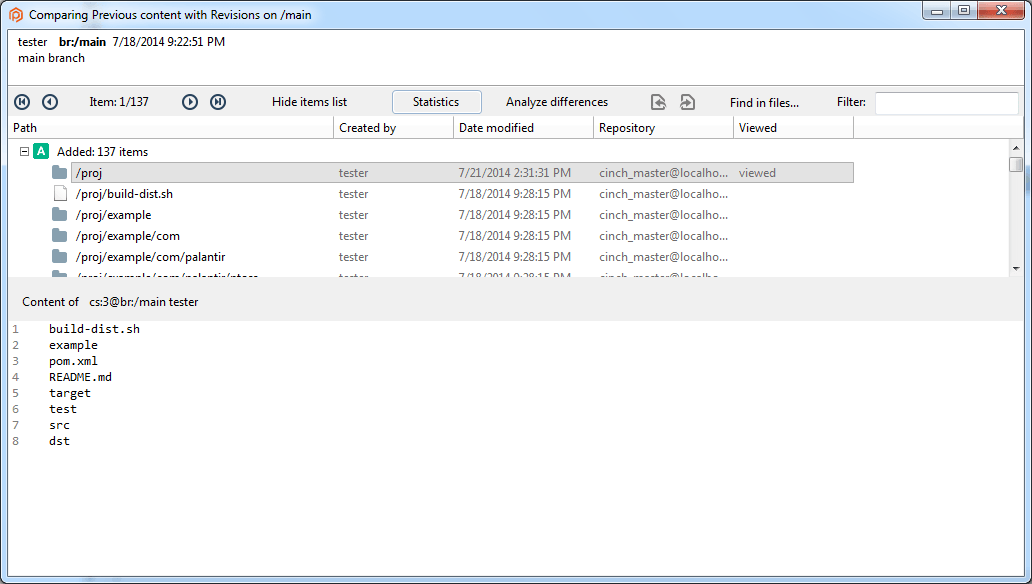
- Properties
-
Display a window with the properties of the branch, such as name, comment and merge history.
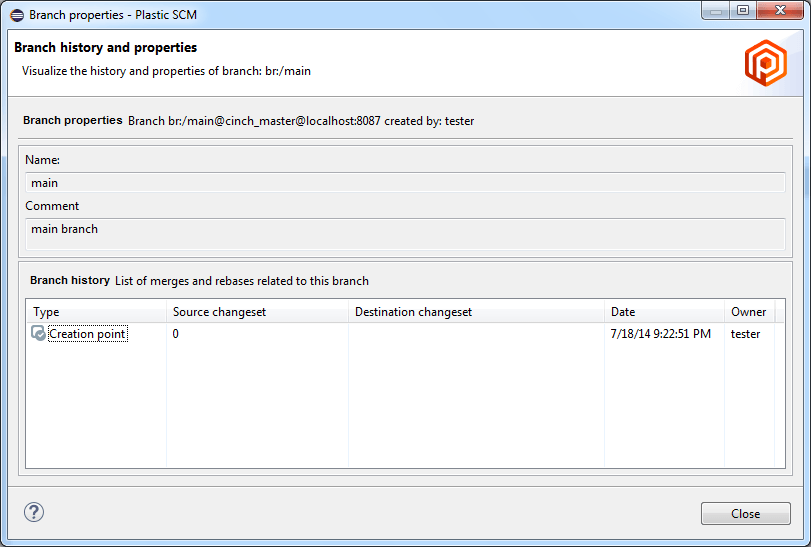
If you right click in a changeset in a branch in the Branch Explorer view you can execute this operations:
- Diff changeset
- Open a Diff window and shows you the differences existing in the selected changeset.
- Switch to this changeset
- Change the workspace configuration so that it downloads the contents of the selected changeset to the workspace. Refer to the PLASTIC SCM GUI guide for more details about workspaces and the Switch workspace to this changeset command.
- Label this changeset
- Create a new label and applies it to the selected changeset. A new window opens to let you enter the name and comment of the new label.
- Go to parent changeset
- Show the parent changeset of the selected changeset.
Open a new view that shows all the branches created in the workspace.
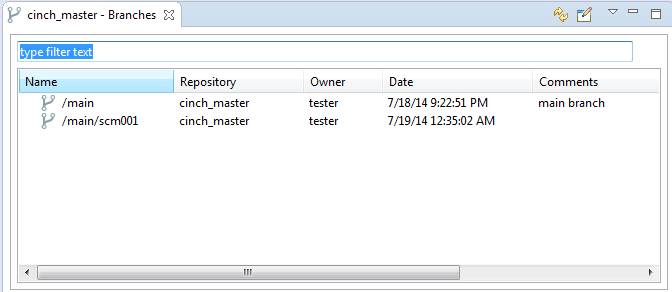
The Branches view has these operations:
- Create child branch
- Create a child branch of the selected branch. This is the same command as Create child branch in the Branch Explorer view.
- Switch to this branch
- Changes the workspace configuration as the same command does in the Branch Explorer view.
- Merge from this branch
- Open a merge branch window. This is the same command as the above in the Branch Explorer view.
- Show in Branch Explorer
- Open a Branch Explorer view and highlight the selected branch.
- Properties
- Display the same Properties window as the same command does in the Branch Explorer view.
- Compare with
- Compare the selected branch with an Eclipse API baseline.
You can get further information about the Branches view in the PLASTIC SCM GUI guide.
The changeset explorer view lets you explore the changesets of the repository currently loaded in the workspace. This view is a table with the list of changesets where the comment, date, branch and author of the changeset are displayed.
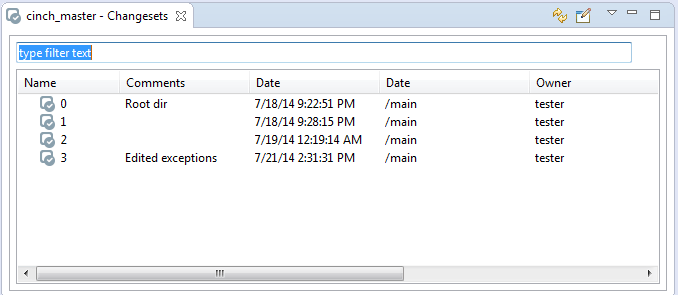
In the Changesets view you can execute the following commands:
- Show in Branch Explorer
- Open a Branch Explorer view and highlight the selected changeset.
- Compare with
- Compare the selected changeset with an Eclipse API baseline.
Open a new view where you can see all the labels created in the current workspace.
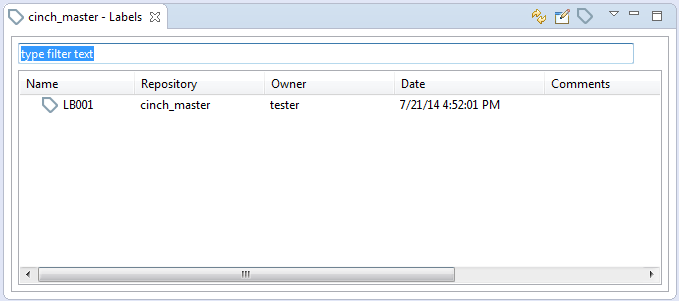
These are the label operations:
- Switch to this label
- Switches the workspace to the selected label. This loads a read-only confirmation in the workspace, since labels are not mutable. For more details, refer to the Switch workspace to this label command in the PLASTIC SCM GUI guide.
- Apply label to workspace contents
- Applies the selected label to the changeset currently loaded in the workspace.
- Merge from this label
-
Opens a merge window to merge the status marked by the label with the items currently loaded in the workspace. At the end, this is the same as merging the changeset to which the label is applied with the changeset currently loaded in the workspace.
For more details, refer to the Merge from this label command in the PLASTIC SCM GUI guide.
- Show in Branch Explorer
- Open a Branch Explorer view and highlight the selected label.
- Compare with
- Compare the selected label with an Eclipse API baseline.
Display the Pending changes view with its own toolbar:
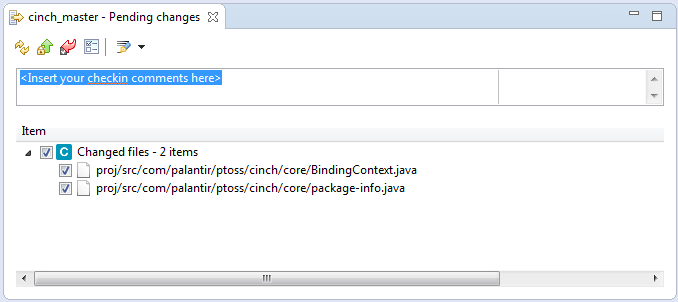
These are the commands available in the toolbar:
- Refresh view
- Reload the view to show any new change.
- Checkin selected changes
- Check in the selected items.
- Undo selected changes
- Undo the selected items.
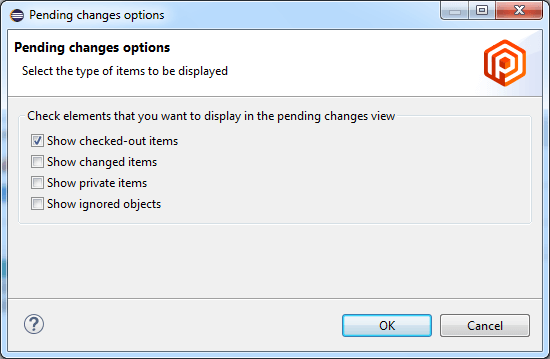
- Show view options
- Display a new window to select the items you want to appear in the pending changes view.
- Paste last used comment
- This option lets you select a used comment o paste the last one used.
The workspace explorer view lets you explore all the previous views of the repository currently loaded in the workspace.

Besides, lets you execute the following operations:
- Show pending changes for this workspace
- Display the pending changes view including all the changes in the workspace.
- Update
- Download the latest changes from the repository. This is the same as right clicking in the project in the Package Explorer and selecting Team > Update workspace, described in the Item operations section above.
Refactor support
Plastic SCM provides complete support for refactor operations, especially effective when renaming and moving items from one directory to another.
Note for Eclipse 3.1: Due to an Eclipse 3.1 restriction, solved in Eclipse 3.2, refactor for renaming a package could show an error at the end of the process, like this:
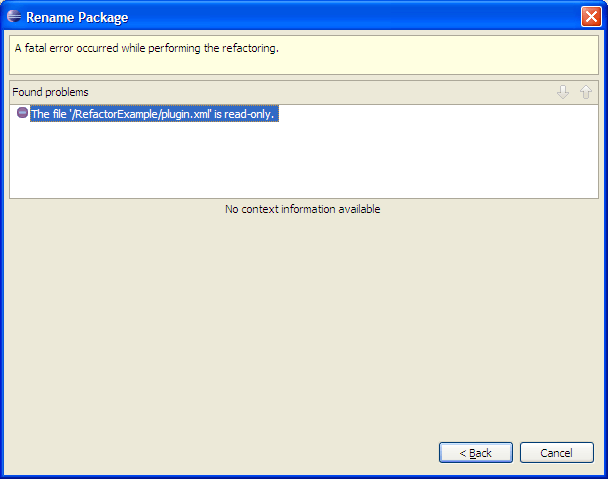
This behavior is due to the way in which Eclipse handles refactor and plug-in communication. You will only have to click Back and Next again and the refactor operation will correctly finish.
Preferences
To set the preferences for the Plastic SCM Eclipse plug-in, go to:
Window > Preferences > Team > Plastic SCM

A dialog is shown where the following option can be set:
- Command line executable - This is the directory to the Plastic SCM cm executable. The Eclipse plug-in can detect this setting automatically if the Plastic SCM directory is contained in the PATH environment variable. Otherwise, it can be manually set here. Changing this setting is normally not needed unless you need to use several separate Plastic SCM installations on the same machine and want to force the Eclipse plug-in to use one of them.
Mylyn integration
Plastic SCM provides integration with Mylyn 3.0 or later; this version of Mylyn works fine in Eclipse 3.4 or later.
This feature is very useful when using task controls (see the TASK AND ISSUE TRACKING SYSTEMS guide of Plastic SCM to obtain a list of task controls that can be connected to Plastic SCM), because the user will be able to work on his / her tasks from the Eclipse environment, checking out and checking in the files and linking those changes to a certain task.
To install the Mylyn integration it is necessary to check the following option when installing or upgrading the Plastic SCM client:

Then, the installer will ask you for the Eclipse location. Specify this information and proceed with the installation process.
When the installation is finished, the Mylyn integration is ready to work with (as long as you have Mylyn installed in Eclipse; otherwise this plugin will not work at all).
If you have Plastic SCM GUI configured with a task control you do not need to do anything else. Continue reading the section Using the Mylyn integration; otherwise you will need to configure the Mylyn integration. To learn about configuring task controls in Plastic SCM GUI, please, check the TASK AND ISSUE TRACKING SYSTEMS guide.
To configure the Mylyn integration, go to
Window > Preferences > Team
and finally Plastic SCM for Mylyn in the list provided in the left pane. You will see something like this:
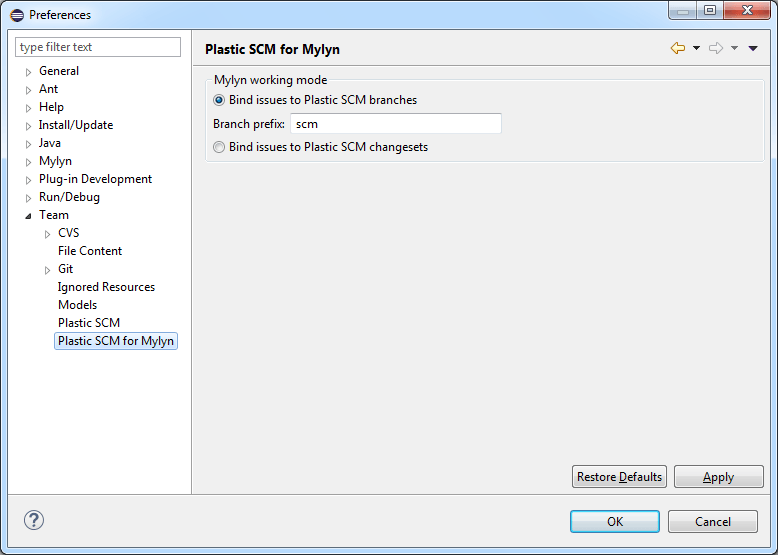
If you have the Plastic SCM GUI already configured with a task control you do not need to change anything.
You can choose if you want to link branches with tasks or changesets with tasks. The most common scenario (and the one we recommend) is the first one.
If you have chosen to link issues with Plastic SCM branches, specify the branch prefix that will be linked with the tasks ID. Finally, click on Ok.
Once the appropriate task control is configured in Mylyn, and having the 'Task list' view opened, just click on the bullet that appears on the left of a certain task, as you would do when working on a task from Mylyn as usual. The following dialog appears:

In this dialog you can select a workspace that is configured with the opened projects (by default is selected the current one, opened in Eclipse). In the list shown below Plastic SCM lists the branches which prefix matches with the task ID of the selected task. This information will be taken from the Plastic SCM GUI or from the Preferences window, as explained before.
You can select the branch that will be associated with the selected task, add and select another one that is not listed, remove branches from the list or create a new one, which will take the configured prefix by default. Finally, press OK.
Plastic SCM will switch to the specified branch automatically; this way working in a specific task from Eclipse is very easy: you simply select the desired task, specify the branch to work on and automatically you are doing changes in that branch.
Mylyn will filter the Package Explorer view with the files that have been modified previously in other tasks, as it believes that a user often modifies the same files; anyway you can see the whole project by clicking on the  icon in this view.
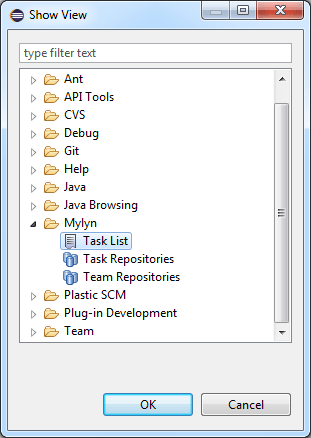
Note: If you cannot see the Task list view, please click on
Window > Show view > Other on the Eclipse menu and select Mylyn from the list. Select
Task Repositories to configure a repository of a task control if you do not have specified one before, or click on
Task list to see this view if you have already configured your task control system. Finally, press
OK.
Last updated
August 12, 2014
Semantic history
July 24, 2014
Updated Plastic SCM views inside Eclipse and their operations.


