Task and issue tracking systems guide
Introduction
This guide describes how Plastic SCM provides integration with diverse control tracking tools: Bugzilla, Mantis,
Trac, Jira, Axosoft, VersionOne, FogBugz, Rally, Polarion and codeBeamer.
Using this guide, you'll also learn too how to write your own Plastic
SCM custom extensions.
Once an issue tracking system is configured, the user will be able to work with the extension and Plastic SCM
seamlessly. This means that the user will be able to see the associated task information through the Plastic GUI.
Plastic SCM extensions allow two different working modes:
-
Task on branch - This mode links one task from the issue tracking system to one Plastic branch,
and allows to browse the associated issue on the issue tracking tool -where the full information is displayed-.
-
Task on changeset - This mode links one or more tasks to one or more Plastic changesets, and the
information of the associated tasks are available from the Plastic Changesets view.
Bugzilla Integration
This section describes the steps to follow in order to use the Bugzilla integration with Plastic SCM.
Use the Previous (<) and Next (>) arrows to see the screenshots in Windows, Linux, and macOS.
Bugzilla - Configuration
In this chapter, you will learn how to configure the Bugzilla integration both in the server and in the client sides.
To setup the Bugzilla extension functionality, copy the script file plastic.cgi (included on plasticscm_install_path/client/extensions/bugzilla) to the Bugzilla installation folder.
Depending on the server's operating system, the first line of the script file may have to be changed:
Read how to configure the Bugzilla integration on your Windows, Linux, or macOS system.
Follow these steps to configure the Bugzilla extension on the Plastic SCM client on your Windows machine:
-
Click the Preferences tab of the main window of the Plastic SCM GUI.
-
In the new window, click the Issue trackers tab.
-
Click the radio button Bind to this issue tracking system.
-
Select the Bugzilla tracking system.
-
Now, select the repository you want to Apply binding to:
-
If you are working with the
Global extension configuration, then select the
plastic-global-config repository.
-
If you want to bind to all your repositories with the issue tracker, then select
Repositories.
-
If you want to bind to a particular repository with Bugzilla, then select that repository.

-
By default, the Bind issues to Plastic branches option is activated to work with the
Task on branch mode.
To work on the Task on changeset mode,
select the Bind issues to Plastic changesets option.
-
Now, you must configure the Bugzilla parameters (URL where your Bugzilla server is located at, credentials,
branch prefix, and so on) accordingly.
You can configure the Bugzilla extension on the Plastic SCM client on your Linux or macOS machine using one of these methods:
- Set a global extension configuration in the server. This way all the Plastic clients have the same Bugzilla settings by default.
Or
-
Set a local Bugzilla configuration. To do this:
-
Create the structure
issuetrackers/server_port/repository under
$HOME/.plastic4, where repository is one of the following values:
-
The name of the repository that you want to link to the issue tracker.
Or
-
allrepos, which means that all of your repositories will be linked to the issue tracker.
-
Copy the
bugzilla.conf example configuration file into the new created path.
You can find this file at this location:
-
Window or Linux:
plasticscm_install_path/client/extensions/config_samples
-
macOS:
/Applications/PlasticSCM.app/Contents/IssueTrackerConfigSamples
Then, you'll have, for example, something like this:
- /home/pablo/.plastic4/issuetrackers/localhost_8087/info/bugzilla.conf
Or
- /home/pablo/.plastic4/issuetrackers/localhost_8087/allrepos/bugzilla.conf.
-
Edit the
bugzilla.conf file:
-
Edit the
WorkingMode
parameter to assign one of these values: TaskOnBranch or TaskOnChangeset.
-
Configure the rest of the Bugzilla extension parameters (URL where your Bugzilla server is located
at, credentials, branch prefix, and so on) accordingly.
-
Edit your
client.conf file to add the following key:
<Extensions>
    <Extension AssemblyFile="plasticscm_install_path/client/extensions/bugzilla/bugzillaextension.dll" />
</Extensions>
Bugzilla Base URL: Specifies the URL where the Bugzilla server is installed and running.User name: If required, enter your user name.-
Branch prefix: If you are going to work on the
Task on branch
mode, specifying this parameter is recommended (but not mandatory). This branch prefix will be used to bind the
Plastic branches to the Bugzilla tasks.
For example, if you enter the scm prefix, then all branches whose name starts with prefix
scm will be linked to the Bugzilla issues. For example, the Plastic branch with name
scm012 will be associated to the Bugzilla task #12.
Bugzilla - Characteristics
Using this working mode, every Bugzilla task is associated to a Plastic branch when creating a new one. The branch name for the new branch must match the configured extension prefix (if it has been set) and the numeric identifier on Bugzilla.
By clicking on the Show extended information button ( ) in the Branches view the information associated to the branches will be displayed on the right panel of the Plastic GUI. By selecting a branch the Bugzilla task information is displayed in Plastic SCM: the number or identifier, task owner, status, title and description.

By double clicking on the task pane or by clicking on the Open issue in browser button ( ), a new browser window will be opened and will display the full information of the task in Bugzilla:

It is possible to setup the Plastic SCM repositories so that numbered branches associated to tasks are checked against Bugzilla. Only if there is a bug number defined in Bugzilla the working branch will be allowed. This check is performed on the branch creation operation, only for child branches.
In order to setup the branch creation check on a repository, create an attribute named plastic-enforce-task-branch on the desired repositories. This attribute must be created using one of the following methods:
- Using the command line run the following command:
cm attribute create plastic-enforce-task-branch
-
Using the Attributes view in the Plastic SCM GUI:

With this attribute created, each time a child branch is going to be created on the repository where it is defined, the extension will check the name of the new branch. If it starts with the task prefix, it will then pick the number contained on it and ask Bugzilla if there is a matching bug number. Otherwise an error is printed and the operation is cancelled:

To configure Plastic SCM to work on the Task on changeset working mode, the user has to configure the Bugzilla extension and select the Bind issues to Plastic changesets option, as explained before on the Client section.
The workflow will resemble something like this:
- Issues are created in Bugzilla. When a developer starts working on one issue, then the issue is open.
- Changes are made on the code, thus checked out items that appear in Plastic.
- When the user decides to check in the changes, Plastic SCM will display a new dialog where the Bugzilla tasks can be linked with this new changeset:
- The user can link the changeset and the task by following one of these options:
-
Adding new issues - Click the Add new issue button to open a new dialog. Now, the user is able to choose one or more task to link to the changeset:
-
Entering comment hashtags - Enter a comment in the Checkin comments text box by starting the comment with the '#' character followed by the issue key (and optionally followed by a colon). This will log the checkin information in the related issue. For example, #9: Edited the user interface.
Once the changeset is linked to the task(s) in Bugzilla, this information can be displayed in the Plastic SCM
Changesets view. When the Extended information panel is visible (
), if you click a changeset then Plastic shows the associated Bugzilla tasks:

The users can also add new tasks or delete previous ones from the Bugzilla Extension pane. Besides, by
double clicking each task associated to a certain changeset or by clicking the
Open issue in browser button (
), a new web browser window opens and shows the selected Bugzilla task. Whenever a user modifies a task in
Bugzilla, the new data will be updated on Plastic GUI by pressing the Refresh button on
the Bugzilla Extension pane.
Mantis integration
This section describes the steps to follow in order to use Mantis integration with Plastic SCM. It also describes its advantages.
This extension is compatible with Mantis versions 0.19.4, 1.0.0, 1.0.8 and higher.
Use the Previous (<) and Next (>) arrows to see the screenshots in Windows, Linux, and macOS.
Mantis - Configuration
Read how to configure the Mantis integration both in the server and in the client sides.
To setup the Mantis extension functionality, copy the script file plastic.php (included on plasticscm_install_path/client/extensions/mantis) to the Mantis installation folder.
Read how to configure the Mantis integration on your Windows, Linux, or macOS system.
Follow these steps to configure the Mantis extension on the Plastic SCM client on your Windows machine:
-
Click the Preferences tab of the main window of the Plastic SCM GUI.
-
In the new window, click the Issue trackers tab.
-
Click the radio button Bind to this issue tracking system.
-
Select the Mantis tracking system.
-
Now, select the repository you want to Apply binding to:
-
If you are working with the
Global extension configuration, then select the
plastic-global-config repository.
-
If you want to bind to all your repositories with the issue tracker, then select
Repositories.
-
If you want to bind to a particular repository with Mantis, then select that repository.

-
By default, the Bind issues to Plastic branches option is activated to work with the
Task on branch mode.
To work on the Task on Changeset mode, select
the Bind issues to Plastic changesets radio button.
-
Now, you must configure the Mantis parameters (URL where your Mantis server is located at, credentials,
branch prefix, and so on) accordingly.
You can configure the Mantis extension on the Plastic SCM client on your Linux or macOS machine using one of these methods:
- Set a global extension configuration in the server. This way all the Plastic clients have the same Mantis settings by default.
Or
-
Set a local Mantis configuration. To do this:
-
Create the structure
issuetrackers/server_port/repository under
$HOME/.plastic4, where repository is one of the following values:
-
The name of the repository that you want to link to the issue tracker.
Or
-
allrepos, which means that all of your repositories will be linked to the issue tracker.
-
Copy the
mantis.conf example configuration file into the new created path.
You can find this file at this location:
-
Window or Linux:
plasticscm_install_path/client/extensions/config_samples
-
macOS:
/Applications/PlasticSCM.app/Contents/IssueTrackerConfigSamples
Then, you'll have, for example, something like this:
- /home/pablo/.plastic4/issuetrackers/localhost_8087/info/mantis.conf
Or
- /home/pablo/.plastic4/issuetrackers/localhost_8087/allrepos/mantis.conf.
-
Edit the
mantis.conf file:
-
Edit the
WorkingMode
parameter to assign one of these values: TaskOnBranch or TaskOnChangeset.
-
Configure the rest of the Mantis extension parameters (URL where your Mantis server is located
at, credentials, branch prefix, and so on) accordingly.
-
Edit your
client.conf file to add the following key:
<Extensions>
    <Extension AssemblyFile="plasticscm_install_path/client/extensions/mantis/mantisextension.dll" />
</Extensions>
-
Mantis Base URL: Specifies the URL where the Mantis server is installed and running.
-
User name: This field must be filled with a valid Mantis user.
-
Branch prefix: If you are going to work on the
Task on branch
mode, specifying this parameter is recommended (but not mandatory). This branch prefix will be used to bind the
Plastic branches to the Mantis tasks.
For example, if you enter the scm prefix, then all branches whose name starts with prefix
scm will be linked to the Mantis issues. For example, the Plastic branch with name
scm022 will be associated to the Mantis task #22.
-
Encoding: UTF-8 is the default and will work for most languages. Edit this value in case you need
to change the enconding.
Mantis - Characteristics
Task on branch is the working mode configured by default which works fine with the "branch per task" pattern. On this working mode, for each task to be done a new branch will be created.
As usual, the first step would be creating issues in Mantis, this would be usually done by the Project Manager, by clicking on the "Report Issue" option a dialog on which to include the information of the new issue to be done will be opened, the information to include would be title, description, severity, etc.

When the issue is created, Mantis assigns it a number. In this case, Mantis assigned the number 4 to the task, as shows the figure below. Users can select an issue from the list of issues -which are shown on different colors depending on their status- and change its status, so issue 4 goes from new to assigned.

The next step is that the developer assigned to the task must create a new branch. It is as simple as right clicking on the parent branch and select the Create child branch option as it is shown in the following image:

In order to link the new branch to the issue in Mantis, the developer must give the branch the same Mantis number, 4 in this case, preceded by the branch prefix:

Now, the user can check the information of the issues linked to a certain branch on the extended information panel () on the Branches view.

If the user clicks on the Open issue in browser button () or double-clicks on the Mantis task, a browser window with the associated branch issue will be opened. When the users changes the status or any other field of the issue, the new information will appear by refreshing Mantis extension.
To configure Plastic SCM to work on the Task on changeset working mode, the user has to configure the Mantis extension and select the Bind issues to Plastic changesets option, as explained before on the Client section.
The workflow will resemble something like this:
- Issues are created in Mantis. When a developer starts working on one issue, then the issue is open.
- Changes are made on the code, thus checked out items that appear in Plastic.
- When the user decides to check in the changes, Plastic SCM will display a new dialog where the Mantis tasks can be linked with this new changeset:
- The user can link the changeset and the task by following one of these options:
-
Adding new issues - Click the Add new issue button to open a new dialog. Now, the user is able to choose one or more tasks or defects to link to the changeset:
-
Entering comment hashtags - Enter a comment in the Checkin comments text box by starting the comment with the '#' character followed by the issue key (and optionally followed by a colon). This will log the checkin information in the related issue. For example, #5: Edited const.
Once the changeset is linked to the issue or task in Mantis, this information can be displayed in the Plastic SCM
Changesets view. When the Extended information panel is visible (
),if you click a changeset then Plastic shows the associated Mantis tasks:

The users can also add new tasks or delete previous ones from the Mantis Extension pane. Besides, by
double clicking each task associated to a certain changeset or by clicking the
Open issue in browser button (
), a new web browser window opens and shows the selected Mantis task. Whenever a user modifies a task in
Mantis, the new data will be updated on Plastic GUI by pressing the Refresh button on
the Mantis Extension pane.
Trac integration
This section describes the steps to follow in order to use Trac integration with Plastic SCM. It also describes its advantages.
This extension is compatible with Trac versions from 0.10.
Use the Previous (<) and Next (>) arrows to see the screenshots in Windows, Linux, and macOS.
Trac - Configuration
In this chapter, you will learn how to configure the Trac integration both in the server and in the client sides.
To setup the Trac extension functionality, the XMLRPC plug-in must be installed into Trac server. This link provides information about how to download, install and verify that it has been properly set up.
Using Trac administration tool, enable the XML_RPC permission on users which will use the extension. If this permission is assigned to user "anonymous" it will be available to every user.

When using the Trac extension, several Server configuration features must be taken into account:
- If the authentication method used is the Basic one (option --basic-auth when launching tracd), which means an authentication mode based on user/password, the URL to access XMLRPC services would be like this format: http://{trac_server}/{trac_project_name}/login/xmlrpc
- If the Trac server is configured with any other authentication method, the Plastic SCM extension cannot proceed with user authentication. In this case, user anonymous must have the XML-RPC permission enabled, and the URL to access to the services would be in the following format: http://{trac_server}/{trac_project_name}/xmlrpc
It will not be necessary to supply user/password authentication information to the Plastic SCM Trac extension.
Read how to configure the Trac integration on your Windows, Linux, or macOS system.
Follow these steps to configure the Trac extension on the Plastic SCM client on your Windows machine:
-
Click the Preferences tab of the main window of the Plastic SCM GUI.
-
In the new window, click the Issue trackers tab.
-
Click the radio button Bind to this issue tracking system.
-
Select the Trac tracking system.
-
Now, select the repository you want to Apply binding to:
-
If you are working with the
Global extension configuration, then select the
plastic-global-config repository.
-
If you want to bind to all your repositories with the issue tracker, then select
Repositories.
-
If you want to bind to a particular repository with Trac, then select that repository.

-
By default, the Bind issues to Plastic branches option is activated to work with the
Task on branch mode.
To work on Task on changeset mode, select the
Bind issues to Plastic changesets option.
-
Now, you must configure the Trac parameters (URL where your Trac server is located at, credentials,
branch prefix, and so on) accordingly.
You can configure the Trac extension on the Plastic SCM client on your Linux or macOS machine using one of these methods:
- Set a global extension configuration in the server. This way all the Plastic clients have the same Trac settings by default.
Or
-
Set a local Trac configuration. To do this:
-
Create the structure
issuetrackers/server_port/repository under
$HOME/.plastic4, where repository is one of the following values:
-
The name of the repository that you want to link to the issue tracker.
Or
-
allrepos, which means that all of your repositories will be linked to the issue tracker.
-
Copy the
trac.conf example configuration file into the new created path.
You can find this file at this location:
-
Window or Linux:
plasticscm_install_path/client/extensions/config_samples
-
macOS:
/Applications/PlasticSCM.app/Contents/IssueTrackerConfigSamples
Then, you'll have, for example, something like this:
- /home/pablo/.plastic4/issuetrackers/localhost_8087/info/trac.conf
Or
- /home/pablo/.plastic4/issuetrackers/localhost_8087/allrepos/trac.conf.
-
Edit the
trac.conf file:
-
Edit the
WorkingMode
parameter to assign one of these values: TaskOnBranch or TaskOnChangeset.
-
Configure the rest of the Trac extension parameters (URL where your Trac server is located
at, credentials, branch prefix, and so on) accordingly.
-
Edit your
client.conf file to add the following key:
<Extensions>
    <Extension AssemblyFile="plasticscm_install_path/client/extensions/trac/tracextension.dll" />
</Extensions>
-
Base Trac URL: Specifies the URL where the Trac server is installed and running.
-
This server requires authentication, User name, and Password: If the
Trac server is configured on Basic authentication User/Password mode, then enable the
This server requires authentication checkbox and type the credentials to authenticate against the
Trac server.
-
Branch prefix: If you are going to work on the
Task on branch mode, specifying this parameter
is recommended (but not mandatory). This branch prefix will be used to bind the Plastic branches to the Trac
tasks.
For example, if you enter the scm prefix, then all branches whose name starts with prefix
scm will be linked to the Trac issues.
Trac - Characteristics
The working mode configured by default is the Task on branch mode, which works fine with the "branch per task" pattern. On this working mode, for each task to be done a new branch will be created.
As usual, the first step would be creating issues in Trac. This would be usually done by the Project Manager. By clicking on the "New Ticket" option, a dialog on which to include the information of the new issue to be done will be opened. The information to include will be the title, description, summary, etc.

When the task or ticket is created, Trac assigns it a number (number 4 on the example picture below).

Now, the developer has to work with the task that has been assigned to. So they create a new branch (as simple as right-clicking on the parent branch and select the Create child branch option), as is shown on the image below. In order to link the new branch to the issue in Trac, its name must match the configured branch prefix for Trac extension (if it has been defined) and the Trac issue number (issue number 4 in this case). So, if branch prefix is set to 'scm', branch name scm004 will be linked to Trac ticket #4.

Extended information of the branches will be displayed by clicking on the Show extended information button (). When a branch is selected on the Branches view, the right pane will show the information of the associated task/defect: its number, owner or developer the task has been assigned to, status, title and comments.

By double clicking on the Trac information task or by pressing the Open issue in browser button (), a new browser window is opened showing the associated branch task and will display the full information of the Trac task.
To configure Plastic SCM to work on the Task on changeset working mode, the user has to configure the Trac extension and select the Bind issues to Plastic Changesets option, as explained before on the Client section.
The workflow will resemble something like this:
- Issues are created in Trac. When a developer starts working on one issue, then the issue is open.
- Changes are made on the code, thus checked out items that appear in Plastic.
- When the user decides to check in the changes, Plastic SCM will display a new dialog where the Trac tasks can be linked with this new changeset:
- The user can link the changeset and the task by following one of these options:
-
Adding new issues - Click the Add new issue button to open a new dialog. Now, the user is able to choose one or more tasks or defects to link to the changeset:
-
Entering comment hashtags - Enter a comment in the Checkin comments text box by starting the comment with the '#' character followed by the issue key (and optionally followed by a colon). This will log the checkin information in the related issue. For example, #3: Updated values.
Once the changeset is linked to the ticket or task in Trac, this information can be displayed in the Plastic SCM
Changesets view. When the Extended information panel is visible (
), if you click a changeset then Plastic shows the associated Trac tasks:

The users can also add new tasks or delete previous ones from the Trac Extension pane. Besides, by
double clicking each task associated to a certain changeset or by clicking the
Open issue in browser button (
), a new web browser window opens and shows the selected Trac task. Whenever a user modifies a task in Trac,
the new data will be updated on Plastic GUI by pressing the Refresh button on
the Trac Extension pane.
Jira integration
This section describes the steps needed to setup Jira and Plastic SCM to work together.
Use the Previous (<) and Next (>) arrows to see the screenshots in Windows, Linux, and macOS.
Jira - Configuration
In this chapter, you will learn how to configure the Jira integration both in the server and in the client sides.
-
Plastic SCM will log the files and folders included in a changeset to their Jira issue. In order for feature to
work, the Jira administrator will need to create a custom field.
-
To create this custom field, go to the "Issues" tab on the "Administration" screen and click on the
"Custom fields" link inside the "Issue Fields" section on the left:

-
Click on "Add Custom Field".

-
It's time to setup the new field type. Select "Text Field (multi-line)", allowing for unlimited text sixe.
This is convenient since a task can affect many files and they need to be stored in this field. The log for
check in operations on Jira is done by Plastic SCM using this Custom Field:

-
Then, it's necessary to provide a name for the field. Any name will do, as Plastic will use the field Id and
not the name to refer to the field. "Plastic SCM" can be a descriptive name:

-
When Jira asks for the association of the field to screens, choose the "Default Screen":

The new field is empty by default and will not show up in the configured screens until it gets some content.
-
Jira assigns an internal id to the custom field. This Id will be used to configure the link between Plastic
SCM and Jira. It can be found in the URL, on the address bar of the screens page:

-
The field is now created and ready to be used:

-
The last step is to ensure that Jira's remote API is accessible by Plastic.
Important for Jira Cloud users
In Jira Cloud, the "Accept remote API calls" option comes enabled by default. So if you are a Jira Cloud
user, you can skip this step.
-
Click on the "General Configuration" link under "System" section.
-
Here, check that the "Accept remote API calls" option is enabled:

-
In case it's disabled, edit and enable it:

Once these steps have been fulfilled, the Jira server is ready to accept Plastic SCM integration.
Read how to configure the Jira integration on your Windows, Linux, or macOS system.
Follow these steps to configure the Jira extension on the Plastic SCM client on your Windows machine:
-
Click the Preferences tab of the main window of the Plastic SCM GUI.
-
In the new dialog, click the Issue trackers tab.
-
Click the radio button Bind to this issue tracking system.
-
Select the Atlassian Jira tracking system.
-
Now, select the repository you want to Apply binding to:
-
If you are working with the Global extension configuration,
then select the
plastic-global-config repository.
-
If you want to bind to all your repositories with the issue tracker, then select
Repositories.
-
If you want to bind to a particular repository with codeBeamer, then select that repository.

-
By default, the Bind issues to Plastic branches option is activated to work with the
Task on branch mode.
To work on the Task on changeset mode,
select the Bind issues to Plastic changesets option. This mode will allow the user
to select the task that the changes will be linked with at checkin time.
-
Now, you must configure the Jira parameters (URL where your Jira server is located at, credentials,
branch prefix, and so on) accordingly.
You can configure the Jira extension on the Plastic SCM client on your Linux or macOS machine by using one of
these methods:
-
Set a global extension configuration in the server. This way, all
the Plastic clients have the same Jira settings by default.
Or
-
Set a local Jira configuration. To do this:
-
Create the structure
issuetrackers/server_port/repository under
$HOME/.plastic4, where repository is one of the following values:
-
The name of the repository that you want to link to the issue tracker.
Or
-
allrepos, which means that all of your repositories will be linked to the issue tracker.
-
Copy the
jira.conf example configuration file into the new created path.
You can find this file at this location:
-
Window or Linux:
plasticscm_install_path/client/extensions/config_samples
-
macOS:
/Applications/PlasticSCM.app/Contents/IssueTrackerConfigSamples
Then, you'll have, for example, something like this:
- /home/pablo/.plastic4/issuetrackers/localhost_8087/info/jira.conf
Or
- /home/pablo/.plastic4/issuetrackers/localhost_8087/allrepos/jira.conf.
-
Edit the
jira.conf file:
-
Edit the
WorkingMode parameter to assign one of these values:
TaskOnBranch or TaskOnChangeset.
-
Configure the rest of the Jira extension parameters (URL where your Jira server is located at,
credentials, branch prefix, and so no) accordingly.
-
Edit your
client.conf file to add the following key:
<Extensions>
    <Extension AssemblyFile="plasticscm_install_path/client/extensions/jira/jiraextension.dll" />
</Extensions>
Jira - Characteristics
The working mode configured by default is the Task on branch mode, which works fine with the "branch per task" pattern. On this working mode, for each task to be done a new branch will be created.
In order to start working with Plastic SCM and Jira extension, the tasks must be created on the issue tracking system by clicking on the "Create issue" option and typing the data related to the new issue, such as name, associated project, summary, etc.

Jira will assign a number to the newly created issue, which will be the same number given to the Plastic branch when working on that task, in this case we create issue number 1.

Then the developer who has been assigned to that issue starts working on it. They will create a new branch using the Plastic SCM GUI client. There are two options to create a new branch linked to Jira:
- Manual: by entering the branch name. Note that the name of the new branch must match the number of the issue on Jira (number 1 in this case), preceded by the scm prefix, as configured on the Plastic SCM Jira extension.

- From task: by selecting an existing task from Jira.

By clicking on the Show extended information button () in the Branches view, the information associated to the branches will be displayed on the right panel of the Plastic GUI. By selecting a Plastic branch, the Jira issue information is displayed:

By double clicking on it or by pressing the Open issue in browser button (), a new browser window is opened showing the associated branch issue and will display the full information of the Jira task. When the user changes any field of the issue the new information will be shown by clicking on Refresh button of Jira Extension panel.
To configure Plastic SCM to work on the Task on changeset working mode, the user has to configure the Jira extension and select the Bind issues to Plastic changesets option, as explained before on the Client section.
The workflow will resemble something like this:
- Issues are created in Jira. When a developer starts working on one issue, then the issue is open.
- Changes are made on the code, thus checked out items that appear in Plastic.
- When the user decides to check in the changes, Plastic SCM will display a new dialog where the Jira issues can be linked with this new changeset:
- The user can link the changeset and the task by following one of these options:
-
Adding new issues - Click the Add new issue button to open a new dialog. Now, the user is able to choose one or more tasks to link to the changeset:
-
Entering comment hashtags - Enter a comment in the Checkin comments text box by starting the comment with the '#' character followed by the issue key (and optionally followed by a colon). This will log the checkin information in the related issue. For example, #PJI-2: Updated values.
Once the changeset has been linked to the issue(s) or task(s) in Jira, this information can be displayed in the Plastic SCM Changesets view. When the Extended information panel is visible (), by clicking in a changeset then shows the associated Jira issues:

The users can also add new tasks or delete previous ones from the Jira Extension information. Besides, by double clicking on each of the issues associated to a certain changeset or by clicking the Open issue in browser button (), a new browser window will be opened showing the Jira selected task. Whenever a user modifies an issue in the task tracking tool, the new data will be updated on Plastic GUI by pressing the Refresh button on the Jira Extension pane.
Besides the ability to display Jira data bound to branches or changesets inside Plastic SCM, the integration also keeps a record of the modified items inside Jira. When changes have been checked in and the integration is active, Jira will display the affected items in the "Plastic SCM" custom field, using either the Task on branch or Task on changeset working modes:

Jira - Multi-project configuration
Plastic SCM also allows Jira multi-project configurations. The idea is to let each branch explicitly contain the project key of its related task, instead of defining a global project key for all branches.
After the Jira server has been configured, it's time to configure the Plastic SCM client to work with a multi-project configuration.
To configure the Jira extension on the Plastic SCM client, click on the Preferences tab of the main window of the Plastic SCM GUI. A new dialog window will be opened. Click on the Issue tracking tab and select the radio button Bind to this issue tracking system and select Atlassian Jira.

Projects and tasks must be created on Jira:


Now it's time to create the Plastic SCM branches. Remember that we choose the "JIRA_" prefix to identify the branches related to the Jira tasks.
As we're working with multi-project configuration it's important to distinguish which branch is related to each project. As you can see in the picture below we use the following scheme to name the Plastic SCM branches: branchPrefix_projectShortName-taskID.
For example, the branch for the Jira task RI-1 will be JIRA_RI-1; and for our Jira project FG (Forms generator), will be JIRA_FG-1.

Field mapping
The Jira extension allows to map the fields from the Jira issue that will be displayed on the task information panel in the Branches or Changesets views in Plastic SCM.
To define the Jira field mapping functionality, the parameter Fields mapping must be configured. In order to do that, open the Jira extension configuration by clicking on the Preferences tab of the main window of the Plastic SCM GUI. Then press the Issue tracking tab. Scroll down the parameters list until the Fields mapping configuration parameter appears:

It stores field name pairs (from->to) separated by '|' (vertical bar) characters. The parameter syntax is:
[ jira_field_name -> plastic_property_name [ | jira_field_name -> plastic_property_name [ | ... ] ] ]
If you are working on a Linux or macOS system, remember to update the required field in the
jira.conf file.
For example, this is a valid configuration of Jira fields mapping:
issue.Fields.Project.Name->Description|issue.Fields.Reporter.Name->Owner|issue.Fields.Description->Title
In this case, these will be the values displayed on the extended information panel "Atlassian Jira extension": the displayed Description would contain the project key, the displayed Owner would be the Jira user who created the issue, and the displayed Title would be the Jira issue description.
The to attribute from the pair "from->to" describes the Plastic SCM field that the plastic_property_name refers to. This is the list of available Plastic SCM fields on the extended information panel:
- Id
- Owner
- Status
- Title
- Description

The from attribute describes the field in the Jira issue (jira_field_name) whose value will be read into the field to as described above. The list of available fields for the from attribute in the Jira extension are detailed in this table:
from field value |
Field data type |
| issue.Fields.Assignee.Name |
String |
| issue.Fields.AttachmentNames |
String[] |
| issue.Fields.ComponentNames |
String[] |
| issue.Fields.Created |
DateTime |
| issue.Fields.Description |
String |
| issue.Fields.DueDate |
DateTime |
| issue.Fields.Environment |
String |
| issue.Key |
String |
| issue.Fields.Priority.Name |
String |
| issue.Fields.Project.Name |
String |
| issue.Fields.Reporter.Name |
String |
| issue.Fields.Resolution |
String |
| issue.Fields.Status.Name |
String |
| issue.Fields.Summary |
String |
| issue.Fields.Issuetype.Name |
String |
| issue.Fields.Updated |
DateTime |
| issue.Fields.Votes.Number |
Long |
It's possible to access the value of custom Jira fields with the customFieldValues modifier, like in this sample mapping:
customFieldValues[10000]->Description
The index between [ ] is the custom field id that can be obtained from Jira as described in the previous sections. Only the custom field id number needs to be provided, in the sample 10000.

Status transition
The Jira issue tracker extension is able to change the status of the associated issue to a branch / changeset based on a changeset comment.
To do so, you can define your own keyword-status mappings. If the keyword is present on the changeset comment, the issue status will be changed to the defined status.
The format of the mappings is as follows:
KEY-VALUE|KEY-VALUE
For example:
[FIXED]-Ready for QA|[WONTFIX]-Done
The example above says that if your changeset includes in its comment the keyword [FIXED] (with the brackets), the issue status will change to Ready for QA.
This feature works binding issues to both branches and changesets.
Bear in mind that the transition between statuses must be allowed by your Jira workflow.
It is not necessary to have the Plastic SCM custom field ID set for this to work.
Read how to configure the status transition feature on your Windows, Linux, or macOS system.
-
Click the Preferences tab of the main window of the Plastic SCM GUI. Then, click the Issue trackers tab. And the Jira extension configuration opens.
-
Go to the Status transitions field and enter the needed pairs KEY-VALUE.
-
Open the
jira.conf file.
-
Add the following line and replace the text in the
Value parameter with the required pairs KEY-VALUE:
Name=Status transitions;Value=[FIXED]-Ready for QA|[WONTFIX]-Done;Type=Text;IsGlobal=True
Axosoft integration
If you want to want to use the Plastic SCM Axosoft integration, please follow the steps in this section.
This extension is compatible with Axosoft v14 and higher.
Use the Previous (<) and Next (>) arrows to see the screenshots in Windows, Linux, and macOS.
Axosoft - Configuration
In this chapter, you will learn how to configure the Axosoft integration both in the server and in the client sides.
To setup the Axosoft extension functionality, you will need to provide Plastic SCM the Axosoft server base URL.
Another two configuration parameters needed by the Plastic SCM client to configure the Axosoft integration are the client-id and client-secret parameters. To get these values, first go to the "System Options" option under the "Tools" menu:

In the "System Settings" window, click on the "Axosoft API Settings" tab. Under this view, check the "Enable API" checkbox and click on the "Manage API Keys" button.

In the new window, click on the "Add" button to obtain the two values that will be used to identify and authenticate the Plastic SCM integration with Axosoft. Type an "Application Name", copy the "Client ID" and "Client Secret" values, and click on the "Save" button:

Once your API key is saved, it's time to create a custom field to allow Plastic SCM log all the changes done in every checkin operation related to an Axosoft issue.
To allow this operation, a new custom field must be created in Axosoft. To do this, go to the "Tools" menu and select the "Custom Fields" option under the "Fields" submenu:

Under the "Bugs" tab in the new window, click on the "Add" button and then type Plastic SCM as the new custom field and select the "Large text" type:

Save the new custom field that will be used in the Plastic SCM client configuration in the next section.
For more information about Axosoft server configuration, please refer to the manuals included on the Axosoft installation or to the Axosoft website.
Read how to configure the Axosoft integration on your Windows, Linux, or macOS system.
Follow these steps to configure the Axosoft extension on the Plastic SCM client on your Windows machine:
-
Click the Preferences tab of the main window of the Plastic SCM GUI.
-
In the new window, click the Issue trackers tab.
-
Click the radio button Bind to this issue tracking system.
-
Select the Axosoft option.
-
Now, select the repository you want to Apply binding to:
-
If you are working with the Global extension configuration,
then select the
plastic-global-config repository.
-
If you want to bind to all your repositories with the issue tracker, then select
Repositories.
-
If you want to bind to a particular repository with codeBeamer, then select that repository.

-
By default, the Bind issues to Plastic branches option is activated to work on the
Task on branch mode.
To work on the Task on changeset mode,
select the Bind issues to Plastic changesets option.
-
Now, you must configure the Axosoft parameters (URL where your Axosoft server is located at, credentials,
branch prefix, and so on) accordingly:
You can configure the Axosoft extension on the Plastic SCM client on your Linux or macOS machine using one of
these methods:
-
Set a global extension configuration in the server. This way, all
the Plastic clients have the same Axosoft settings by default.
Or
-
Set a local Axosoft configuration. To do this:
-
Create the structure
issuetrackers/server_port/repository under
$HOME/.plastic4, where repository is one of the following values:
-
The name of the repository that you want to link to the issue tracker.
Or
-
allrepos, which means that all of your repositories will be linked to the issue tracker.
-
Copy the
ontime.conf example configuration file into the new created path.
You can find this file at this location:
-
Window or Linux:
plasticscm_install_path/client/extensions/config_samples
-
macOS:
/Applications/PlasticSCM.app/Contents/IssueTrackerConfigSamples
Then, you'll have, for example, something like this:
- /home/pablo/.plastic4/issuetrackers/localhost_8087/info/ontime.conf
Or
- /home/pablo/.plastic4/issuetrackers/localhost_8087/allrepos/ontime.conf.
-
Edit the
ontime.conf file:
-
Edit the
WorkingMode parameter to assign of these values:
TaskOnBranch or TaskOnChangeset.
-
Configure the cAxosoft parameters (URL where your Axosoft server is located at, credentials,
branch prefix, and so on) accordingly:
-
Edit your
client.conf file to add the following key:
<Extensions>
    <Extension AssemblyFile="plasticscm_install_path/client/extensions/ontime/ontimeextension.dll" />
</Extensions>
-
Axosoft Root URL: As explained before on the
Server topic, Plastic SCM Axosoft extension needs this
value to work.
-
User and Password: Each Plastic SCM user must have an Axosoft account and use the
Axosoft credentials to allow Plastic to connect with the Axosoft server.
-
Branch prefix: If Plastic SCM is configured to work with the
Task on branch mode, the user will be able to
configure several branch prefixes to bind them to several Axosoft objects. For example, if
the user enables the mapping between Axosoft Defects and Axosoft Tasks, branches whose name starts with
prefix def will be linked to Axosoft Defects, and branches whose name starts with prefix
task will be linked to Axosoft Tasks.
For example, branch name def021 will be linked to Axosoft defect DE21 and branch
name task021 will be linked to Axosoft task TA21. The rest of the objects have the
same behaviour.
-
Client ID and Client Secret: These fields must be filled with the tokens generated
from the Axosoft admin panel. See the Server topic for
more info.
-
Plastic SCM custom field: This parameter is the
custom field created on Axosoft and used for
logging the Plastic SCM check in information.
-
Pending status list: You can edit the list of statuses considered as "pending" (affecting the
list of tasks displayed on the Create Branch dialog) using this field by entering a comma-separated values
string.
Axosoft - Characteristics
The working mode configured by default is the Task on branch mode, which works fine with the "branch per task" pattern. On this working mode, for each task to be done a new branch will be created.
To start working with Plastic SCM and its Axosoft extension, the defects must be created on the issue tracking system. To do that, click on the "Add" menu and select the "Full Add" option, as the image below shows:

On the "Add Bug" window, information such as name of the new task, priority, status, engineer assigned, etc., must be filled. Once the new defect is saved, Axosoft will give it an identification number, which will be used by the assigned developer when creating the Plastic SCM branch to work on that task.

Then, the developer who has been assigned to that issue starts working on it creating a new branch through Plastic SCM GUI client. Note that the name of the new branch must match the configured branch prefix for Plastic SCM Axosoft extension (if it has been defined) followed by the issue number assigned by Axosoft to be linked.
By clicking on the Show extended information button () on the Branches view, the information associated to the branches will be displayed on the GUI's right hand side as the following screenshot shows. When selecting a branch the detailed information of the Axosoft defect will be shown: name, owner, status, title, and description.

By double clicking on it or by pressing the Open issue in browser button (), a new web browser window with the associated branch task is opened, and it'll display the full information of the Axosoft task. When the user changes the status or any other field of the issue, the new information will be shown by clicking on the Refresh button of the Axosoft Extension.
To configure Plastic SCM to work on the Task on changeset working mode, the user has to configure the Axosoft extension and select the Bind issues to Plastic changesets option, as explained before on the Client section.
The workflow will resemble something like this:
- Issues are created in Axosoft. When a developer starts working on one issue, then the issue is open.
- Changes are made on the code, thus checked out items that appear in Plastic.
- When the user decides to check in the changes, Plastic SCM will display a new dialog where the Axosoft issues can be linked with this new changeset:
- The user can link the changeset and the task by following one of these options:
-
Adding new issues - Click the Add new issue button to open a new dialog. Now, the user is able to choose one or more tasks to link to the changeset:
-
Entering comment hashtags - Enter a comment in the Checkin comments text box by starting the comment with the '#' character followed by the issue key (and optionally followed by a colon). This will log the checkin information in the related issue. For example, #def3: Included encode modes.
Once the changesets have been linked to the Axosoft defect or task, the extension information () will be shown on the Changesets view. Users can also add new tasks or delete previous ones through the Axosoft extension pane; and by double-clicking on each issue or by clicking the Open issue in browser button (), a web browser window with the associated Axosoft issue will be opened. Whenever a user modifies an issue in the task tracking tool, the new data will be updated on Plastic GUI by pressing the Refresh button on the Axosoft Extension pane.

Apart from showing information on the issues associated to the branches and changesets integrated with Plastic SCM, this extension logs in Axosoft every check in done with associated issues.
So users can see how each check in operation has been registered on the Axosoft task:

VersionOne integration
This section describes the steps to use the VersionOne integration with Plastic SCM.
This extension is compatible with VersionOne version 7.2 and following ones.
Use the Previous (<) and Next (>) arrows to see the screenshots in Windows, Linux, and macOS.
VersionOne - Configuration
In this chapter, you will learn how to configure the VersionOne integration both in the server and in the client sides.
It is not necessary to make any changes at the server-side for the Plastic SCM VersionOne extension configuration.
Read how to configure the VersionOne integration on your Windows, Linux, or macOS system.
To configure the VersionOne extension on the Plastic SCM client on your Windows machine:
-
Click the Preferences tab of the main window of the Plastic SCM GUI.
-
In the new window, click the Issue trackers tab.
-
Click the radio button Bind to this issue tracking system.
-
Select the VersionOne tracking system.
-
Now, select the repository you want to Apply binding to:
-
If you are working with the Global extension configuration,
then select the
plastic-global-config repository.
-
If you want to bind to all your repositories with the issue tracker, then select
Repositories.
-
If you want to bind to a particular repository with codeBeamer, then select that repository.

-
By default, the Bind issues to Plastic branches option is activated to work with the
Task on branch mode.
To work on the Task on changeset mode, select
the Bind issues to Plastic changesets option. In this case, all the VersionOne objects
will be enabled to map them to a Plastic changeset.
-
Now, you must configure the VersionOne parameters (URL where your VersionOne server is located at, credentials,
branch prefix, and so on) accordingly.
You can configure the VersionOne extension on the Plastic SCM client on your Linux or macOS machine using one of these methods:
-
Set a global extension configuration in the server. This way, all the
Plastic clients have the same VersionOne settings by default.
Or
-
Set a local VersionOne configuration. To do this:
-
Create the structure
issuetrackers/server_port/repository under
$HOME/.plastic4, where repository is one of the following values:
-
The name of the repository that you want to link to the issue tracker.
Or
-
allrepos, which means that all of your repositories will be linked to the issue tracker.
-
Copy the
versionone.conf example configuration file into the new created path.
You can find this file at this location:
-
Window or Linux:
plasticscm_install_path/client/extensions/config_samples
-
macOS:
/Applications/PlasticSCM.app/Contents/IssueTrackerConfigSamples
Then, you'll have, for example, something like this:
- /home/pablo/.plastic4/issuetrackers/localhost_8087/info/versionone.conf
Or
- /home/pablo/.plastic4/issuetrackers/localhost_8087/allrepos/versionone.conf.
-
Edit the
versionone.conf file:
-
Edit the
WorkingMode
parameter to assign one of these values: TaskOnBranch or TaskOnChangeset.
-
Configure the rest of the VersionOne extension parameters (URL where your VersionOne server is located at,
credentials, branch prefix, and so on) accordingly.
-
Edit your
client.conf file to add the following key:
<Extensions>
    <Extension AssemblyFile="plasticscm_install_path/client/extensions/versionone/versiononeextension.dll" />
</Extensions>
VersionOne - Characteristics
The working mode by default is Task on branch, used for the "branch per task" pattern, on which for each task a new branch will be created.
To start working with Plastic SCM and its VersionOne extension, the first step is create the tasks in VersionOne. This would be usually done by the Project Manager, by clicking on the "Add Defect", "Add Issue", "Add backlog Item" and "Add Request" shortcuts on the VersionOne web interface. A new dialog window will be opened to enter the data of the new task. VersionOne assigns numbers to tasks starting on 1000 and up. This is very important to remark, because branch names have to contain the configured prefix for that type of task and the assigned number by VersionOne.

Once the issue is created, VersionOne assigns it a number. In the following figure, we can see a list of items created:

Then, the developer assigned to a task starts working on it. They must create a new branch (as simple as right clicking on the parent branch and select the Create child branch option), as the following image shows, and, in order to link it to the task in VersionOne, the branch must be given the same number (remember: this number always would be upper than 1000):

Now the user can check the information of the issues just by going to the extended information () on the branch view and selecting the branch. Then, a new pane displays on the right-side of the view from which the VersionOne extension information is shown: task number, owner, status, etc.

Performing a double click on the task associated with a branch or clicking on the Open issue in browser button (), a new web browser window opens. When a user changes the status or any other field of the issue, the new information will appear by refreshing VersionOne extension.
To configure Plastic SCM to work on the Task on changeset working mode, the user must configure the VersionOne extension and select the Bind issues to Plastic Changesets option, as explained before on the Client section.
The workflow will resemble something like this:
- Issues are created in VersionOne. When a developer starts working on one issue, then the issue is open.
- Changes are made on the code, thus checked out items that appear in Plastic.
- When the user decides to check in the changes, Plastic SCM will display a new dialog where the VersionOne defects/tasks/tests/stories can be linked with this new changeset:
- The user can link the changeset and the VersionOne issues by following one of these options:
-
Adding new issues - Click the Add new issue button to open a new dialog. Now, the user is able to choose one or more tasks to link to the changeset:
-
Entering comment hashtags - Enter a comment in the Checkin comments text box by starting the comment with the '#' character followed by the issue key (and optionally followed by a colon). This will log the checkin information in the related issue. For example, #D-01002: Added search feature.
Once the changeset have been linked to VersionOne tasks, the extension information () appears on the Changesets view. From the VersionOne extension information, the users can also add new tasks or delete previous ones. And by double-clicking on each of the issues associated to a certain changeset or by clicking on the Open issue in browser button (), a browser with VersionOne opens. Whenever a user modifies an issue in VersionOne by refreshing the VersionOne Extension information, it will be shown in Plastic SCM.

FogBugz integration
This section describes the steps to follow in order to use FogBugz integration with Plastic SCM.
This extension is compatible with FogBugz version 7.2 and following.
Use the Previous (<) and Next (>) arrows to see the screenshots in Windows, Linux, and macOS.
FogBugz - Configuration
Learn how to configure the FogBugz integration both in the server and in the client sides.
It is not necessary to make any changes on the server side for Plastic SCM FogBugz extension.
Read how to configure the FogBugz integration on your Windows, Linux, or macOS system.
Follow these steps to configure the FogBugz extension on the Plastic SCM client on your Windows machine:
-
Click the Preferences tab of the main window of the Plastic SCM GUI.
-
In the new window, click the Issue trackers tab.
-
Click the radio button Bind to this issue tracking system.
-
Select the FogBugz tracking system.
-
Now, select the repository you want to Apply binding to:
-
If you are working with the
Global extension configuration, then select
the
plastic-global-config repository.
-
If you want to bind to all your repositories with the issue tracker, then select
Repositories.
-
If you want to bind to a particular repository with codeBeamer, then select that repository.

-
By default, the Bind issues to Plastic branches option is activated to work with the
Task on branch mode.
To work on the Task on changeset mode, select
the Bind issues to Plastic changesets option.
-
Now, you must configure the FogBugz parameters (URL where your FogBugz server is located at, credentials,
branch prefix, and so on) accordingly.
You can configure the FogBugz extension on the Plastic SCM client on your Linux or macOS machine using one of these methods:
-
Set a global extension configuration in the server. This way, all the
Plastic clients have the same FogBugz settings by default.
Or
-
Set a local FogBugz configuration. To do this:
-
Create the structure
issuetrackers/server_port/repository under
$HOME/.plastic4, where repository is one of the following values:
-
The name of the repository that you want to link to the issue tracker.
Or
-
allrepos, which means that all of your repositories will be linked to the issue tracker.
-
Copy the
fogbugz.conf example configuration file into the new created path.
You can find this file at this location:
-
Window or Linux:
plasticscm_install_path/client/extensions/config_samples
-
macOS:
/Applications/PlasticSCM.app/Contents/IssueTrackerConfigSamples
Then, you'll have, for example, something like this:
- /home/pablo/.plastic4/issuetrackers/localhost_8087/info/fogbugz.conf
Or
- /home/pablo/.plastic4/issuetrackers/localhost_8087/allrepos/fogbugz.conf.
-
Edit the
fogbugz.conf file:
-
Edit the
WorkingMode
parameter to assign one of these values: TaskOnBranch or TaskOnChangeset.
-
Configure the rest of the FogBugz parameters (URL where your FogBugz server is located at, credentials,
branch prefix, and so on) accordingly.
-
Edit your
client.conf file to add the following key:
<Extensions>
    <Extension AssemblyFile="plasticscm_install_path/client/extensions/fogbugz/fogbugzextension.dll" />
</Extensions>
-
FogBugz URL: Specifies the URL where the FogBugz server is installed and running.
-
User name and Password: These fields must be filled with a valid FogBugz user.
-
Branch prefix: If you are going to work on the
Task on branch mode, specifying a
Branch prefix is recommended (but not mandatory). This branch prefix will be used to bind the Plastic
branches to the FogBugz tasks.
For example, if you enter the scm prefix, then all branchs whose name starts with prefix
scm will be linked to the FogBugz issues.
-
Enable checkin log: This option allows FogBugz to
record all the check in operations executed in Plastic SCM.
FogBugz - Characteristics
The working mode configured by default is Task on branch, used for the "branch per task" pattern, on which for each task a new branch will be created.
To start working with Plastic SCM and its FogBugz extension, the tasks must be created on your project on
FogBugz. This would be usually done by the Project Manager, by clicking on the "New Case" option. A new dialog window will be opened to type the data of the new task.

Once the issue is created, FogBugz assigns it a number. Then the developer assigned to that task starts working on it.
They will created a new branch (as simple as right clicking on the parent branch and select the Create child branch option), as the image below shows. In order to link the branch to the task in FogBugz, the branch name must match the configured branch prefix (if it has been defined) and the same task number.

Now the user can check the information of the issues just by going to the extended information () on the Branches view and selecting the branch. A new pane displays on the right side of the view from which the FogBugz extension information is shown: task number, owner, etc.

By double-clicking on it or by clicking on the Open issue in browser button (), a new web browser window opens. It will display the full information of the FogBugz task. When the user changes the status or any other field of the issue, the new information will be shown by clicking on Refresh button of the FogBugz Extension.
To configure Plastic SCM to work on the Task on changeset working mode, the user has to configure the FogBugz extension and select the Bind issues to Plastic Changesets option, as explained before on the Client section.
The workflow will resemble something like this:
- Issues are created in FogBugz. When a developer starts working on one issue, then the issue is open.
- Changes are made on the code, thus checked out items that appear in Plastic.
- When the user decides to check in the changes, Plastic SCM will display a new dialog where the FogBugz tasks can be linked with this new changeset:
- The user can link the changeset and the FogBugz issues by following one of these options:
-
Adding new issues - Click the Add new issue button to open a new dialog. Now, the user is able to choose one or more issues to link to the changeset:
-
Entering comment hashtags - Enter a comment in the Checkin comments text box by starting the comment with the '#' character followed by the issue key (and optionally followed by a colon). This will log the checkin information in the related issue. For example, #4: Fixed login.
Once the changesets have been linked to the issue or task in FogBugz, the extension information () will be shown on the Changesets view. From the FogBugz extension information users can also add new tasks or delete previous ones. And by double-clicking on each of the issues associated to a certain changeset or by clicking on the Open issue in browser button (), a browser with FogBugz will be opened. Whenever a user modifies an issue in FogBugz, by refreshing the FogBugz Extension information, it will be shown in Plastic.

Besides showing information on the issues associated to the branches and changesets integrated with Plastic SCM, this extension logs in FogBugz every check in done with associated issues only if the Enable checkin log checkbox has been marked on the Client section.
So users can see how each check in operation has been registered on the FogBugz task by clicking on the "Checkins - Click to list" link:

Rally integration
This section describes the steps to follow in order to use the Plastic SCM Rally Software Development integration.
Use the Previous (<) and Next (>) arrows to see the screenshots in Windows, Linux, and macOS.
Rally - Configuration
In this chapter, you will learn how to configure the Rally integration both in the server and in the client sides.
To setup the Rally extension functionality, a valid Rally account is needed. There is neither to be done on the server side nor local setup because Rally is a Web based service, all the actions against Rally are done via Internet.
Read how to configure the Rally integration on your Windows, Linux, or macOS system.
Follow these steps to configure the Rally extension on the Plastic SCM client on your Windows machine:
-
Click the Preferences tab of the main window of the Plastic SCM GUI.
-
In the new window, click the Issue trackers tab.
-
Click the radio button Bind to this issue tracking system.
-
Select the Rally tracking system.
-
Now, select the repository you want to Apply binding to:
-
If you are working with the
Global extension configuration, then select
the
plastic-global-config repository.
-
If you want to bind to all your repositories with the issue tracker, then select
Repositories.
-
If you want to bind to a particular repository with codeBeamer, then select that repository.

-
By default, the Bind issues to Plastic branches option is activated to work with the
Task on branch mode.
To work on the Task on Changeset mode, select
the Bind issues to Plastic changesets option. In this case, all the Rally objects will be
enabled to map them to a Plastic changeset.
-
Now, you must configure the Rally parameters (URL where your Rally server is located at, credentials,
branch prefix, and so on) accordingly.
You can configure the Rally extension on the Plastic SCM client on your Linux or macOS machine using one of these methods:
- Set a global extension configuration in the server. This way all the Plastic clients have the same Rally settings by default.
Or
-
Set a local Rally configuration. To do this:
-
Create the structure
issuetrackers/server_port/repository under
$HOME/.plastic4, where repository is one of the following values:
-
The name of the repository that you want to link to the issue tracker.
Or
-
allrepos, which means that all of your repositories will be linked to the issue tracker.
-
Copy the
rally.conf example configuration file into the new created path.
You can find this file at this location:
-
Window or Linux:
plasticscm_install_path/client/extensions/config_samples
-
macOS:
/Applications/PlasticSCM.app/Contents/IssueTrackerConfigSamples
Then, you'll have, for example, something like this:
- /home/pablo/.plastic4/issuetrackers/localhost_8087/info/rally.conf
Or
- /home/pablo/.plastic4/issuetrackers/localhost_8087/allrepos/rally.conf.
-
Edit the
rally.conf file:
-
Edit the
WorkingMode
parameter to assign one of these values: TaskOnBranch or TaskOnChangeset.
-
Configure the rest of the Rally parameters (URL where your Rally server is located at, credentials,
branch prefix, and so on) accordingly.
-
Edit your
client.conf file to add the following key:
<Extensions>
    <Extension AssemblyFile="plasticscm_install_path/client/extensions/rally/rally.dll" />
</Extensions>
-
Rally URL: Specifies the URL where the Rally server is running.
-
User name and Password: These fields must be filled with a valid
Rally user for the configured Rally Server.
-
Task prefix, Defect prefix, Test case prefix, and
User story prefix: These are the available Rally objects to be linked to Plastic SCM.
If Plastic SCM is configured to work with the
Task on branch mode, the user will be able to
configure several branch prefixes to bind them to several Rally objects. For example, if the user enables the
mapping to Rally Defects and Rally Tasks, branches whose name starts with prefix def will be linked
to Rally Defects, and branches whose name starts with prefix task will be linked to Rally Tasks.
Let's see an example. The branch name def021 will be linked to Rally Defect DE21 and the
branch name task021 will be linked to Rally Task TA21.
The rest of the objects have the same behaviour.
Rally - Characteristics
In order to use this working mode, the first step would be setting it up on Plastic SCM Rally extension, following the indications from the previous section, or leaving the configuration by default which applies to this mode.
To start working with Plastic SCM and its Rally extension the objects on Rally must be created.
Defects can be created through its own tab by clicking on the "New defect" action. The same for the rest of the Rally objects, such as "Tasks", "Test Cases" and "User Stories".

On the "Create Defect" window, information such as name of the new task, priority, state, etc must be included. Once the new defect is saved, Rally will give it an identification string, which will be later used by the assigned developer when creating the Plastic branch to work on that task. The prefix ID will depend on the object type. For instance if user creates a new task, the ID could be TA4 or DE4 in case of a defect.
By clicking on the Show extended information button (), the information associated to the branches will be displayed on the GUI's right hand side as the following screenshot shows. Selecting a branch the detailed information of the Rally object will be shown:

By double clicking on it or by clicking on the Open issue in browser button (), a web browser window with the associated branch task is opened. Whenever the user finishes the task and changes its status or any other field, in order to view the new values, the user will only have to refresh it on the Plastic branch extended information.
To configure Plastic SCM to work on the Task on changeset working mode, the user has to configure the Rally extension and select the Bind issues to Plastic Changesets option, as explained before on the Client section.
The workflow will resemble something like this:
- Issues are created in Rally. When a developer starts working on one issue, then the issue is open.
- Changes are made on the code, thus checked out items that appear in Plastic.
- When the user decides to check in the changes, Plastic SCM will display a new dialog where the Rally tasks can be linked with this new changeset:
- The user can link the changeset and the task by following one of these options:
-
Adding new issues - Click the Add new issue button to open a new dialog. Now, the user is able to choose one or more Rally objects to link to the changeset:
-
Entering comment hashtags - Enter a comment in the Checkin comments text box by starting the comment with the '#' character followed by the issue key (and optionally followed by a colon). This will log the checkin information in the related issue. For example, #DE5: Created report folder.
Once the changeset has been linked to the Rally object, its information will be shown from the Changesets view, and users can also add new links to Rally objects or delete previous ones. And by double-clicking on each issue or by clicking on the Open issue in browser button (), a web browser window with the associated object in Rally will be opened. Whenever a user modifies a defect, task, test case or user story from the issue tracking tool, their changes will be loaded by clicking the Refresh button of Rally Extension.

Polarion integration
This section describes the steps to follow in order to use the Plastic SCM Polarion Software Development integration.
Use the Previous (<) and Next (>) arrows to see the screenshots in Windows, Linux, and macOS.
Polarion - Configuration
Learn how to configure the Polarion integration both in the server and in the client sides.
To setup the Polarion extension functionality some tasks have been performed:
-
Include the Plastic SCM plugin into Polarion. To do this, follow these steps:
-
Stop the Polarion service.
-
Copy the directory
com.codicesoftware.platform.repository.external.plasticscm
from the client/polarion folder at the Plastic SCM installation directory to the
Polarion extensions folder at [Polarion installation]/polarion/extensions.
This plugin is needed for the issue tracker extension to work properly into Plastic SCM.
And this is so because it allows to link Plastic SCM revisions (changesets) to Polarion workitems by linking
a revision to a workitem manually, or by linking a workitem via checkin comment.
-
Start the Polarion server again.
-
Then, a Plastic SCM repository must be created on the Polarion server side:
-
Go to the Administration option in Polarion:

-
Then click on the Repositories section.
-
A Plastic SCM repository is needed. So click on the "Add New Repository" button:

-
In the repository configuration window, enter the information needed to create the new Plastic repository in
Polarion, where:

-
Once the information is added then click on the "Save" button.
Read how to configure the Polarion integration on your Windows, Linux, or macOS system.
Follow these steps to configure the Polarion extension on the Plastic SCM client on your Windows machine:
-
Click the Preferences tab of the main window of the Plastic SCM GUI.
-
In the new window, click the Issue trackers tab.
-
Click the radio button Bind to this issue tracking system.
-
Select the Polarion tracking system.
-
Now, select the repository you want to Apply binding to:
-
If you are working with the
Global extension configuration, then select the
plastic-global-config repository.
-
If you want to bind to all your repositories with the issue tracker, then select
Repositories.
-
If you want to bind to a particular repository with codeBeamer, then select that repository.

-
By default, the Bind issues to Plastic branches option is activated to work with the
Task on branch mode.
To work on the Task on changeset mode,
select the Bind issues to Plastic changesets option.
-
Now, you must configure the Polarion parameters (URL where your Polarion server is located at, credentials,
branch prefix, and so on) accordingly.
You can configure the Polarion extension on the Plastic SCM client on your Linux or macOS machine using one of these methods:
- Set a global extension configuration in the server. This way all the Plastic clients have the same Polarion settings by default.
Or
-
Set a local Polarion configuration. To do this:
-
Create the structure
issuetrackers/server_port/repository under
$HOME/.plastic4, where repository is one of the following values:
-
The name of the repository that you want to link to the issue tracker.
Or
-
allrepos, which means that all of your repositories will be linked to the issue tracker.
-
Copy the
polarion.conf example configuration file into the new created path.
You can find this file at this location:
-
Window or Linux:
plasticscm_install_path/client/extensions/config_samples
-
macOS:
/Applications/PlasticSCM.app/Contents/IssueTrackerConfigSamples
Then, you'll have, for example, something like this:
- /home/pablo/.plastic4/issuetrackers/localhost_8087/info/polarion.conf
Or
- /home/pablo/.plastic4/issuetrackers/localhost_8087/allrepos/polarion.conf.
-
Edit the
polarion.conf file:
-
Edit the
WorkingMode
parameter to assign one of these values: TaskOnBranch or TaskOnChangeset.
-
Configure the rest of the Polarion extension parameters (URL where your Polarion server is located
at, credentials, branch prefix, and so on) accordingly.
-
Edit your
client.conf file to add the following key:
<Extensions>
    <Extension AssemblyFile="plasticscm_install_path/client/extensions/polarion/polarionextension.dll" />
</Extensions>
-
Polarion Base URL: Specifies the URL where the Polarion server is installed and running.
-
User name and Password: These fields must be filled with a valid Polarion user.
-
Branch prefix: If you are going to work on the
Task on branch mode, specifying this
parameter is recommended (but not mandatory). This branch prefix will be used to bind the Plastic branches to the
Polarion tasks.
For example, if you enter the scmprefix, then all branches whose name starts with prefix
scm will be linked to Polarion issues.
-
Work Item Statuses: These are the work item types that will be displayed on the "Pending tasks" list
when a new branch is created using the
From task mode. These values will be checked
too when linking new revisions using the
Task on changeset mode.
These statuses must be separated using the vertical bar ("|") char.
-
Open Work Item Status: This is the new status that the Polarion task will have if the user creates a
new branch using the From task mode and also
checks the Mark as open in issue tracker option.
-
Repository ID: This parameter is the same "ID"
field configured in the Polarion server side.
-
Default Repository: This field indicates if the selected repository is the default one. If you don't
select it, then you will have support for multiple repositories.
Polarion - Characteristics
The working mode configured by default is the Task on branch mode, which works fine with the "branch per task" pattern. On this working mode, for each task to be done a new branch will be created.
In order to start working with Plastic SCM and Polarion extension, the tasks must be created on the issue tracking system by creating a new work item associated to a Polarion project:

Type the data related to the new task, such as name, description, priority... and click on the "Create" button:

Polarion will assign a number to the newly created task, which will be the same number given to the Plastic branch when working on that task:

Then the developer who has been assigned to that issue starts working on it. He will create a new branch using the Plastic SCM GUI client. There are two options to create a new branch linked to Polarion:
By clicking on the Show extended information button () in the Branches view the information associated to the branches will be displayed on the right panel of the Plastic GUI. By selecting a branch the Polarion issue information is displayed in Plastic SCM:

By double clicking on it or by pressing the Open issue in browser button () a new browser window is opened showing the associated branch issue and will display the full information of the Polarion task.
If the user changes any value of the work item in Polarion then the new information will be shown in Plastic by clicking on Refresh button of the Polarion Extension panel.
To configure Plastic SCM to work on the Task on changeset working mode, the user has to configure the Polarion extension and select the Bind issues to Plastic changesets option, as explained before on the Client configuration section.
The workflow will resemble something like this:
- Tasks are created in Polarion. When a developer starts working on one issue, then the issue is open.
- Changes are made on the code, thus checked out items that appear in Plastic.
- When the user decides to check in the changes, Plastic SCM will display a new dialog where the Polarion tasks can be linked with this new changeset:
- The user can link the changeset and the Polarion work items by following one of these options:
-
Adding new issues - Click the Add new issue button to open a new dialog. Now, the user is able to choose one or more tasks to link to the changeset:
-
Entering comment hashtags - Enter a comment in the Checkin comments text box by starting the comment with the '#' character followed by the issue key (and optionally followed by a colon). This will log the checkin information in the related issue. For example, #IP-83: Fixed error when searching by name.
In the following example, two Polarion work items are linked to the change that is going to be checked in:

The Polarion extension will check the status of the work item to be linked. Only the Polarion work items whose status is defined in the Work item statuses field in the client configuration will be allowed to be linked. As you've seen before the work item statuses configured are draft and open. So any other status won't be allowed:
Note: This check currently works if you link the Polarion work items by using the Add new issue button. We will soon include the same behaviour when linking the work items by entering the comment hashtags.

Once the changeset has been linked to the work items in Polarion, the information can be displayed in the Plastic SCM Changesets view. When the Extended information panel () is visible, by clicking in a changeset shows the associated Polarion work items.

The users can also add new tasks or delete previous ones from the Polarion Extension information. Besides, by double clicking on each of the issues associated to a certain changeset, a new browser window will be opened showing the Polarion selected work item. Whenever a user modifies an issue in the task tracking tool, the new data will be updated on Plastic GUI by pressing the Refresh button on the Polarion Extension pane.
The Plastic SCM Polarion integration supports distributed scenarios: the linked revisions will use the changeset GUID instead of the changeset ID (integer number).
However, the changeset info (such as changeset comment) won't be available until the changeset is replicated to the configured Plastic SCM server in Polarion.
Remarks:
- The Plastic SCM Polarion extension (client side) and the Polarion Plastic SCM extension (server side) should be updated at the same time.
- This update is backwards compatible, so all the linked revisions already added to Polarion using the changeset id will still be browsable.
As you've seen you are able to get in Plastic all the Polarion work items information through their related branches or changesets. And you can also get in the Polarion side all the information related to the revisions created in Plastic. This way the Polarion integration keeps a record of the modified items: When changes have been checked-in in Plastic and the integration is active, Polarion will display the affected items in the "Linked revisions" section, using either the Task on branch mode:

or the Task on changeset working mode:

When the Plastic revision is correctly linked to Polarion you'll see that the icon revision includes a green bullet: 
codeBeamer integration
If you want to want to use the Plastic SCM codeBeamer integration, please follow the steps in this section.
codeBeamer - Configuration
Learn how to configure the codeBeamer integration both in the
server and in the
client sides.
It is not necessary to make any changes at the server-side for the Plastic SCM codeBeamer extension configuration.
But if you want to add a secret token of the webhook to codeBeamer configuration, please follow these steps:
-
Go to codeBeamer's "System Admin" page.
-
Go to "Application Configuration".
-
Add
"scc" node if it doesn't exist in your json (json root level).
-
Add
"plasticscm" node if it doesn't exist in your json under "scc" node.
-
Add
"secretToken" : "<secret_token_of_the_webhook>" under "plasticscm"
node.

Read how to configure the codeBeamer integration on your
Windows,
Linux, or macOS system.
Follow these steps to configure the codeBeamer extension on the Plastic SCM client on your Windows machine:
-
Click the Preferences tab of the main window of the Plastic SCM GUI.
-
In the new window, click the Issue trackers tab.
-
Click the radio button Bind to this issue tracking system.
-
Select the codeBeamer tracking system.
-
Now, select the repository you want to Apply binding to:
-
If you are working with the
Global extension configuration, then select the
plastic-global-config repository.
-
If you want to bind to all your repositories with the issue tracker, then select
Repositories.
-
If you want to bind to a particular repository with codeBeamer, then select that repository.

-
By default, the Bind issues to Plastic branches option is activated to work with the
Task on branch mode.
To work on the Task on changeset mode,
select the Bind issues to Plastic changesets option.
-
Now, you must configure the codeBeamer parameters (URL where your codeBeamer server is located at, credentials,
branch prefix, and so on) accordingly.
You can configure the codeBeamer extension on the Plastic SCM client on your Linux or macOS machine by using one of
these methods:
-
Set a global extension configuration in the server. This way, all the
Plastic clients have the same codeBeamer settings by default.
Or
-
Set a local codeBeamer configuration. To do this:
-
Create the structure
issuetrackers/server_port/repository under
$HOME/.plastic4, where repository is one of the following values:
-
The name of the repository that you want to link to the issue tracker.
Or
-
allrepos, which means that all of your repositories will be linked to the issue tracker.
-
Copy the
codebeamer.conf example configuration file into the new created path.
You can find this file at this location:
-
Window or Linux:
plasticscm_install_path/client/extensions/config_samples
-
macOS:
/Applications/PlasticSCM.app/Contents/IssueTrackerConfigSamples
Then, you'll have, for example, something like this:
- /home/pablo/.plastic4/issuetrackers/localhost_8087/info/codebeamer.conf
Or
- /home/pablo/.plastic4/issuetrackers/localhost_8087/allrepos/codebeamer.conf.
-
Edit the
codebeamer.conf file:
-
Edit the
WorkingMode
parameter to assign one of these values: TaskOnBranch or TaskOnChangeset.
-
Configure the rest of the codeBeamer extension parameters (URL where your codeBeamer server is located
at, credentials, branch prefix, and so on) accordingly.
-
Edit your
client.conf file to add the following key:
<Extensions>
    <Extension AssemblyFile="plasticscm_install_path/client/extensions/codebeamer/codebeamerextension.dll" />
</Extensions>
-
codeBeamer URL: Specifies the URL where the codeBeamer server is installed and running.
-
User name and Password: These fields must be filled with a valid codeBeamer user.
-
Branch prefix: If you are going to work on the
Task on branch
mode, specifying this parameter is recommended (but not mandatory). This branch prefix will be used to bind the
Plastic branches to the codeBeamer tasks.
For example, if you enter the scm prefix, then all branches whose name starts with prefix
scm will be linked to the codeBeamer issues.
-
Enable SCM log: Enable this checkbox if your codeBeamer version supports External SCM integrations.
-
Secret token: Enter the secret token value if it's configured in your
codeBeamer server.
codeBeamer - Characteristics
Use the Previous (<) and Next (>) arrows to see the screenshots in Windows, Linux and mac OS.
The working mode configured by default is the Task on branch mode, which works fine with the
"branch per task" pattern. On this working mode, for each task to be done a new branch will be created.
To start working with Plastic SCM and its codeBeamer extension, the tasks must be created on your project on
codeBeamer:

Once the new task is saved, codeBeamer gives this task an identification number. This number will be used by the
assigned developer when creating the Plastic SCM branch to work on that task:

Then, the developer assigned to that task starts working on it. They will create a new branch using the Plastic SCM
GUI client. There are two options for creating a new branch linked to codeBeamer:
-
Manual: by entering the branch name. Note that the name of the new branch must match the number
of the task on codeBeamer (number 1129 in this case), preceded by the branch prefix
(scm in this case) prefix as configured on the
Plastic SCM codeBeamer extension:
-
From task: by selecting an existing task from codeBeamer:
By clicking the Show extended information button (
) in the Branches view, the information associated to the branches displays on the right panel of
the Plastic GUI. By selecting a Plastic branch, the codeBeamer task information displays:

By double clicking the task or by pressing the Open issue in browser button (
), a new web browser window opens showing the full information of the related codeBeamer task. When the user
changes any field of the task, the new information will be shown by clicking the
Refresh button of codeBeamer Extension panel.
To configure Plastic SCM to work on the Task on changeset working mode, the user must select the
Bind issues to Plastic changesets option when configuring the codeBeamer extension, as
explained before on the Client section.
The workflow will resemble something like this:
- Task are created in codeBeamer. When a developer starts working on a task, then the task is open.
- Changes are made on the code, thus checked out items that appear in Plastic.
-
When the user decides to checkin the changes, Plastic SCM displays a new dialog where the codeBeamer tasks can be
linked with this new changeset:
-
The user then links the changeset and the task by following one of these options:
-
Adding new issues - Click the Add new issue button to open a new dialog. Now, the
user is able to choose one or more tasks to link to the changeset:
-
Entering comment hashtags - Enter a comment in the Checkin comments text box by
starting the comment with the '#' character followed by the issue key (and optionally followed by a colon).
This will log the checkin information in the related issue. For example,
#1129: Added the new structure to define waypoints.

Once the changeset is linked to the task(s) in codeBeamer, this information can be displayed in the Plastic SCM
Changesets view. When the Extended information panel is visible (
), if you click a changeset then Plastic shows the associated codeBeamer tasks:

The users can also add new tasks or delete previous ones from the codeBeamer Extension pane. Besides, by
double clicking each task associated to a certain changeset or by clicking the
Open issue in browser button (
), a new web browser window opens and shows the selected codeBeamer task. Whenever a user modifies a task in
codeBeamer, the new data will be updated on Plastic GUI by pressing the Refresh button on
the codeBeamer Extension pane.
Besides showing information about the issues associated to the branches and the changesets integrated with Plastic
SCM, this extension logs in codeBeamer every checkin linked to the issues.
If you are working with a codeBeamer version minor than 10.0, then set the
Enable SCM log parameter
as
FALSE when configuring the codeBeamer extension on the
Client side.
This way, you can see how each checkin operation is registered on codeBeamer:

Global extension configuration
It's possible to set a global configuration in the server so that all clients have the same settings by default. This is useful to set default global parameters like connection strings and let the users specify their particular credentials.
Once the global configuration is created at the server side, the server configuration will be downloaded at the client side when the Plastic GUI starts.
Use the Previous (<) and Next (>) arrows to see the screenshots in Windows, Linux, and macOS.
Creating the global repository configuration
To set up the global configuration in the server, create a repository named plastic-global-config. This repository will have a well defined structure with the configuration file(s) for the issue tracker extension(s) that will be applied to the repositories and used by the Plastic users.
The plastic-global-config repository will have the following structure:
- Global configuration for a specific repository:
/repname/issuetrackers/extension_configuration_file.conf.
For example, /doomsrc/issuetrackers/jira.conf.
- Global configuration for all the repositories:
/allrepos/issuetrackers/extension_configuration_file.conf.
For example, /allrepos/issuetrackers/bugzilla.conf.
Note: For submodules, you should use the '-' char instead of '/': /myrepo-mysubrepo/issuetrackers/extension_configuration_file.conf
For example, /plugins-3dplugin/issuetrackers/jira.conf, where plugins is the main repo and 3dplugin is the submodule.
The plastic-global-config repository can be configured with more than one issue tracking systems. The Plastic client will load first the specific configuration for the repository the user is working on. If the specific configuration doesn't exist, then the allrepos configuration will be loaded.
To set up the global extension configuration, the first step is to create the plastic-global-config repository in the server (if it doesn't exist yet because it was created to set up the global file configuration):

Then, the repository must have the needed structure as you've seen previously. In the following example the repository vb44 will be linked to Bugzilla and the rest of the repositories will be linked to Jira:
Use the Previous (<) and Next (>) arrows to see the example in Windows, Linux, and macOS.
Note: The issue trackers configuration example files are included in the plasticscm_install_path/client/extensions/config_samples folder. You must include and update the parameters you need.
When the client GUI starts, each server configuration is downloaded in a hidden workspace which will be created automatically in the user local directory (in the plastic4 directory (under $HOME/.plastic4 on Linux/Mac systems or C:\Users\user\AppData\Local\plastic4 on Windows)). For example: C:\Users\user\AppData\Local\plastic4\globalconfig\server_port.
Customize the global configuration
If needed, the issue tracker configuration can be customized with the credentials that every client use. This way, when a user opens the Issue Tracking tab in the Preferences dialog of the Plastic SCM client, those common and global values will be loaded automatically for the linked issue tracker and the user only has to enter the credentials information to be correctly logged in the issue tracking system.
These user credentials will be saved in the user local directory (in the plastic4 directory (under $HOME/.plastic4 on Linux/Mac systems or C:\Users\user\AppData\Local\plastic4 on Windows)). For example: C:\Users\user\AppData\Local\plastic4\issuetrackers\server_port\repname\extension_configuration_file.conf
Writing Plastic SCM custom extensions
Plastic SCM includes some "out of the box" issue tracker integration extensions that you can use to connect with the most popular issue tracking and project management systems.
These "out of the box" extensions enable Plastic SCM to display information about the tasks linked to a branch (recommended), or a changeset in the Branch Explorer, the Changesets view or the Branches view. This way, if you implement a branch per task pattern or link individual changesets to tasks, you will always have relevant information from your issue tracker immediately available.
The reason that we have created a way to develop custom "extensions" is because providing integrations with all ALM, issue trackers and build systems that exist in the market would be an impossible task. We've designed a common issue tracker connection interface, so you can write your own custom extension for Plastic SCM!
Requirements
In order to write your own custom extension for Plastic SCM, you will need to install Visual Studio and our Plastic SCM client on your machine. There are only one library you'll need to build your issue tracker extension: issuetrackerinterface.dll. If you wish to add logging capabilities, you can take advantage of log4net.dll, used by Plastic SCM.
Creating a new extension
To create a new extension, you must first create a Class Library project in Visual Studio and add the issuetrackerinterface.dll reference (and log4net.dll if you wish).
Note: Please pay close attention to the .NET framework version used by your Plastic SCM client. In the Plastic SCM downloads area, you will find both .NET 2.0 and .NET 4.0 standard versions. If you'd rather use .NET 4.0 or later, you'll need to download the Plastic SCM .NET 4 compatible version.
In addition to the Class Library project in Visual Studio, you'll need to implement two different interfaces:
IPlasticIssueTrackerExtension: Definition of all issue tracker connection capabilities for Plastic SCM.IPlasticIssueTrackerExtensionFactory: Manages the issue tracker extension configuration and creation.
Once the Class Library and files are set up, you are now ready to start using Plastic SCM. First of all, add a new class called SampleExtension. Additionally, change the namespace to place your class to Codice.Client.IssueTracker.SampleExtension:
namespace Codice.Client.IssueTracker.SampleExtension
{
    public class SampleExtension : IPlasticIssueTrackerExtension
    {
    }
}
First of all, we need to store the extension configuration. We'll do this through the class constructor. We'll set its visibility to internal since only its Factory needs to know how to create this kind of objects.
public class SampleExtension : IPlasticIssueTrackerExtension
{
    IssueTrackerConfiguration mConfig;

    // If you want logging, this is the way to declare it
    // Don't forget to set log4net.dll as a reference!
    static readonly ILog mLog = LogManager.GetLogger("sampleextension");

    Internal SampleExtension(IssueTrackerConfiguration config)
    {
        mConfig = config;

        mLog.Info("Sample issue tracker is initialized");
    }
}
Now that we have defined how to create our issue tracker extension class, we can build its factory. To do this, add a new SampleExtensionFactory class which implements the IPlasticIssueTrackerExtension interface. You'll probably want to add all needed methods using the Visual Studio refactor option; just right-click the interface reference and select Refactor > Implement interface. This will add a stub for each interface method. It'll start like this:
namespace Codice.Client.IssueTracker.SampleExtension
{
    public class SampleExtensionFactory : IPlasticIssueTrackerExtensionFactory
    {
        public IssueTrackerConfiguration GetConfiguration(
            IssueTrackerConfiguration storedConfiguration)
        {
            throw new NotImplementedException();
        }

        public IPlasticIssueTrackerExtension GetIssueTrackerExtension(
            IssueTrackerConfiguration configuration)
        {
            throw new NotImplementedException();
        }

        public string GetIssueTrackerName()
        {
            throw new NotImplementedException();
        }
    }
}
The last two methods are easy to implement:
public IPlasticIssueTrackerExtension GetIssueTrackerExtension(
    IssueTrackerConfiguration configuration)
{
    return new SampleExtension(configuration);
}

public string GetIssueTrackerName()
{
    return "Sample Issue Tracker";
}
They return a working issue tracker extension from a valid configuration and the issue tracker name, respectively. However, the first one is a little bit complex: It receives an issue tracker configuration and returns a valid one. We need then to define our required parameters and the default values for them.
The IssueTrackerConfiguration class is quite simple: it stores an enumerate ExtensionWorkingMode field and a list of IssueTrackerConfigurationParameter.
The working mode accepts two values:
- TaskOnBranch: Tasks are automatically linked to branches by their names, using the defined branch prefixes (we'll talk about that later).
- TaskOnChangeset: Tasks are manually linked to changesets.
The configuration parameters will be listed in the Issue tracker tab on the Plastic SCM Preferences dialog. See the Configuring the extension section below for further info.
We'll define the following parameters:
-
The current user ID. This will affect the currently pending tasks results.
-
The Plastic SCM branch prefix. This will tell Plastic which branch name prefix to expect when guessing if a branch
is linked to an issue tracker task.
Each parameter contains 4 attributes:
-
name - The name of the parameter. It's a string class attribute.
-
value - The value fo the parameter. It's a string class attribute.
-
type- The type of the parameter. This is defined by the IssueTrackerConfigurationParameterType
enumerate type, and describes what the parameter contains:
- Host: The target host.
- User: The user name to authenticate.
- Password: The password to authenticate.
- Label: The text to display on the configuration panel.
- BranchPrefix: The Plastic SCM branch prefix.
- Text: A text value drawn as a textbox on the configuration panel.
- Boolean: A true/false value drawn as a checkbox on the configuration panel.
Except for Host, User, and Password, any number of parameters set to the
same type can be defined. The configuration panel will disable all BranchPrefix entries when the
extension worked mode is switched to TaskOnChangeset.
-
IsGlobal - Related to the global configuration,
lets you configure your extension globally or locally at the same time. The value of the parameters existing both
in a global and local configuration depends on the IsGlobal value:
-
If True, the extension will use the parameter's value defined in the global configuration.
-
If False, the extension will use the parameter's value defined in the local configuration.
This is useful because you can define global parameters that everybody must use (for example, host,
branch prefix, or project key), and local parameters that are the ones of the user
(for example, user and password).
For example:
Name=Host;Value=http://localhost:8080;Type=Host;IsGlobal=True
Name=User name;Value=tester;Type=User;IsGlobal=False
Name=Password;Value=tester;Type=Password;IsGlobal=False
Name=Branch prefix;Value=scm;Type=BranchPrefix;IsGlobal=True
Finally, this is how our GetConfiguration method will look like:
public IssueTrackerConfiguration GetConfiguration(
    IssueTrackerConfiguration storedConfiguration)
{
    List<IssueTrackerConfigurationParameter> parameters
        = new List<IssueTrackerConfigurationParameter>();

    ExtensionWorkingMode workingMode = GetWorkingMode(storedConfiguration);

    string user = GetValidParameterValue(
        storedConfiguration, SampleExtension.USER_KEY, "1");

    string prefix = GetValidParameterValue(
        storedConfiguration, SampleExtension.BRANCH_PREFIX_KEY, "sample");

    IssueTrackerConfigurationParameter userIdParam =
        new IssueTrackerConfigurationParameter()
    {
        Name = SampleExtension.USER_KEY,
        Value = GetValidParameterValue(
            storedConfiguration, SampleExtension.USER_KEY, "1"),
        Type = IssueTrackerConfigurationParameterType.User,
        IsGlobal = false
    };

    IssueTrackerConfigurationParameter branchPrefixParam =
        new IssueTrackerConfigurationParameter()
    {
        Name = SampleExtension.BRANCH_PREFIX_KEY,
        Value = GetValidParameterValue(
            storedConfiguration, SampleExtension.BRANCH_PREFIX_KEY, "scm"),
        Type = IssueTrackerConfigurationParameterType.BranchPrefix,
        IsGlobal = true
    };

    parameters.Add(userIdParam);
    parameters.Add(branchPrefixParam);

    return new IssueTrackerConfiguration(workingMode, parameters);
}

ExtensionWorkingMode GetWorkingMode(IssueTrackerConfiguration config)
{
    if (config == null)
        return ExtensionWorkingMode.TaskOnBranch;

    if (config.WorkingMode == ExtensionWorkingMode.None)
        return ExtensionWorkingMode.TaskOnBranch;

    return config.WorkingMode;
}

string GetValidParameterValue(
    IssueTrackerConfiguration config, string paramName, string defaultValue)
{
    string configValue = (config != null) ? config.GetValue(paramName) : null;
    if (string.IsNullOrEmpty(configValue))
        return defaultValue;
    return configValue;
}
We have finished our factory! Let's go back to the Extension class.
Implementing the extension methods
The next step is to implement all interface methods. Use the Visual Studio refactor to add all interface methods:
public class SampleExtension : IPlasticIssueTrackerExtension
{
    public void Connect()
    {
        throw new NotImplementedException();
    }

    public void Disconnect()
    {
        throw new NotImplementedException();
    }

    public string GetExtensionName()
    {
        throw new NotImplementedException();
    }

    public List<PlasticTask> GetPendingTasks(string assignee)
    {
        throw new NotImplementedException();
    }

    public List<PlasticTask> GetPendingTasks()
    {
        throw new NotImplementedException();
    }

    public PlasticTask GetTaskForBranch(string fullBranchName)
    {
        throw new NotImplementedException();
    }

    public Dictionary<string, PlasticTask> GetTasksForBranches(List<string> fullBranchNames)
    {
        throw new NotImplementedException();
    }

    public List<PlasticTask> LoadTasks(List<string> taskIds)
    {
        throw new NotImplementedException();
    }

    public void LogCheckinResult(PlasticChangeset changeset, List<PlasticTask> tasks)
    {
        throw new NotImplementedException();
    }

    public void MarkTaskAsOpen(string taskId, string assignee)
    {
        throw new NotImplementedException();
    }

    public void OpenTaskExternally(string taskId)
    {
        throw new NotImplementedException();
    }

    public bool TestConnection(IssueTrackerConfiguration configuration)
    {
        throw new NotImplementedException();
    }

    public void UpdateLinkedTasksToChangeset(PlasticChangeset changeset, List<string> tasks)
    {
        throw new NotImplementedException();
    }
}
Of course, you don't need to implement all methods. If there is some functionality you don't need or don't want to provide, just leave the method body empty or return a default value. If the return type is a collection type, we recommend you to return an empty collection instead of a null object.
This is a brief description of each method:
Connect- Write here any needed actions to prepare your extension to connect to your target issue tracker.
Disconnect- The opposite to
Connect, it will contain code to release any resources needed to connect to your target issue tracker (sessions, etc.)
GetExtensionName- Returns a human-readable name to display on Plastic SCM views.
GetPendingTasks- Returns a list of pending tasks in the issue tracker system. There are two method overloads, one returning a list of tasks for a given user name, the other one returning all existing pending tasks.
GetTaskForBranch- Returns the task associated to a full branch name (i.e. showing the complete branch hierarchy). The result can be null if no matching task is found.
GetTasksForBranches- Retrieves task information for a list of branches. The result maps each branch name to its related task information.
LoadTasks- Retrieves the issue tracker task information for a list of task IDs. The format for these IDs is defined by the issue tracker system.
LogCheckinResult- Records the information of a single changeset into a list of associated tasks, passed as a parameter. This method is called after a successful checkin is finished.
MarkTaskAsOpen- Alters the state of a task defined by ID -passed as parameter- and, if the issue tracker system supports it, set the assigned user as the referenced one.
OpenTaskExternally- Opens a task -passed as an ID- in the external browser.
TestConnection- Tests whether the passed configuration can successfully establish a connection to the defined issue tracker.
UpdateLinkedTasksToChangeset- For those issue tracker systems supporting it, modifies the Plastic SCM referenced changeset of a list of tasks.
To illustrate some of these methods, we'll see some sample implementations. The task contents will be retrieved from a sample lorem ipsum web service at http://jsonplaceholder.typicode.com.
OK, this one is really silly. We just need to return the name we Plastic to display on its views.
public string GetExtensionName()
{
    return "My awesome extension";
}
When the issue tracker extension is configured to work in a TaskOnBranch mode, this method is used by the Branch Explorer to map the drawn branches to their associated tasks. And since we love our code clean, we've broken down this functionality into several methods to ensure its readability!
public Dictionary<string, PlasticTask> GetTasksForBranches(
    List<string> fullBranchNames)
{
    Dictionary<string, PlasticTask> result =
        new Dictionary<string, PlasticTask>();

    foreach(string fullBranchName in fullBranchNames)
    {
        string taskId = GetTaskIdFromBranchName(
            GetBranchName(fullBranchName));
        result.Add(fullBranchName, LoadSingleTask(taskId));
    }
    return result;
}

string GetBranchName(string fullBranchName)
{
    int lastSeparatorIndex = fullBranchName.LastIndexOf('/');

    if (lastSeparatorIndex < 0 )
        return fullBranchName;

    if (lastSeparatorIndex == fullBranchName.Length - 1)
        return string.Empty;

    return fullBranchName.Substring(lastSeparatorIndex + 1);
}

string GetTaskIdFromBranchName(string branchName)
{
    string prefix = mConfig.GetValue(BRANCH_PREFIX_KEY);
    if (string.IsNullOrEmpty(prefix))
        return branchName;

    if (!branchName.StartsWith(branchName) || branchName == prefix)
        return string.Empty;

    return branchName.Substring(prefix.Length);
}

const string POST_URL = "http://jsonplaceholder.typicode.com/posts/{0}";

PlasticTask LoadSingleTask(string taskId)
{
    if (string.IsNullOrEmpty(taskId))
        return null;

    string uri = string.Format(POST_URL, taskId);
    string resultJson = PerformJsonRequest(uri);

    return BuildTaskFromJson(
        JsonConvert.DeserializeObject<MyServiceData>(resultJson));
}

string PerformJsonRequest(string targetUri)
{
    HttpWebRequest req = (HttpWebRequest)WebRequest.Create(targetUri);

    try
    {
        using (HttpWebResponse resp = (HttpWebResponse)req.GetResponse())
        using (StreamReader reader = new StreamReader(resp.GetResponseStream()))
        {
            return reader.ReadToEnd();
        }
    }
    catch(Exception e)
    {
        mLog.ErrorFormat(
            "Unable to perform request on URI {0}: {1}", targetUri, e.Message);
        mLog.DebugFormat(
            "Stack trace:{0}{1}", Environment.NewLine, e.StackTrace);
        return string.Empty;
    }
}

PlasticTask BuildTaskFromJson(MyServiceData jsonData)
{
    if (jsonData == null)
        return null;

    return new PlasticTask()
    {
        Id = jsonData.Id.ToString(),
        Owner = jsonData.UserId.ToString(),
        Title = jsonData.Title,
        Description = jsonData.Body,
        Status = "working"
    };
}
You'll notice that this method receives a list of full branch names (i.e. the name contains their whole hierarchy). For each one of them, the method extracts the task ID and performs a query against the jsonplaceholder service.
Note: JsonPlaceholder is the "lorem ipsum" generator equivalent to
REST services. You can pass a numeric value and it will return a JSON object with some sample fields. Querying the URL without a number will return a list of objects. You will find more detailed information at
http://jsonplaceholder.typicode.com .
Once the JSON response is received, you can use your favorite JSON parser to deserialize it into a valid object instance. In the previous example we've used Newtonsoft.Json.
The last step is to build a PlasticTask instance and set its fields using the values returned by the REST service. When every branch name has been process, the method returns the mapping as a Dictionary<string, PlasticTask> class.
The OpenTask method is used when you need to access the original source of information. For instance, you may have a website or third-party application that contains information you need; in these situations, the Plastic issue tracker extension can show this data for you using the OpenTask method.
public void OpenTaskExternally(string taskId)
{
    Process.Start(string.Format(
        "https://www.google.es/search?q={0}", taskId));
}
Our sample implementation is very simple: we build a URI to search the task number on Google and we use the System.Diagnostics.Process class to open it with the default browser.
The OpenTask method is useful when you need to establish a tight integration between Plastic SCM and your issue tracker.
SampleExtension example
Referring to the previous GetTasksForBranches code samples, when you select a branch starting with the sample prefix on the Plastic SCM Branches view you will see detailed information on the right panel:

As you can see, the right panel displays the PlasticTask properties information retrieved by the GetTasksForBranches method.
If you configure your extension to use the TaskOnChangeset working mode, then you will see three buttons displayed on the right panel:

While the TaskOnBranch mode is an automated mechanism which uses the branch name and a prefix to automatically link issues to branches, the TaskOnChangeset mode allows us to manually associate the issue information to individual changesets. Besides the action buttons on the Changesets view we just saw, you can also add this kind of links at checkin time using the Checkin information dialog:

Our latest key feature regarding issue tracker is creating new branches from a given issue. Whenever an issue tracker extension is properly configured, the Create Branch dialog will automatically display a new set of controls, called the From Task mode.

The main control is a pending task list, populated with the results returned by the GetPendingTasks method. Only those tasks assigned to the current user (set in the configuration panel) are displayed by default. Checking the Display pending tasks from all users control will override this constraint, as the checkbox title says. The Branch name and Comment are automatically set, but the latter can be modified.
Finally, checking the Mark as open in issue tracker will execute the MarkTaskAsOpen method after a successful branch creation. It should set the state of the selected issue to Open, In Progress or the equivalent for the current issue tracker.
Debugging
Every time you write class libraries, the question arises: which is the best way to easily debug my code? Regarding the Plastic SCM Extensions, the solution is quite clear: just modify the class library properties in the build section to deploy the .dll and .pdb output files directly into the Plastic SCM client directory:

Once you set the output path, you can also configure Visual Studio to launch the Plastic SCM client and automatically attach the debugger to the resulting plastic.exe process. This way, when Plastic interacts with your custom extension code the breakpoints you set will be automatically trigerred.

Note: it's important to remember that you'll need the appropriate permissions to be able to place the compiled files inside the Plastic SCM client directory -which is typically placed under Program Files.
Configuring the extension
To make Plastic able to see your custom extension, we'll need to edit the customextensions.conf file inside the Plastic SCM client folder.
# Each line defines a Plastic SCM extension with a name and a relative dll
# path from client installation directory
# i.e:
# My Custom Extension=extensions/mycustomextension/mycustomextension.dll
Sample Extension=SampleExtension.dll
After this configuration step, you may open the Preferences dialog and open the Issue tracking tab. We'll find our extension listed in the dropdown list there. When selected, the main panel will display the necessary controls to configure your extension:

By clicking the Apply or OK button, Plastic will be able to work with our brand new extension.
Creating your own extension
Custom issue tracker extensions allow you to integrate any issue tracker with Plastic SCM. A corporate intranet, the in-house developed issue tracking system... The possibilities are endless.
The ability to develop your own code to connect with your own systems and the simplicity of integrating it all with the Plastic SCM client; all of it provides an awesome opportunity for you to customize your SCM experience with Plastic SCM.
If you like what you see and you'd like to have the full sources for this sample extension, you can check our GitHub repository.
Last updated
November 30, 2021
Now, the IsGlobal attribute is fully described in the
Creating a new extension
section.
November 19, 2020
We added a note about
supporting Jira Next-gen projects.
April 29, 2020
We added a new chapter about the codeBeamer integration.
We included the location of the configuration examples files on the macOS system.
March 10, 2020
We included a note for Jira Cloud users related to the "Accept
remote API calls" option.
May 16, 2019
We updated the Jira configuration to explain how to configure your credentials if you use Atlassian Cloud.
March 22, 2019
We replaced the references to deprecated attribute administration commands like cm makeattribute for their new counterparts.
November 21, 2018
Now, you can configure these new Jira extension parameters: Use LDAP credentials if available, Use default proxy credentials and Issue types.
May 18, 2018
All issue trackers:
- Now, you can link a changeset with your issue tracker system through comment hashtags. Starting the comment with the '#' character followed by the issue key (and optionally followed by a colon) will log the checkin information in the related issue. This behavior will only take effect if your issue tracker extension is configured in Task On Changeset mode.
September 27, 2017
Now, the Jira extension is able to transition status based on the comment of the associated checkin.
June 14, 2017
All issue trackers:
-
The issue trackers client configuration has been updated:
- You can select the repository (or all the repositories) to link to your issue tracking system.
- Learn how to configure the issue trackers integration on your Linux or macOS systems.
- We added some Linux and macOS screenshots to see how these integrations look like.
Axosoft:
Polarion:
Jira:
October 8, 2015
The Polarion integration has been added.
October 7, 2015
The Jira extension now supports the new Rest API. The Field mapping documentation has been updated.
August 25, 2015
All references to Branch Prefix are no longer stated as a must.
June 12, 2015
The Writing Plastic SCM custom extensions chapter has been updated and now includes new methods.
June 12, 2015
The Global extension configuration is now easier to configure.
February 26, 2015
Updated the Axosoft integration chapter: compatibility with Axosoft v14.
January 22, 2015
Learn how to write your Plastic SCM custom extension.
January 8, 2015
Added Jira multi-project configuration.
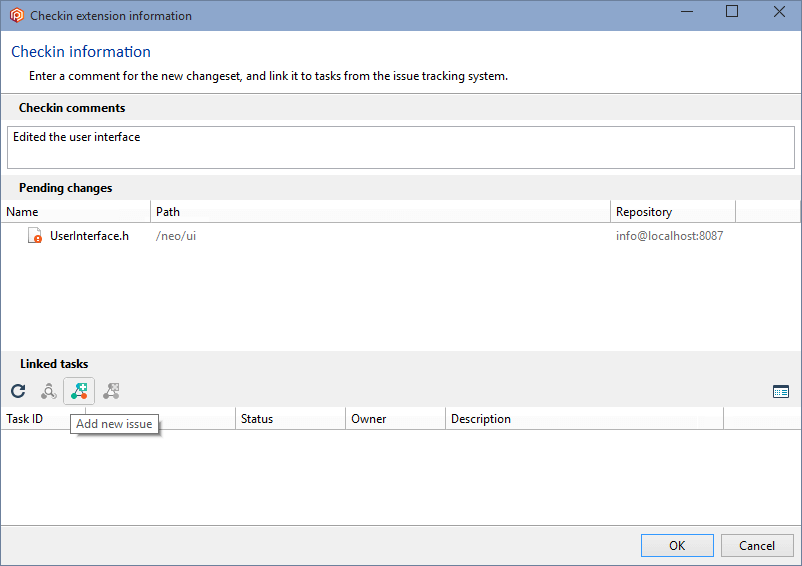
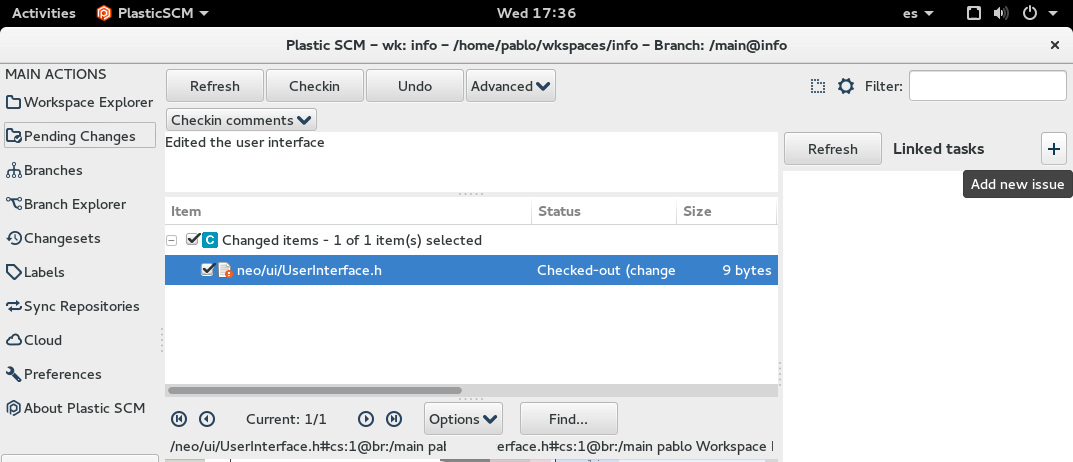

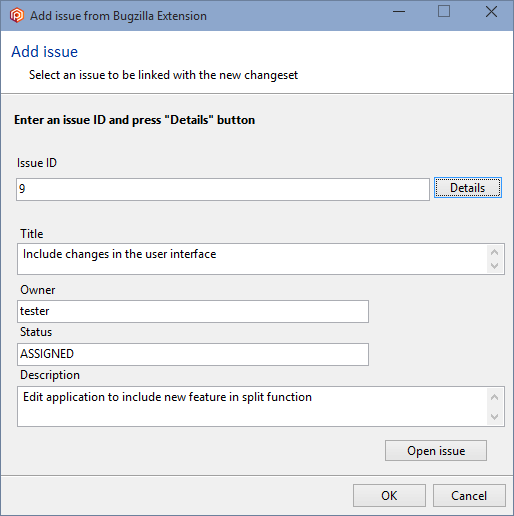


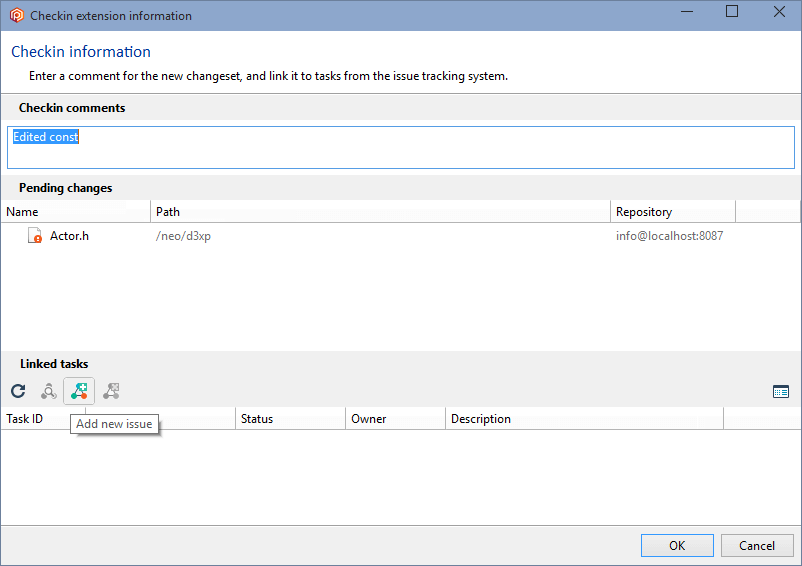


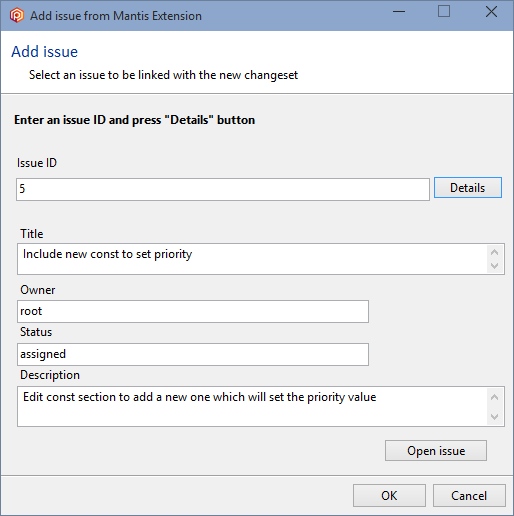


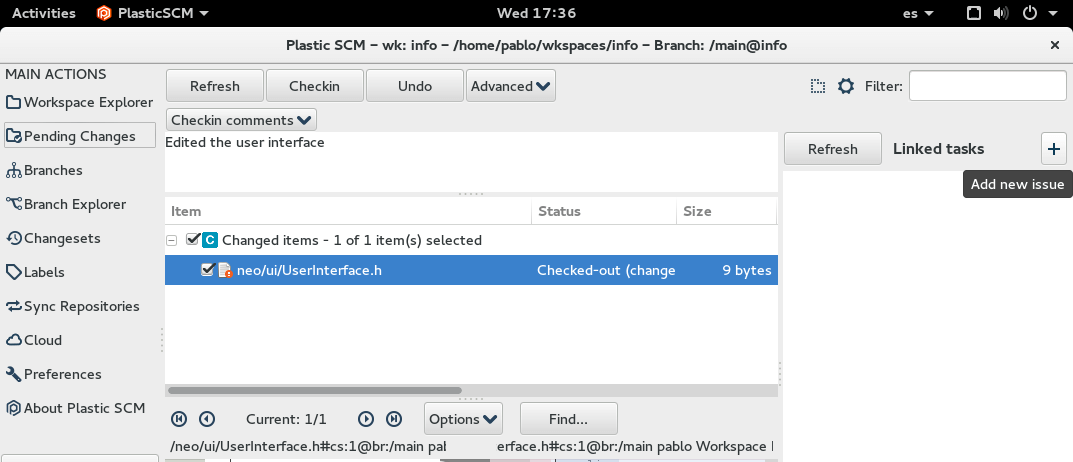

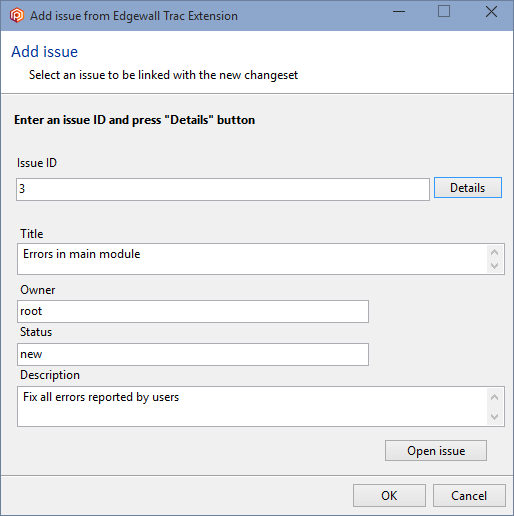


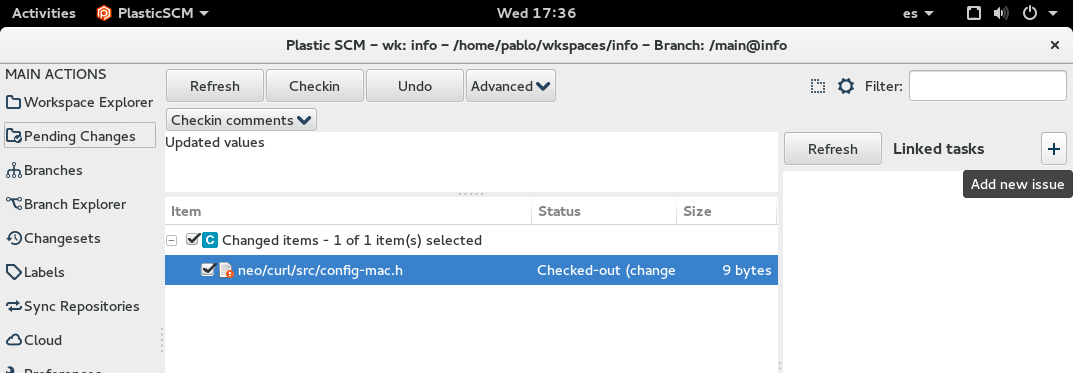
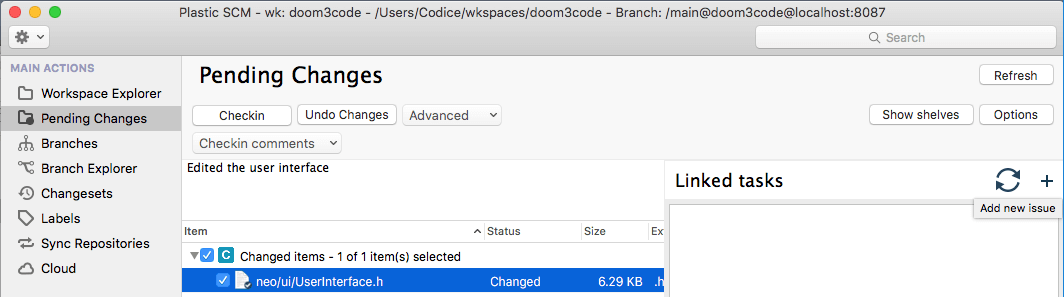
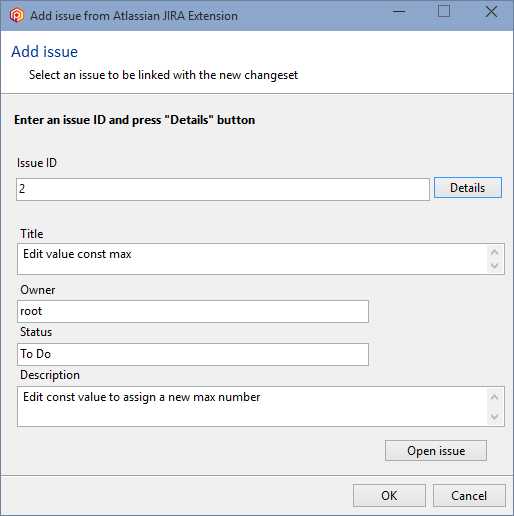


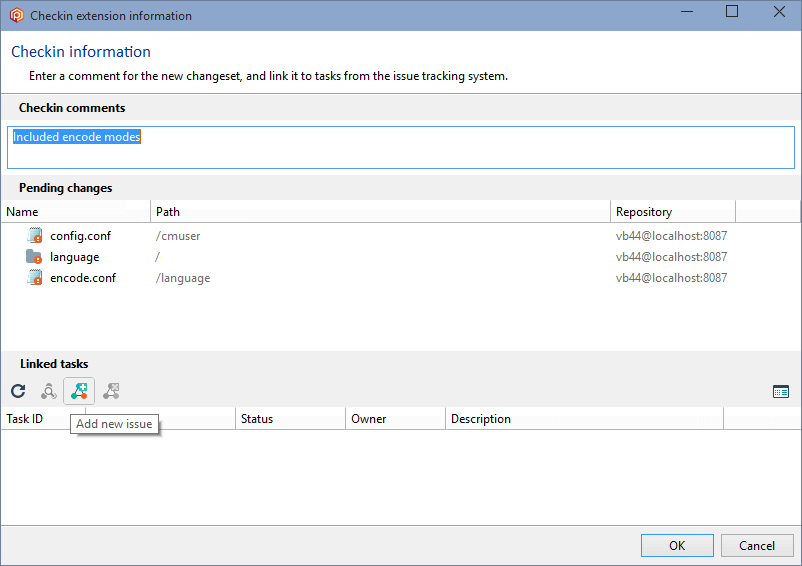
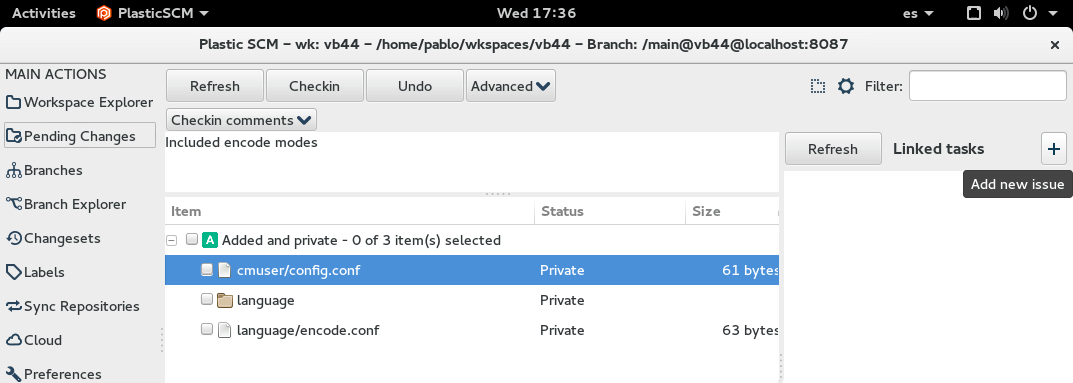
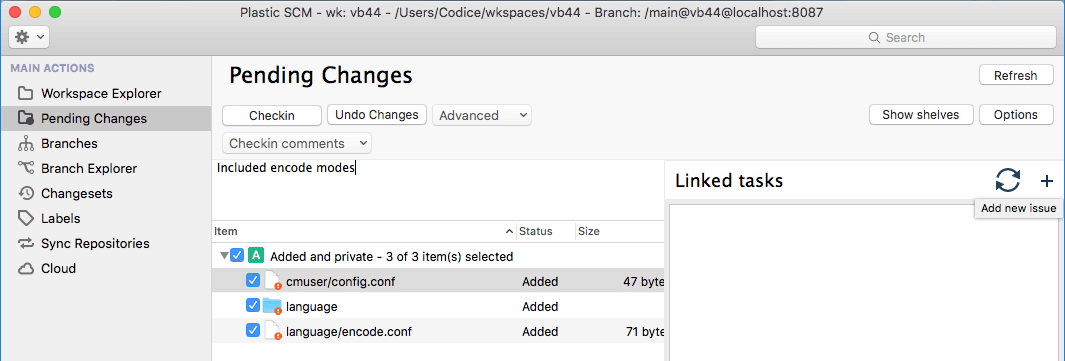
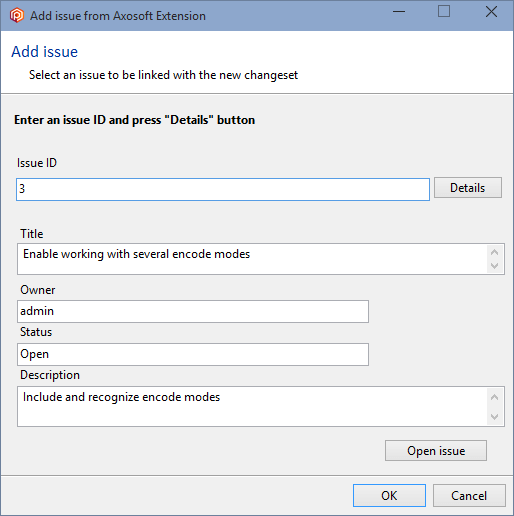

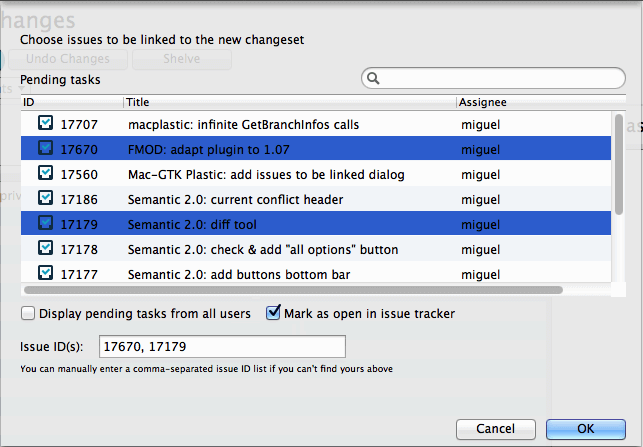
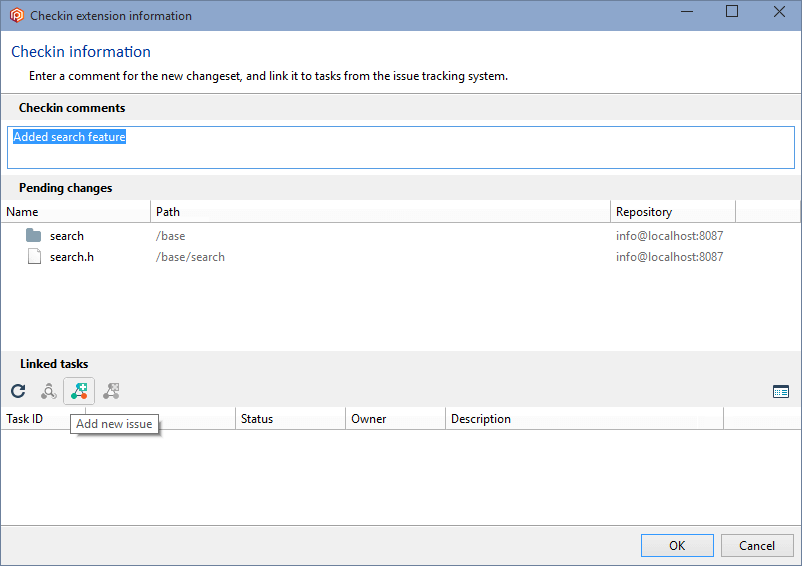
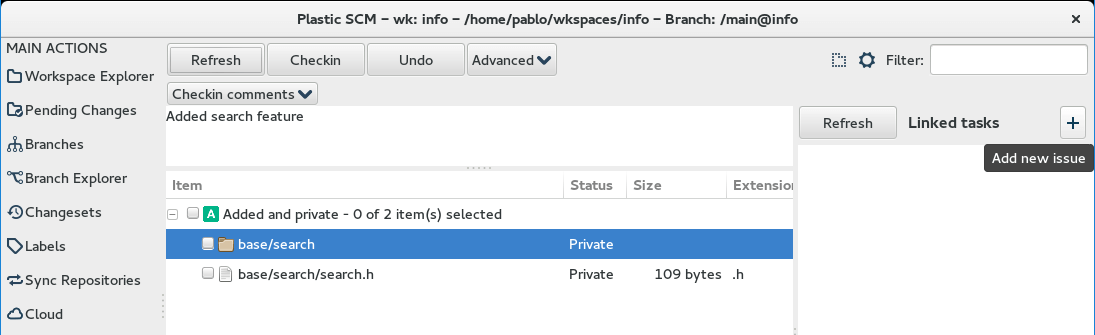
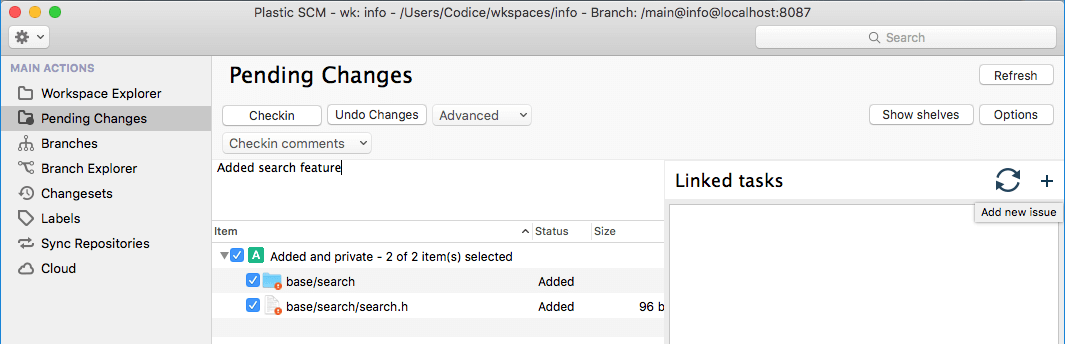
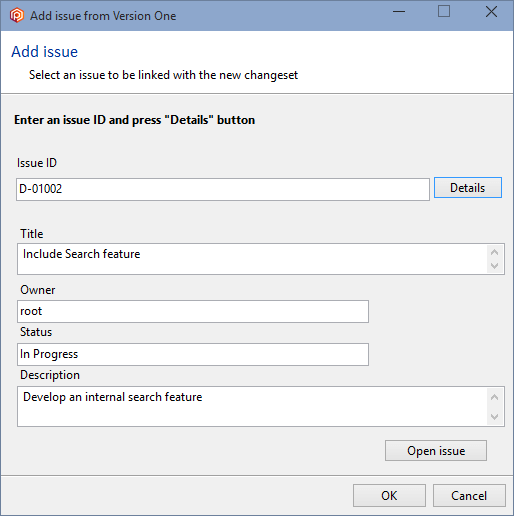


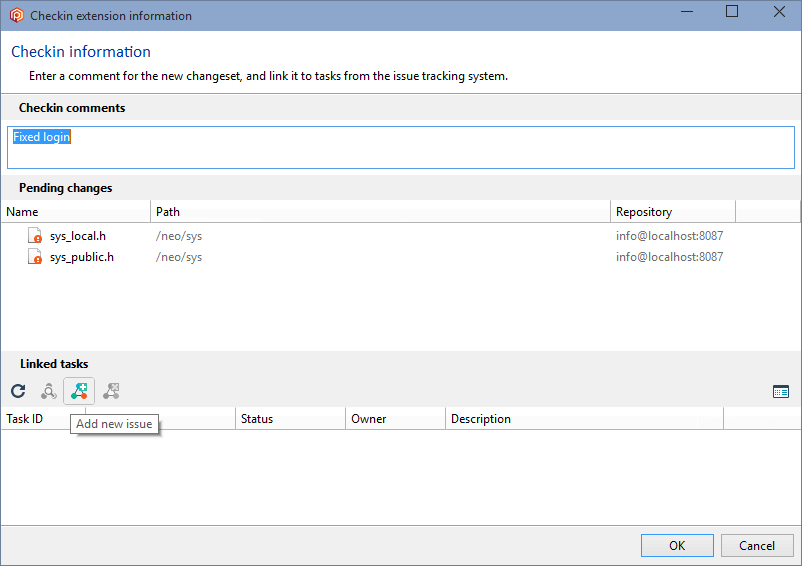
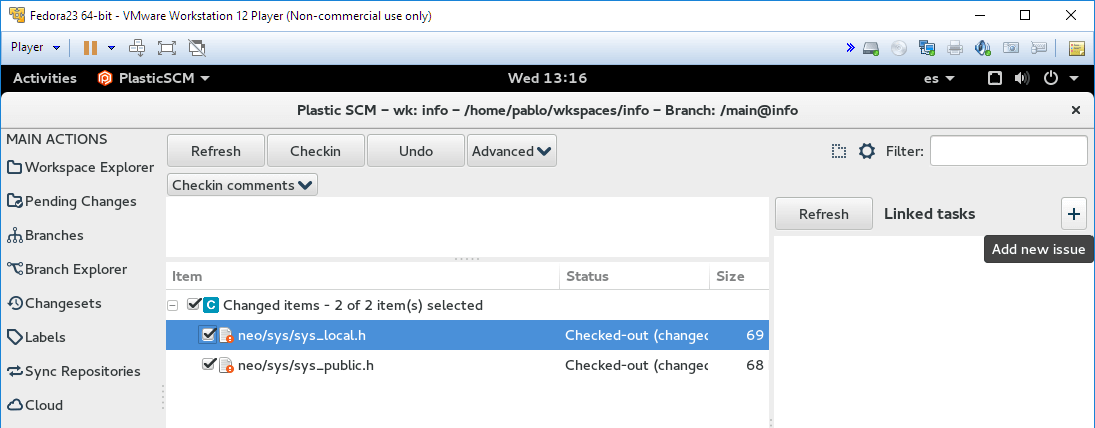
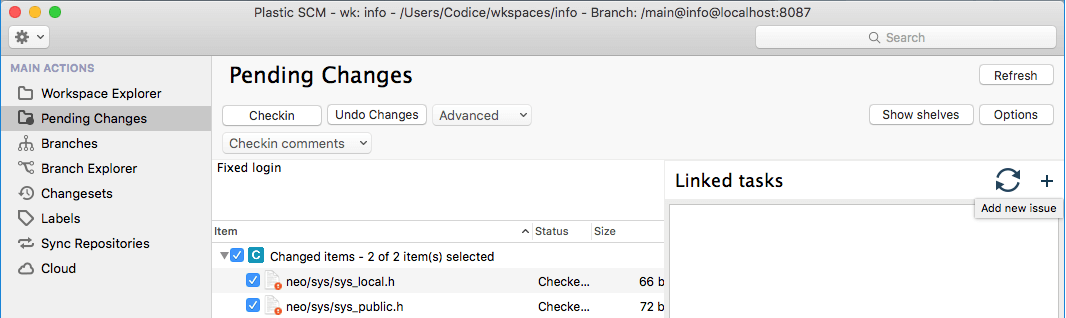
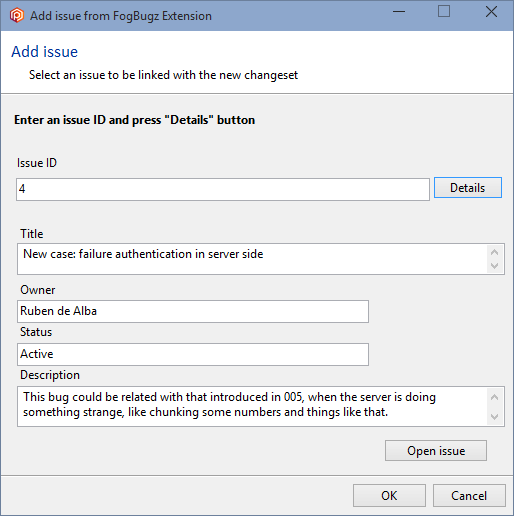
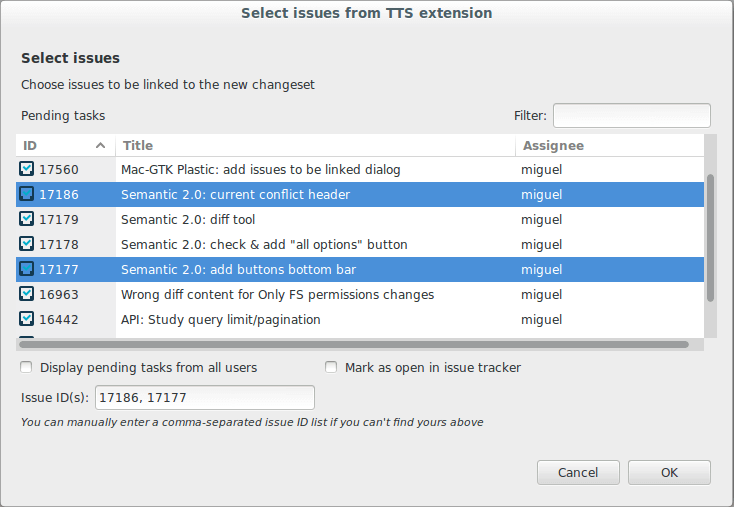

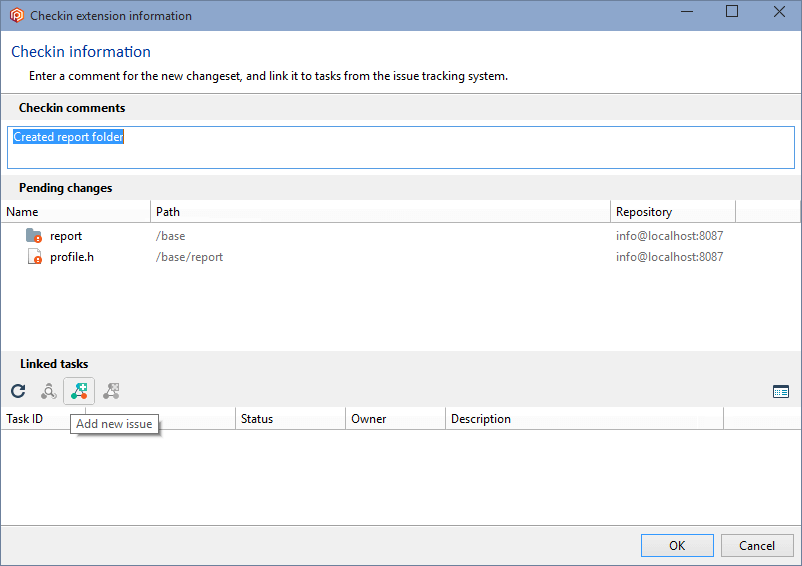
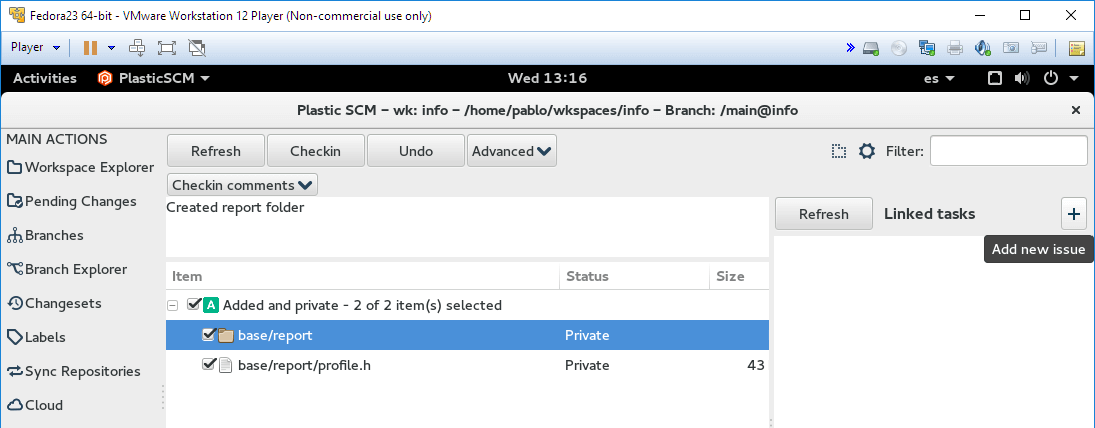

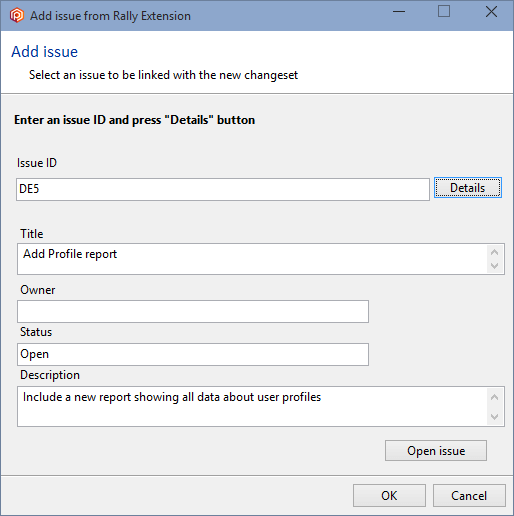


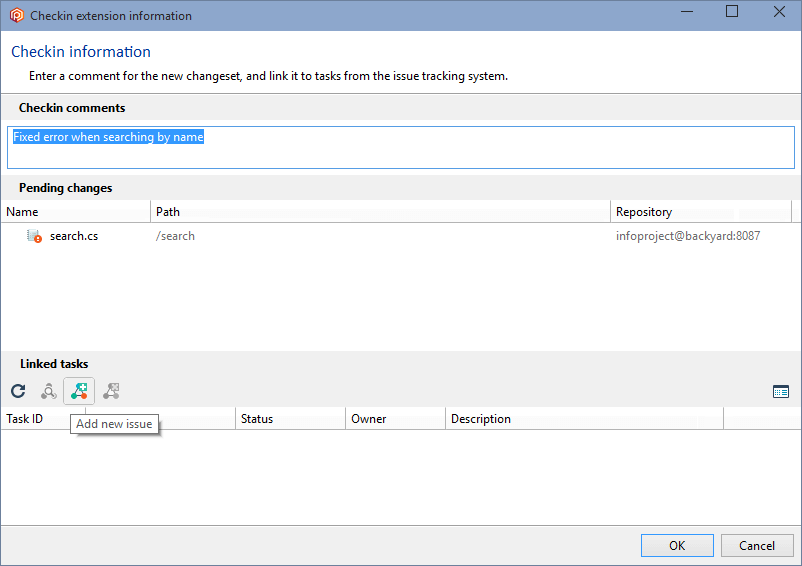
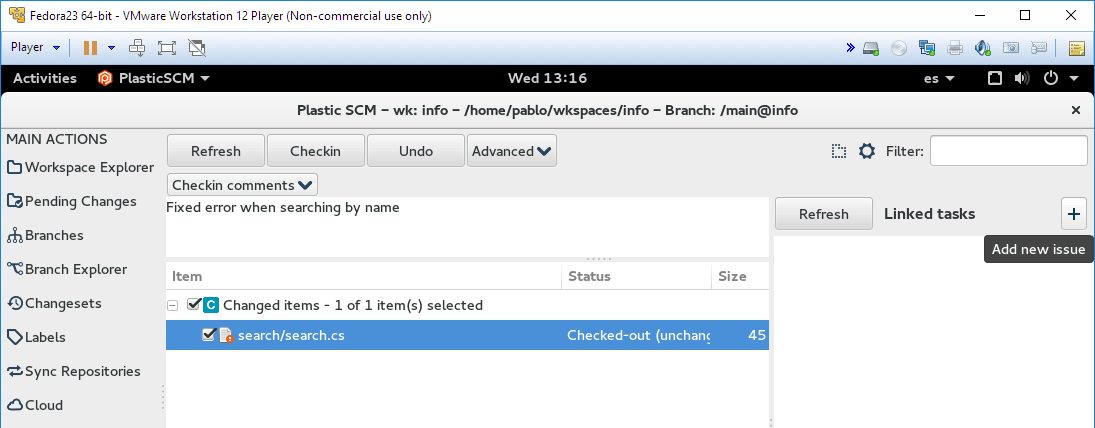
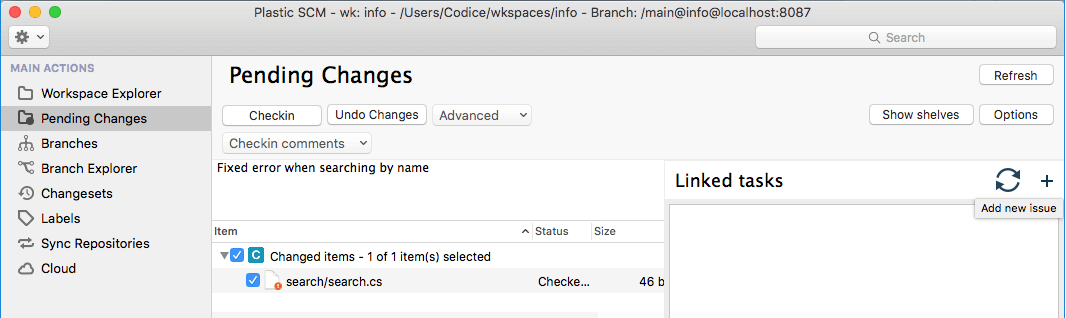
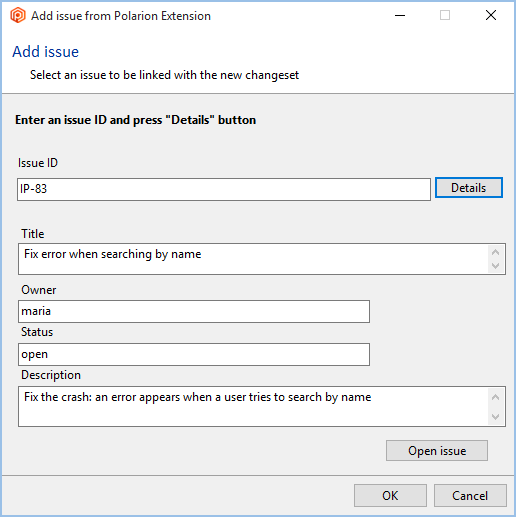


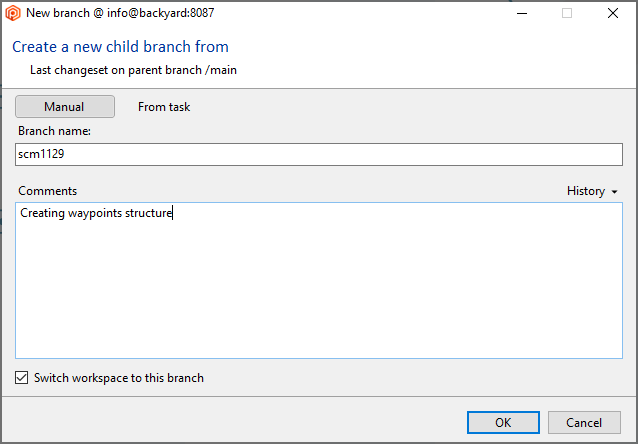
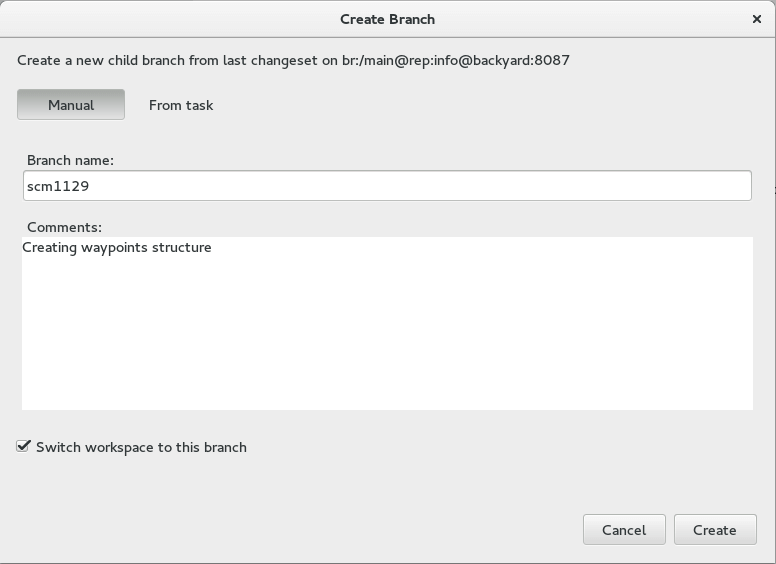
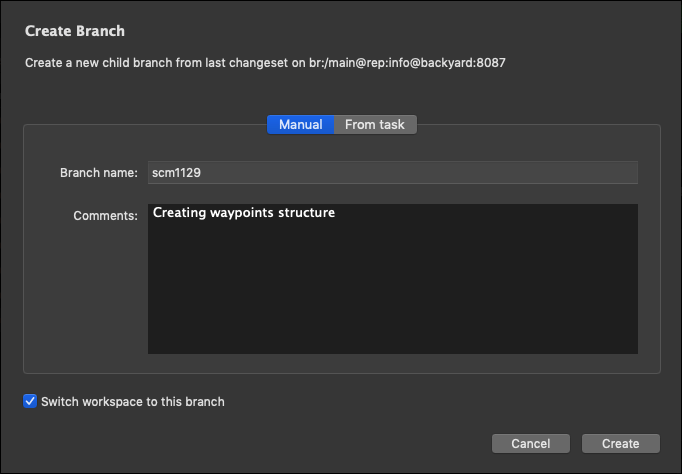
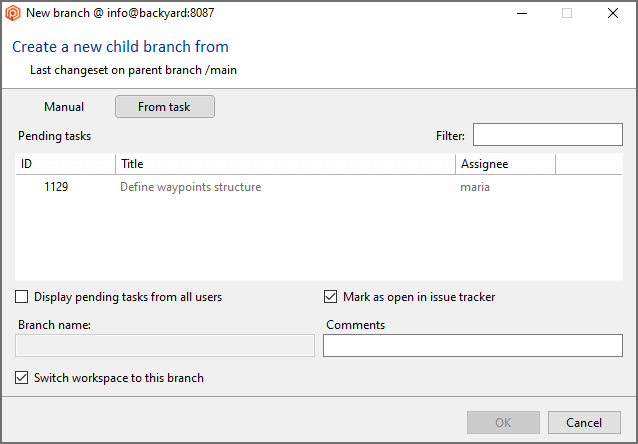
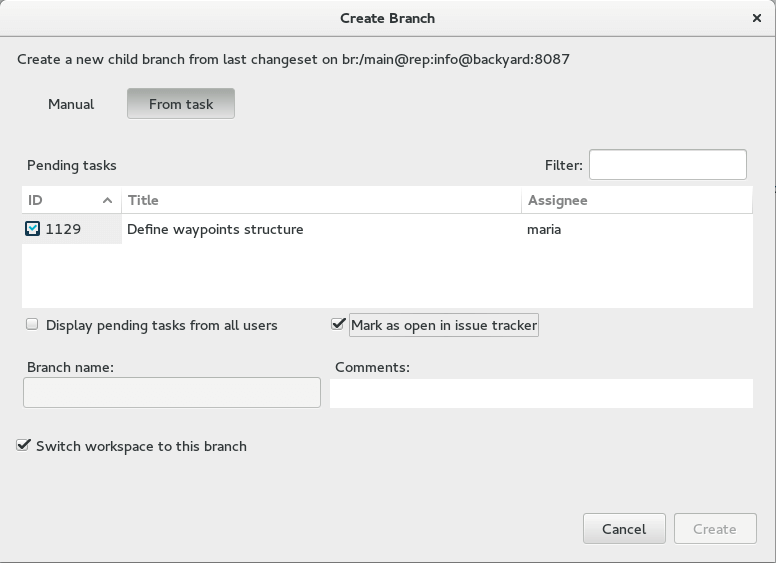
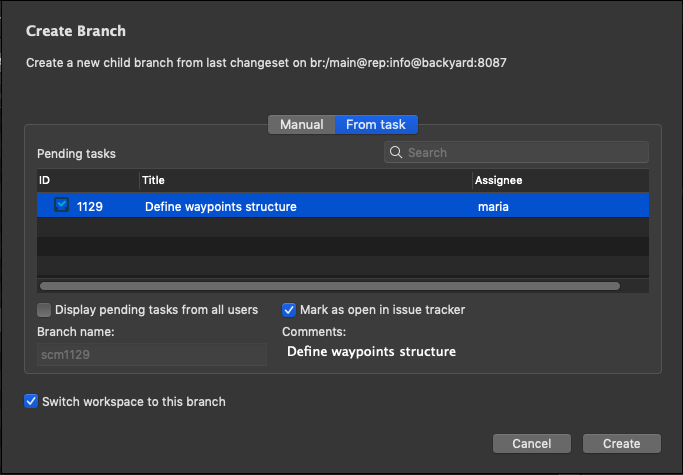
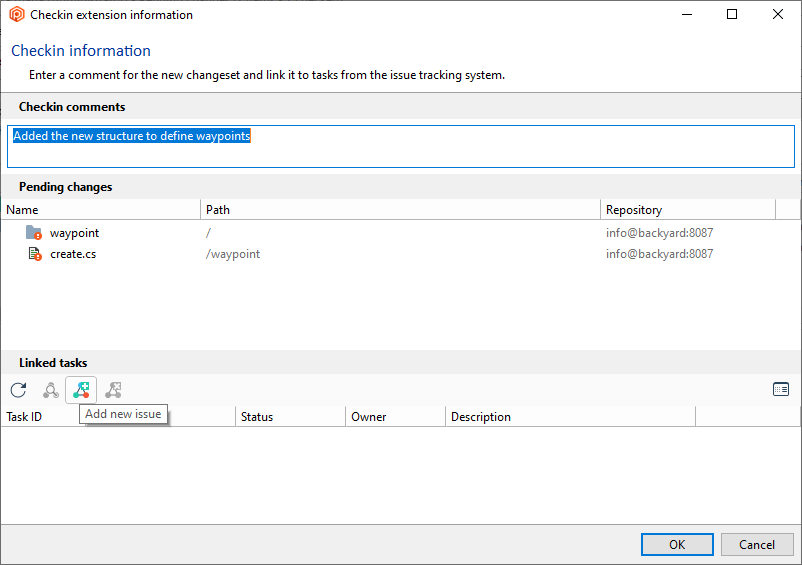
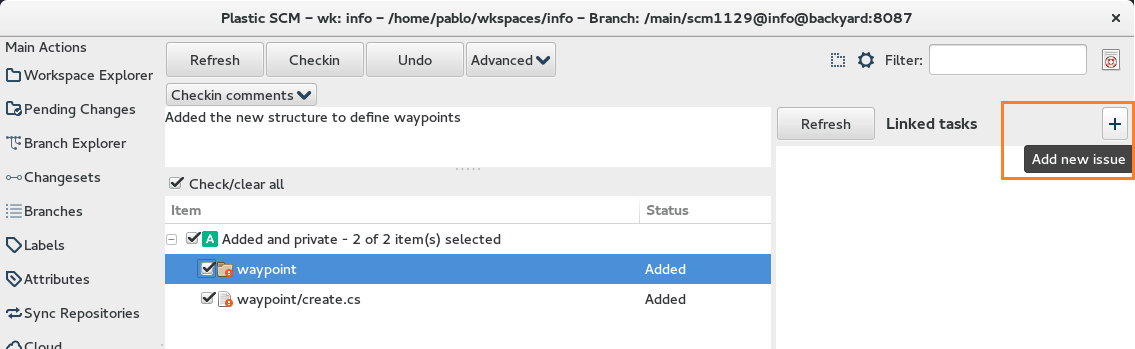
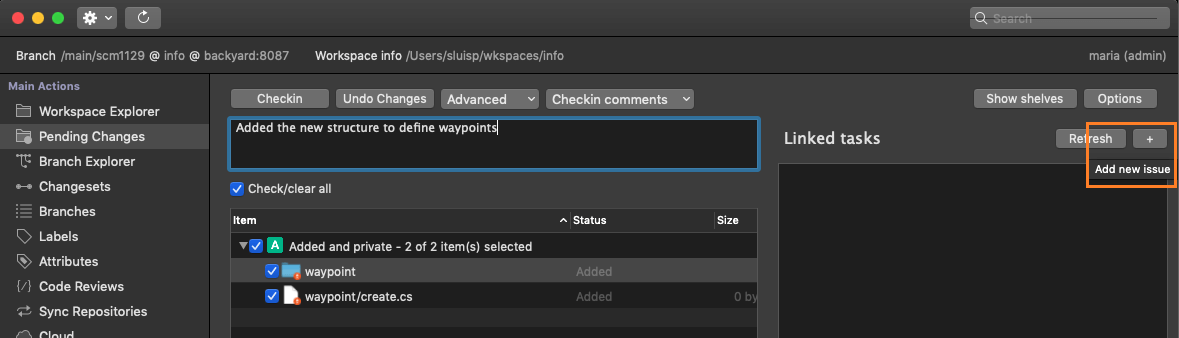
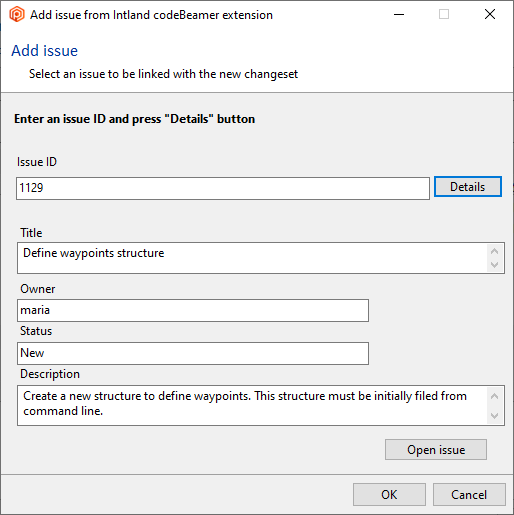
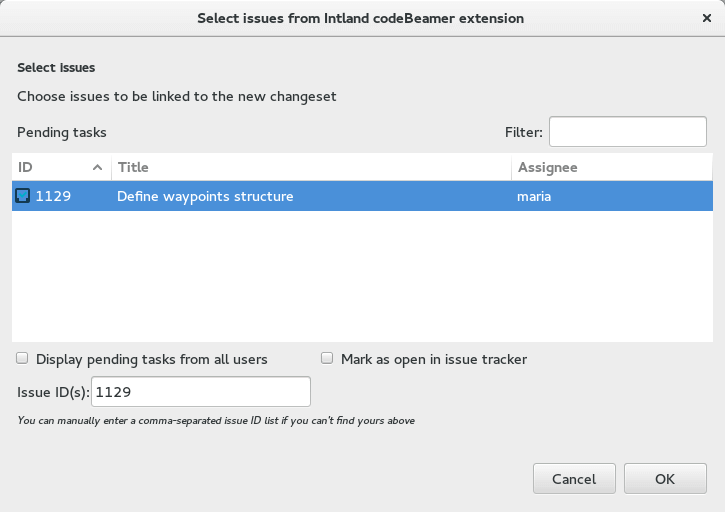
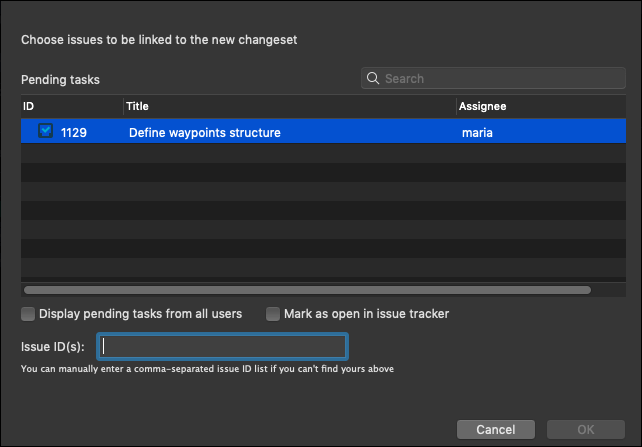
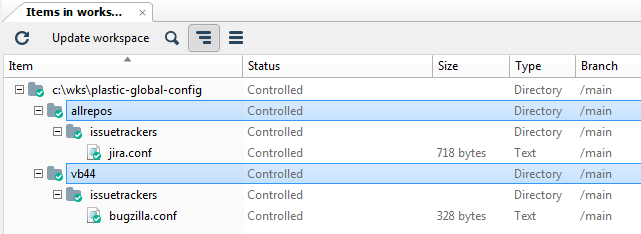
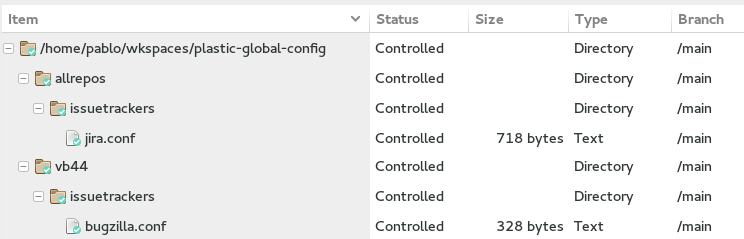
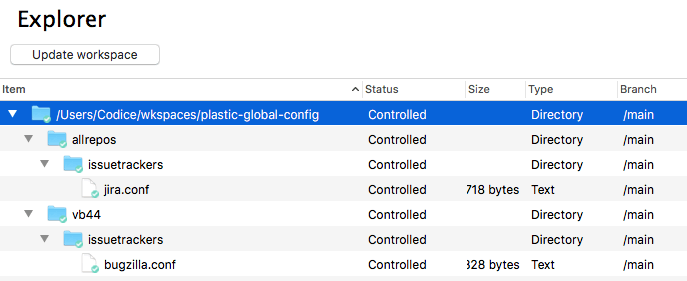
 The first button will open the task information in a browser, as we saw before on the
  The second button will link a task to the selected changeset. Once clicked, a dialog will be displayed to select the task to be linked.


 The third button removes a selected issue linked to the currently selected changeset.