Distributed Version Control Guide
Read the Centralized and Distributed chapter in the Plastic Book to learn the basics of distributed development.
Use this current guide to learn about package replication vs direct replication, authentication across different servers, how to replicate using the command line and the GUI, and how the Branch Explorer helps visualizing distributed repos.
Replication modes
There are two replication modes available:
- Direct server-to-server replication - A Plastic SCM client will tell the destination server to replicate a branch from a source server. Servers will communicate through internet or intranet connections to replicate data.
- Package based replication - A Plastic SCM client connects with the source server and creates a replication package. The package will be delivered in person (via USB drive, for example) and imported later on by the destination server.
The next figure depicts the two available replication modes.
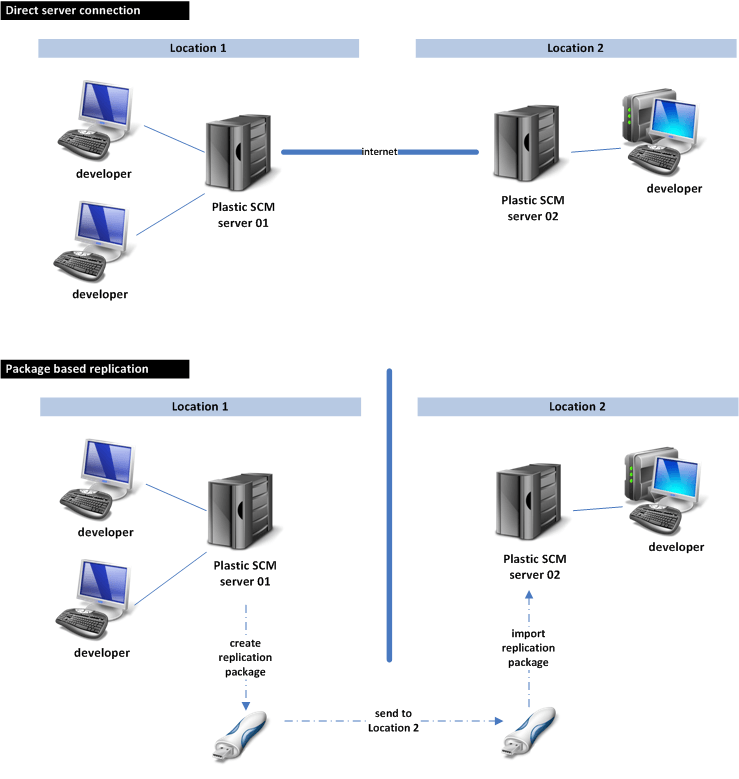
The package based replication introduces the ability to keep servers in sync which are not allowed to connect directly due to security restrictions.
Replication from the command line
All the replication scenarios and possibilities described above can be managed with the Plastic SCM commands: push and pull.
cm pull srcbranch destinationrepos
Where srcbranch is a branch spec identifying the branch to be replicated and its repository, and destinationrepos is the repository where the branch is going to be replicated.
Direct server replication
Suppose you want to replicate the branch main at repository code at server london:8084 to repository code_clone at bangalore:7070. The command would be:
cm pull main@code@london:8084 rep:code_clone@bangalore:7070
If you want to replicate not only the branch main, but the entire repository, you can use the clone command:
cm clone code@london:8084 code_clone@bangalore:7070
Replication packages
To replicate branches using packages, the first step will be creating a replication package, and then importing the package into another server.
Suppose you have to create a replication package for the main branch at repository code at server box:8084.
cm push br:/main@code@box:8084 --package=box.pk
The previous command will generate a package named box.pk with all the content of the main branch.
Later on, the package will be imported at the repository server berlin:7070.
cm pull rep:code@berlin:7070 --package=box.pk
Authentication
During replication, different servers have to communicate with each other. This means that servers running different authentication modes will have to exchange data.
To do so, the replication system is able to set up different authentication options.
Setting up authentication modes
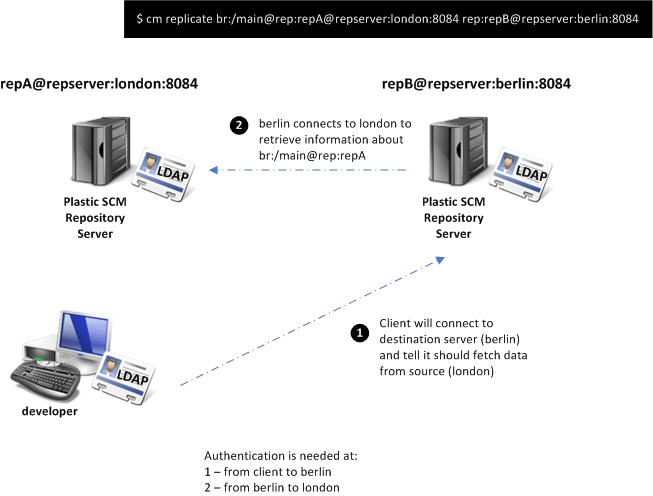
The next figure shows a typical scenario with a client and two servers. All the involved Plastic SCM components are configured to work in LDAP and they share the same LDAP credential, so no translation is required.
Note that authentication happens at two levels:
- The client needs to be authenticated in order to connect to the destination server. In the figure, the destination server is berlin.
- Then berlin will need to connect to the server london to retrieve information about the branch to be replicated (main in the sample).
If both servers were not using the same authentication mechanism or not authenticating against the same LDAP authority, step 2 would fail.
The figure below shows a scenario in which the server london is configured to use user/password authentication. In this case, a command like the one specified at the top of the figure will fail because authentication between servers won't work at step 2.

To solve this problem, the replication system has the ability to specify authentication credentials to be used between servers. In the example, the client can specify to the server berlin a user and password to communicate with server london.
The next figure shows two different ways to specify authentication credentials when using user/password at the source server.
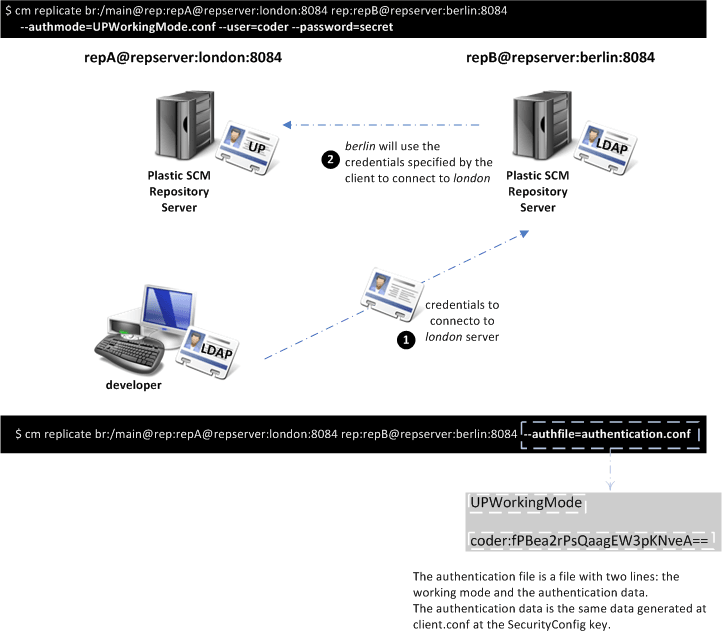
The first option is actually specifying the mode plus the user and password (for UP) at the command line.
The second one uses an authentication file, which is useful when authentication credentials are going to be used repeatedly. As the figure shows, an authentication file is a simple text file containing two lines:
- Authentication working mode - UPWorkingMode, LDAPWorkingMode, NameWorkingMode, ADWorkingMode, or NameIDWorkingMode
- Specific authentication data for the authentication mode - The data specified in the second line is exactly the same data in the SecurityConfig section of the configuration file
client.conf.
Suppose now that replication must happen in the opposite direction, from berlin to london as the next figure shows. The parameters to connect to an LDAP server (in this case an Active Directory accessed through LDAP) are specified. Normally in LDAP an authentication file will be used to ease the process.
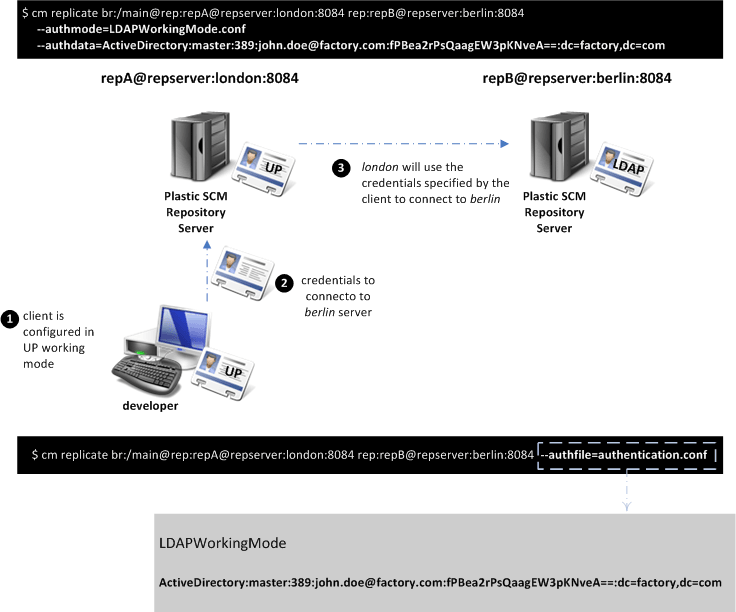
Note: If replication is performed through replication packages, the client needs to be able to connect to the source or destination servers, depending on whether it is performing an export or import operation.
Translating users and groups
When replication is performed between servers with different security modes, authentication is not the only issue. User and group identifications have to be translated between the different security modes.
The sample at the next figure tries to replicate from a user/password authentication mode to an LDAP based one. The user list at the UP node stores plain names but the user list at the LDAP server stores SIDs. When the owner of a certain revision being replicated needs to be copied from repA to repB, a user or group will be taken from the user list at repA and introduced into the list at repB. If a name coming from repA is directly inserted into the list at repB, there will be a problem later on when the server at berlin tries to resolve the LDAP identifier because it will find an invalid one: The user identifiers in user/password mode won't match those of the LDAP directory and the user names will be wrong in the replicated repository.
So in order to solve the problem, translation will be needed.
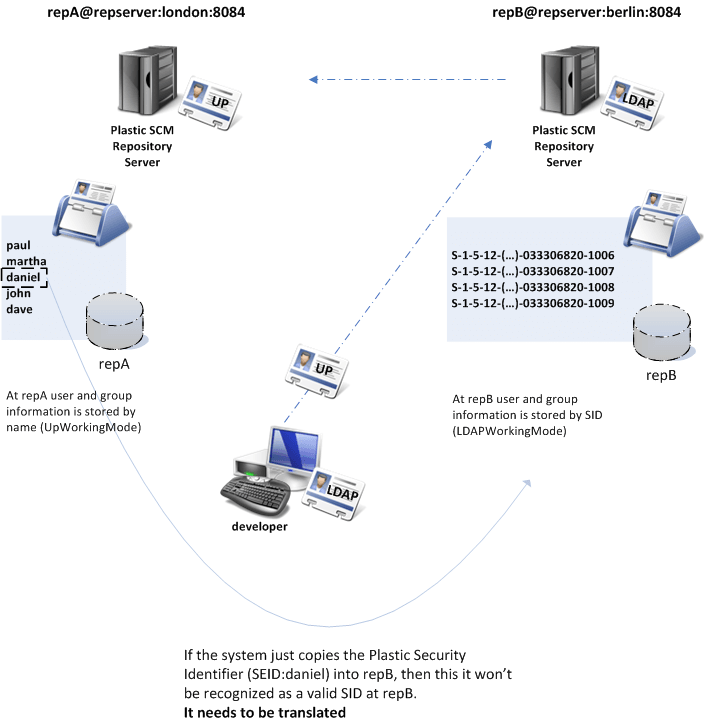
The Plastic replication system supports three different translation modes:
- Copy mode - This is the default behavior. The security IDs are just copied between repositories on replication. This only works when the servers hosting the different repositories work in the same authentication mode.
- Name mode - Translation between security identifiers is done based on name. In the sample at the previous figure suppose user daniel has to be translated by name from repA to repB. At repB, the Plastic SCM server will try to locate a user with name daniel and will introduce its LDAP SID into the table if required.
- Translation table - This also performs a translation based on name, but is instead driven by a table. The table, specified by the user, tells the destination server how to match names. It tells how a source user or group name has to be converted into a destination name. The next figure explains how a translation table is built and how it can translate between different authentication modes.
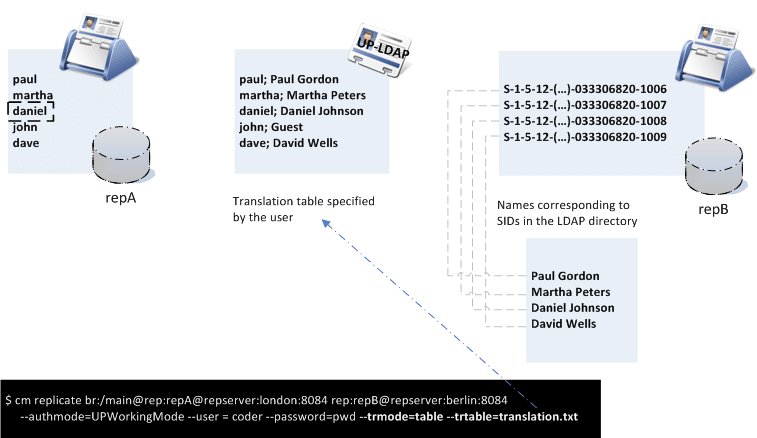
Note: A translation table is just a plain text file with two names per line separated by a semi-colon (";"). The first name indicates the user or group to be translated (source) and the second one indicates the destination.
Replication from the graphical interface
Replication can be done from both the command line interface (CLI) and the Plastic Graphical User Interface (GUI) tool. All the possible actions are located in a submenu under the branch options, because replication is primarily related to branches. This topic will describe how to perform the most common replication actions from the GUI.
Replication actions
In the GUI, replication and distributed collaboration has been organized in the following actions:
- Branch actions:
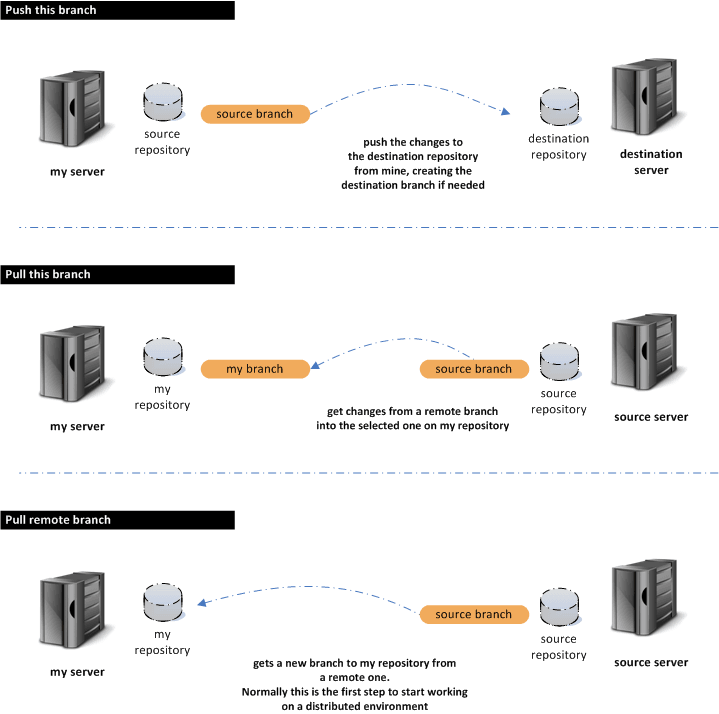
- Push the selected branch
- Pull the selected branch
- Pull a remote branch
- Package actions:
- Create a replication package from the current branch
- Create a replication package from a branch
- Import a replication package
The next figure depicts the different available operations. From the command line, all the operations are issued from a single command, but the GUI makes a distinction between push (move changes from your server to a destination) and pull (bring changes from a remote repository to yours) actions.
Replication menu
As was mentioned before, all replication actions can be accessed from the branch menu (check the figure below).
The options Push this branch, Pull this branch, and Create replication package from this branch are related to the branch currently selected in the branch view.
The other options: Pull remote branch, Create replication package, and Import replication package are generic replication actions which are not constrained to the current branch, but are instead located under the branch menu to keep all the replication options together.

Pushing your changes to a remote repository
Whenever you want to push your changes to a remote repository, select Push this branch on the branch menu. Pushing your changes means sending the changes made on the selected branch to a remote repository.
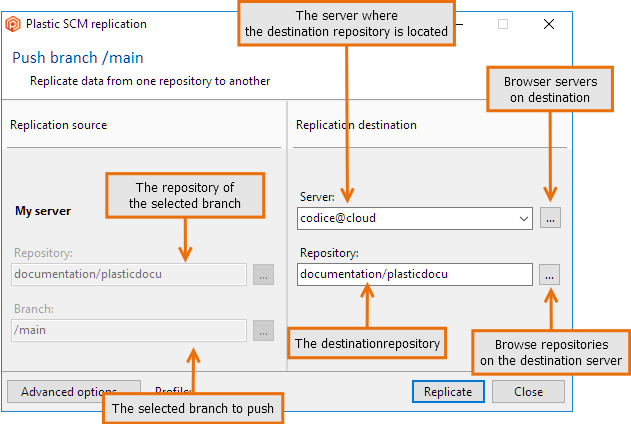
- Server - If you never replicated from the destination repository before you'll have to type the server destination name or the server destination ip (plus the port number).
- Browse server - List previous replications on your repository and the list of servers available on your configured profiles (check Advanced options).
When you pull a branch, a record is created on your repository to know where (server and repository) the branch comes from. This server will be used on later push and pull operations as possible server.
- Repository in the Replication destination - If the branch already exists in the destination repository, the changes will be synchronized. A warning message will show up if there are conflicting changesets in the destination. Then, the developer will have to reconcile changes by first pulling the branch to the local server and then pushing it, once the merge conflicts have been resolved.
If the branch doesn't exist in the destination repository, a new branch will be created (identified by the same GUID used on the source repository).
- Browse repository - Browse repositories on the destination server. If you don't have permissions to access the server you'll have to select or create a profile on Advanced options.
Synchronizing your branch with remote changes
Once you've pushed your branch to a different repository, the branch can be modified remotely. At some point in time, you'll be interested in retrieving the changes made remotely to your branch. In order to do that, you have to use the Pull this branch action from the replication branch menu.
The dialog box depicted in the next figure is very similar to the one used to push changes, but this time, your server is located on the right as destination of the operation.
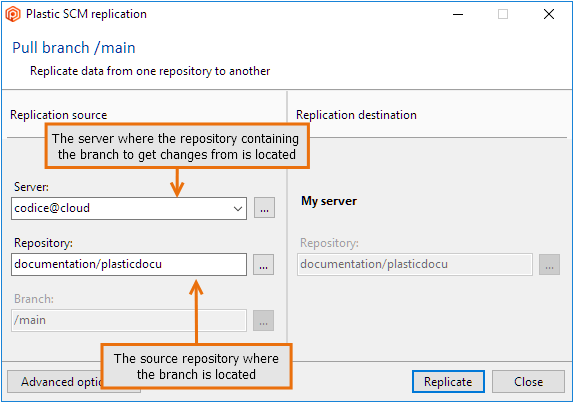
When you pull changes from a remote branch, a subbranch can be potentially created if there are conflicting changesets on the two locations.
Importing a remote branch
Another common scenario during replication is importing a branch from a remote repository into yours in order to start making changes or create child branches from it.
In order to perform the import, use the Pull remote branch option. The dialog box shown in the next figure will be displayed. Notice that this time you can choose the source server, repository, branch, and destination repository on your server.
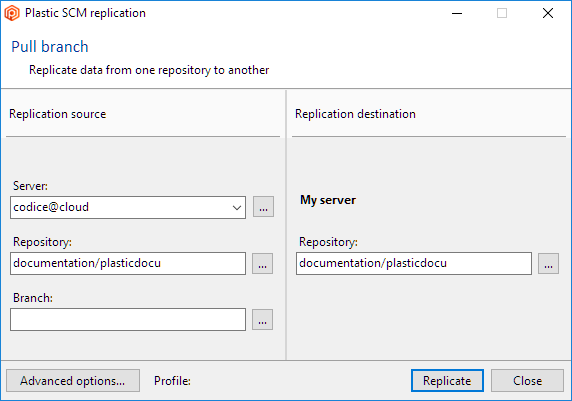
Managing remote authentication
As it was described in the Authentication chapter, different Plastic SCM servers can use different authentication modes. By default, when you try to connect to a remote server, you'll be using your current profile (the configuration used to connect to your server). Sometimes, though, the default profile won't be valid on the remote server.
In order to configure Plastic SCM to be able to connect with a remote server with different authentication mode, use the Advanced options button on the replication dialog. It will pull up a dialog like the one in the next figure.
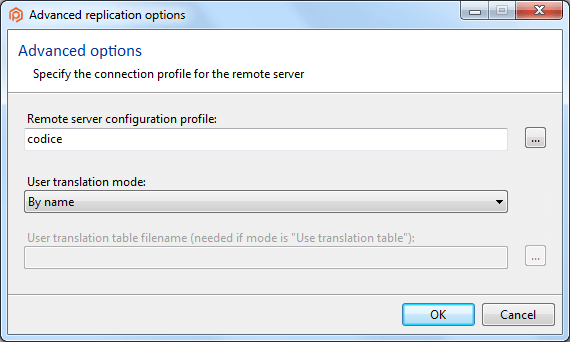
The dialog box shows the profile currently selected (the default one on the screenshot) and also the translation mode (refer to Authentication chapter for more information) and the optional translation table.
You can have different authentication profiles created from previous replication operations, and you can list them or create new ones by pressing the Browse button located on the right of the Remote server configuration profile edit box.
It will display a dialog box like the one in the figure below which will allow you to select, edit, create, or remove a profile.

Note: The Replication dialog box will try to choose a profile automatically each time you change the server. It will look for the most suitable profile based on the server information provided.
Running the replication process
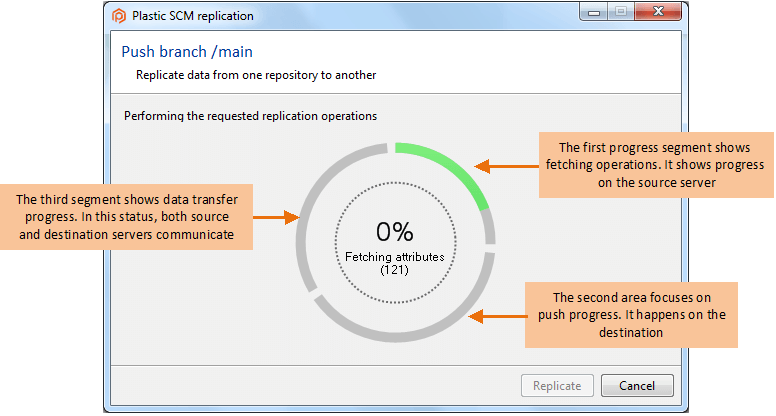
So far, all the steps have been focused on setting up the replication process. Once the operation is correctly configured, press the Replicate button and you'll actually enter the replication progress dialog box as explained in the figure below.
The replication operation is divided into three main states:
- fetch metadata - Happen on the source server.
- push metadata - Happen on the destination server.
- transfer revision data - Involve the two servers as data is transferred from the source to the destination.
At any point in time, the operation can be canceled pressing the Cancel button.
When the replication operation finishes, a summary is displayed, containing detailed information about the number of objects created.
Creating a package
A replication package can be created from a branch on your repository or from any branch on any server you can connect to. In order to create a package from the selected branch in the branch view, click on Create replication package from this branch.
If you want to create a package from any remote branch, click on Create replication package on the replication menu.
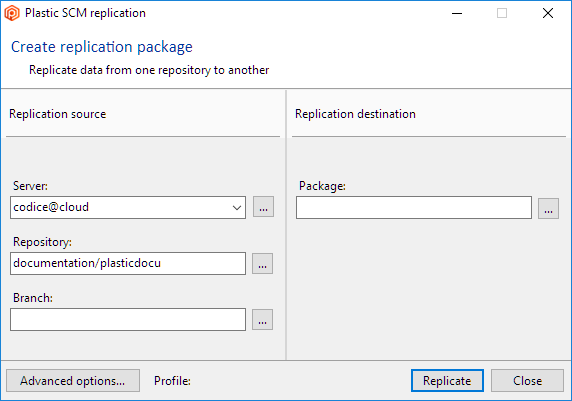
The figure above shows the package creation dialog. It will generate a replication package from the selected branch which will contain all data and metadata from the branch. It can be used to replicate between servers when no direct connection is available.
Importing a replication package
From the replication menu select Import replication package and select a package file to be imported. The dialog box is shown in the next figure.

Distributed Branch Explorer
The Branch Explorer is one of the core features in the Plastic SCM GUI and it has been greatly improved in recent releases to be able to deal with distributed scenarios. That's the reason why it now receives the distributed Branch Explorer name. Its short-hand name is DBrEx.
How the DBrEx works
Consider two replicated Plastic SCM servers, one running on a central server, the other one on a laptop, as depicted below.
The server running on the laptop firsts replicated the main branch from the central. Later task002 was created and the developer worked on it. At a certain point in time the scenario is as follows:

The DBrEx is able to render a distributed diagram by collecting data from different sources and then rendering the changesets and branches on a single diagram as the next figure shows.
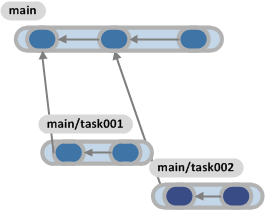
The DBrEx will combine the different sources and create an interactive diagram with the information gathered from the different sources.
Rendering multiple repository sources on the DBrEx
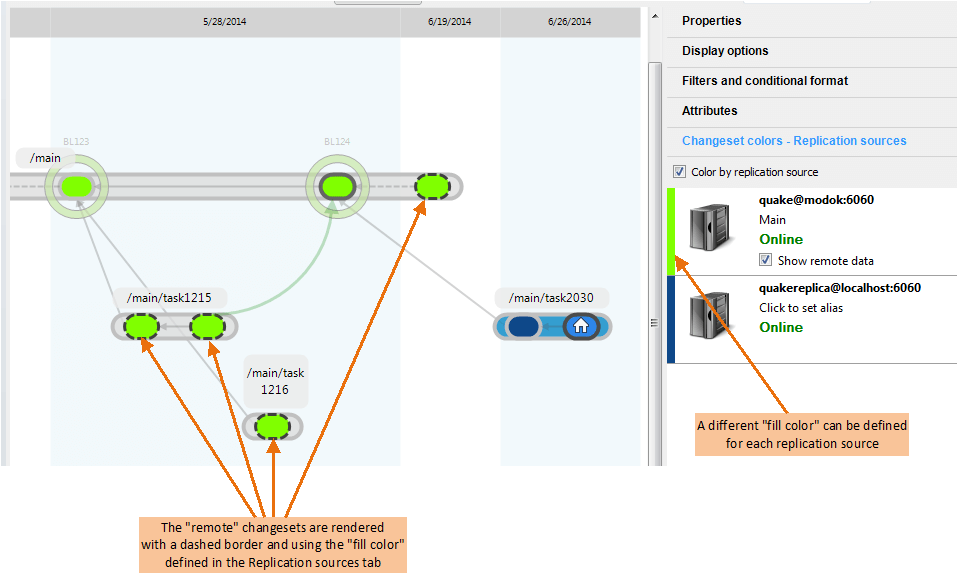
There are several options in order to combine more than one replicated repository into the same DBrEx diagram. The first one is used to create a combined render including all the changesets and branches coming from the selected replication sources. The next figure shows you how to start configuring the diagram.
The Replication sources tab shows the repositories that have been used to pull changes from the one that is being rendered on the DBrEx (or alternatively repositories that pushed changes to the active one).

Once you click on one or more replication sources (clicking on Show remote data checkbox) the distributed diagram will be rendered as depicted in the figure below. It's expanded and include the information from the remote repository.
This way, the Distributed Branch Explorer introduces a new way to understand how the project and branches evolve across different replicas.
It is also possible to run the replication operations from the DBrEx, so pulling a remote branch is now as easy as selecting the remote branch rendered in the DBrEx and clicking on Pull this branch. Remote branches and changesets are available for "diffing" too, which greatly enhances your work with distributed changes.
Diffing remote branches and changesets
It is possible to right-click a remote branch or changeset on the DBrEx to explore and understand what was modified remotely. This way developers or integrators can better understand what changes are going to be pulled from the remote sources prior to completing the operation. The following figure shows the options enabled on a remote changeset.

Enabling the DBrEx for a single branch
Sometimes it is not necessary to render the whole distributed diagram because the SCM manager or developer needs to focus on a specific branch only.
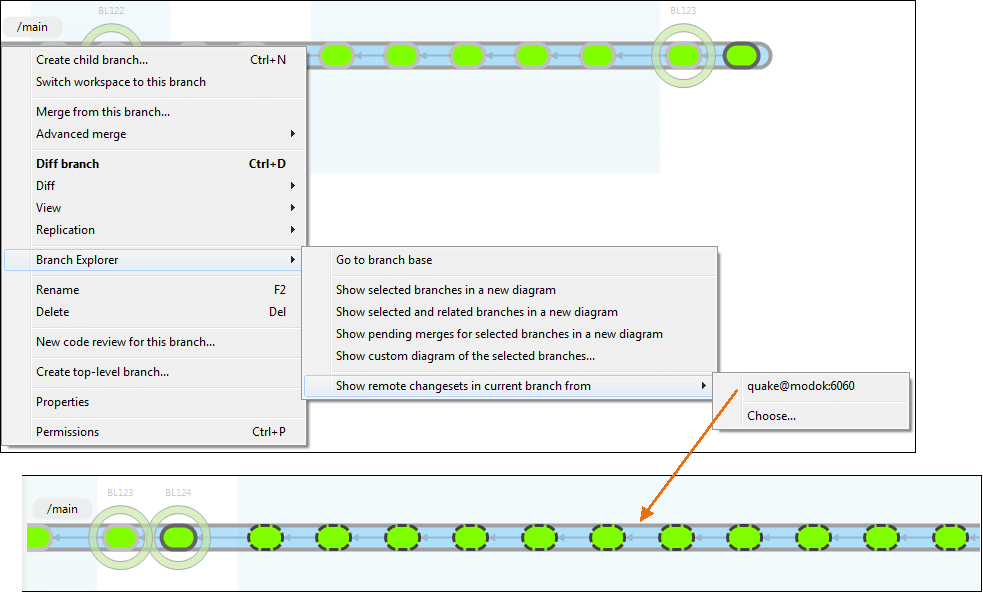
The figure above shows the Branch Explorer / Show remote changesets in current branch from menu option which allows you to select a remote source to decorate a branch with remote data to understand what needs to be pulled, see explorer differences, and trigger replication commands.
Synchronization
Plastic SCM is all about helping teams to embrace distributed development. To do so, we enhanced the DBrEx, but in order to deal with hundreds of distributed changesets, a new perspective has been created: the distributed view.
The Sync View enables you to synchronize any pair of repositories easily, browsing and diffing the pending changes to push or pull.
To get all the information about how to work with Synchronization refer to The Synchronization View section in the GUI guide.
Updates
March 22, 2019
We updated Replication from the command line to show how the clone command fits the distributed scenario.
March 20, 2019
We updated the command line usage examples to use the new commands push and pull.
February 15, 2019
We added a note explaining what you will learn by reading this guide. In this note, you will also find a link to the Plastic book chapter talking about the basics of Centralized and Distributed modes.
May 12, 2017
We updated some screenshots because we changed the repository-related replication dialogs replacing their server text boxes with a combo box containing a list of recently used servers.


